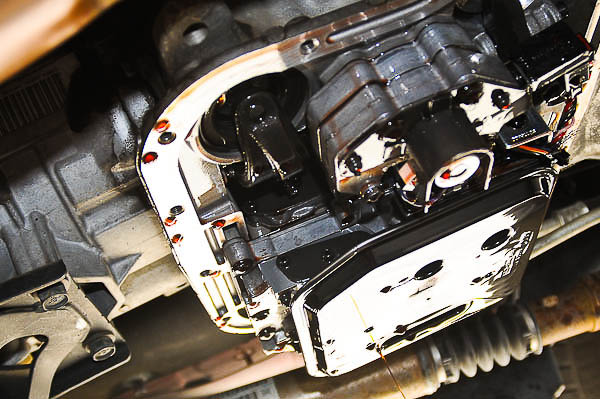
Jeep CJ, YJ Wrangler, TJ Wrangler and Dodge Ram truck automatic transmissions can benefit from in-chassis upgrades. If you want your Jeep or Dodge Ram truck automatic transmission to survive, consider these reliability and safety improvements. Short of a major transmission rebuild or heavy duty replacement transmission, service can be enhanced with these important aftermarket parts.
Illus. 1: Chrysler automatic transmissions have a reputation for durability. Aluminum case three-speed 904/999 and 727 units appeared in performance cars from the early 1960s forward. The 727 Torqueflite became legendary behind 426 muscle car hemis and 440 V-8s in ‘Class A’ motorhomes.
For the 1980 models, AMC/Jeep outsourced Chrysler automatic transmissions. CJs and XJ Cherokees through 1986 used the 904/999 Torqueflite, while the full-size Cherokee and Grand Wagoneers benefitted from the rugged A727 Torqueflite. The Grand Cherokee automatics, YJ and TJ Wrangler automatics, Liberty and other late Jeep models have each offered Chrysler/Jeep transmission platforms.
During the electronic transmission control era, lock-up converters and computer-controlled shift mechanisms evolved. The 904/999 and 727 Torqueflites grew into RH and RE series transmissions, providing traditional durability with modern efficiency. The 727-derivative RE transmissions acquired a fourth gear overdrive, while the Jeep 30RH and 32RH models remained three-speed designs. Dodge/Ram trucks have always offered Chrysler automatic transmissions, sharing design features with several of the Jeep applications.
Every transmission design offers room for improvement, and the 1978-up rear wheel drive (RWD) Chrysler automatics do have quirks. While a complete rebuild or overhaul encourages the use of heavy-duty aftermarket hard parts upgrades, there are also practical in-chassis improvements available. For 4WD Jeep or Dodge/Ram trucks, several in-chassis fixes can increase reliability and keep your automatic transmission alive.
Pinpointing 1978-Up Chrysler Transmission Needs
CJ, YJ and TJ Wranglers and Dodge Ram trucks with the 904/999, 727 and RE or RH transmissions can benefit from several valve body upgrades. Our 2005 Dodge Ram 3500 4WD, purchased new with the 48RE automatic and Cummins diesel power, has become a testbed for improvements. At just over 90,000 miles, the first glitch appeared: stuck in Park mode, a problem that can also occur in Jeep Wranglers equipped with the 30RH or 32RH transmissions.
While en route home from the 2010 Moab Jeep Safari, I made a quick coffee stop at Winnemucca, Nevada. Returning to the truck, I found the shift lever stuck in Park. The problem had developed suddenly, apparently caused by vibration from a failing rear driveshaft U-joint.
Coaxing the shifter, I managed to get home. Following the factory workshop manual’s troubleshooting steps, I began by replacing the ‘BTSI’ (shift) cable…The stiff shift out of Park position persisted.
Note—If you find your RE- or RH-equipped Jeep or Dodge Ram transmission sticking in Park, run this test: 1) Park the vehicle on flat ground, 2) shut off the engine and remove the key from the ignition switch, 3) safely chock the wheels and set the parking brake firmly and 4) disconnect the shift cable or rod at the transmission lever…If you can easily move the shift lever through each gear and Park position at the transmission end, suspect the BTSI cable or shift linkage. If you cannot move the shift lever out of Park with the cable or rod disconnected, you likely have a sticking detent ball and shift lever comb…Continue reading this article!
I searched the internet for more information. A gentleman in a prominent Dodge/Ram truck forum described a similar situation. He noted, “We were parked on a ferry in the Puget Sound, with dozens of vehicles lined up behind us…When the time came to depart from the ferry, I could not get the shifter out of Park—’a slice of heaven’!“
My own ‘slice of heaven’ was at Winnemucca, although I was fortunate enough to coax the transmission out of Park. Following this truck owner’s forum thread, I discovered not only the cause for Park seizure but also several other trouble spots in 1978-up rear wheel drive (RWD) Chrysler automatic transmissions, including the RH/RE models.
In this piece, I share my findings and ‘how-to’ photo steps. My goal is to upgrade the transmission “in-chassis”, without a transmission removal or major disassembly work. Whether you perform your own automatic transmission work or sublet these tasks to a specialist, the parts described are essential for a dependable, predictable Chrysler 904/999, 727 and RH- or RE-series Jeep or Dodge/Ram transmission.
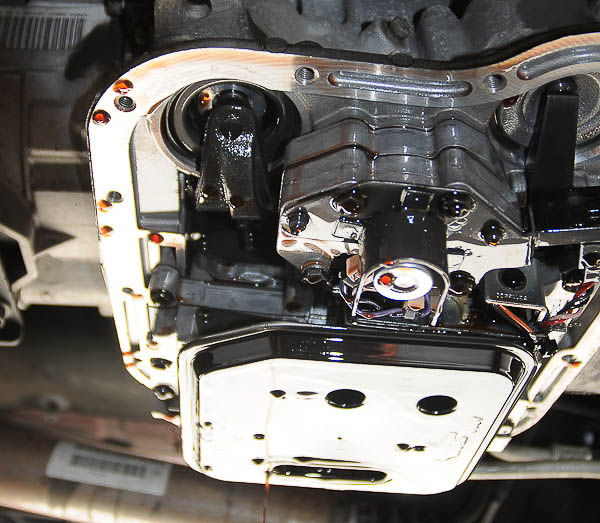
Illus. 2: This 48RE transmission shares many features with other Chrysler RE/RH series transmissions. Routine service includes filter and fluid changes; band adjustment is required at higher mileage. Most in-chassis work begins with removal of the oil pan and draining fluid.
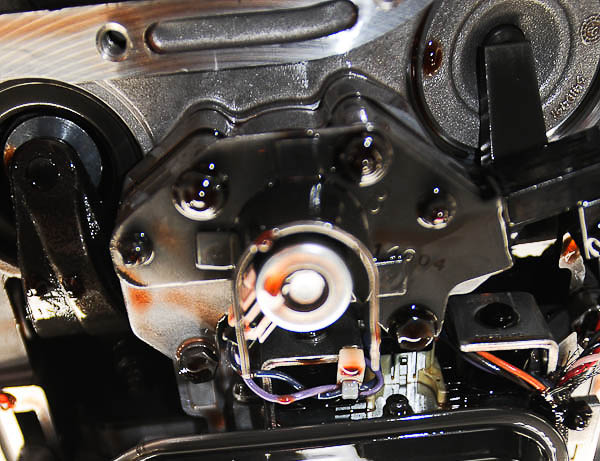
Illus. 3: Band adjust can be performed with the valve body in place and the filter removed. At 90,000-plus miles of lighter duty hauling, this 48RE is due for its first band adjustment. Band adjustment is still routine service on all RH and RE Jeep and Dodge/Ram automatics.
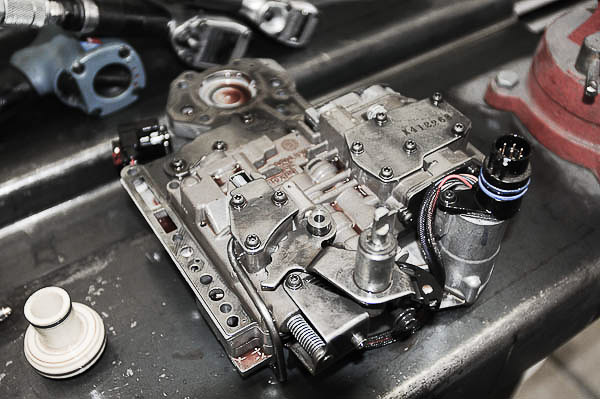
Illus. 4: Follow the steps in the factory manual to remove the valve body from the transmission case. If you follow the sequence, the valve body will come loose with the accumulator piston and spring in position. Watch for the piston (plastic, at left) and accumulator spring.

Illus. 5: Cleaning parts must take place in a clean pan. The slightest amount of debris in a valve body will cause a malfunction. Your hands, tools and all fluids must be clean and free of debris—and lint!
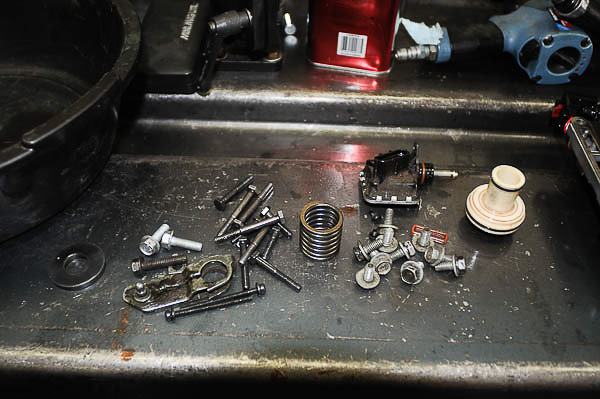
Illus. 6: Here, the accumulator piston, the gear position indicator switch, accumulator spring and hardware are on the bench. Note the correct location for the accumulator spring, which varies by unit design.
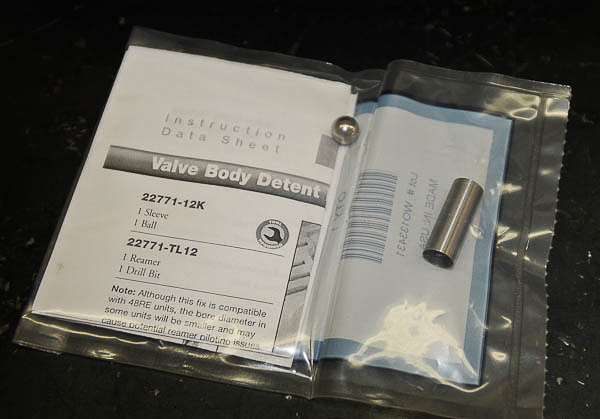
Illus. 7: The ‘stuck in Park’ results from a binding valve body shift detent ball. This kit from Sonnax provides a custom sleeve and special diameter ball. The kit requires valve body reaming with the 22771-TL12 Sonnax reamer kit. Sonnax’s custom reamer is well worth the cost.
Note: To access the Sonnax website and more product details, click here! Sonnax offers a full line of upgrades for all popular automatic transmissions.

Illus. 8: Sonnax also provides a manual valve that allows fluid charging of the torque converter in Park position. These Chrysler transmissions do not charge the converter or transmission cooler when in Park; this delays gear engagement, especially after parking for longer periods. The Sonnax manual valve will help prevent front pump bushing failure, the result of fluid starvation in Park.
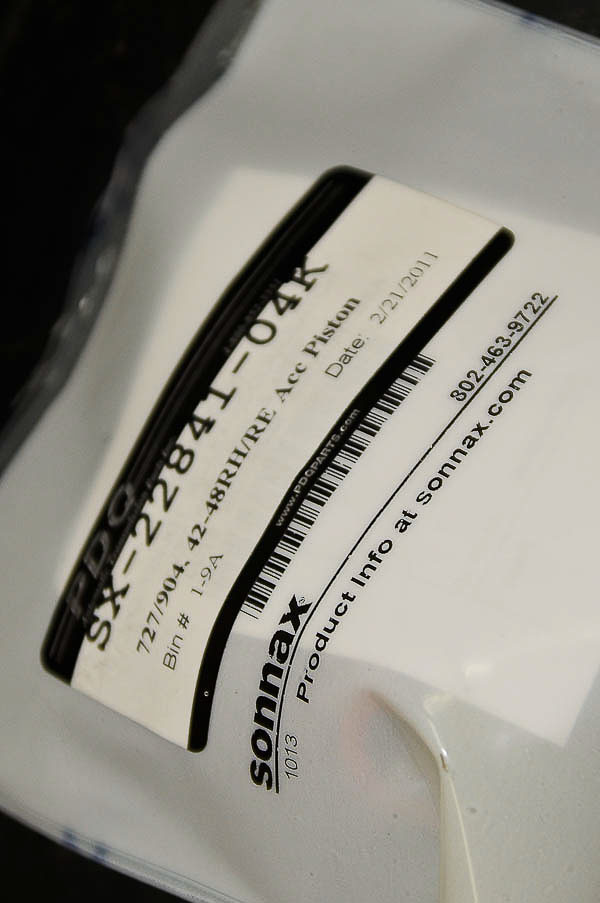
Illus. 9: A plastic accumulator piston in a transmission mounted behind a 610 ft-lb torque Cummins diesel? Sounds light-duty to me! RWD ’78-up Chrysler transmissions can benefit from Sonnax’s anodized aluminum accumulator piston.
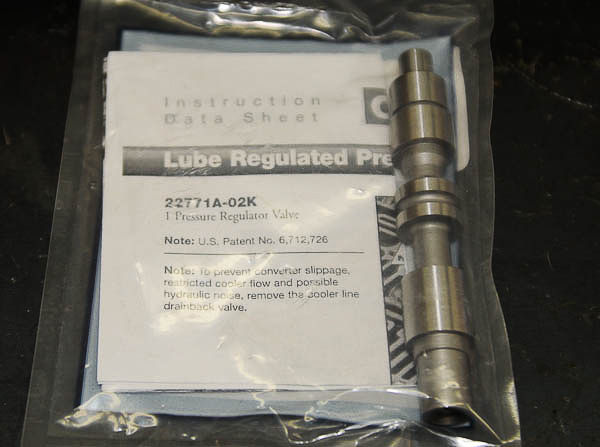
Illus. 10: Sonnax Lube Regulated Pressure Valve helps assure adequate fluid to the converter and works in conjunction with the new Sonnax manual valve. Premature front pump failure is eliminated with these two valve changes—inexpensive compared to the cost of a torque converter and pump replacement in one of these transmissions—avoid a failed front pump on the Rubicon Trail or when trailering!

Illus. 11: Sonnax components serve the transmission remanufacturing industry and automatic transmission shops. Specialized and top quality, these precision niche parts address the weaknesses in modern automatic transmissions from manufacturers around the globe!
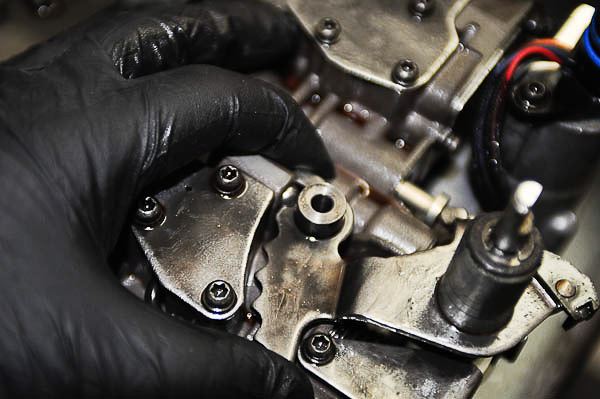
Illus. 12: ‘Stuck in Park’ cause is often detent bore wear in the valve body. Vibration of the detent ball wallows the soft aluminum bore from vibration.By design, wear of just a few thousandths can virtually wedge the ball in the Park notch of the manual lever! This lever requires excessive force to move.
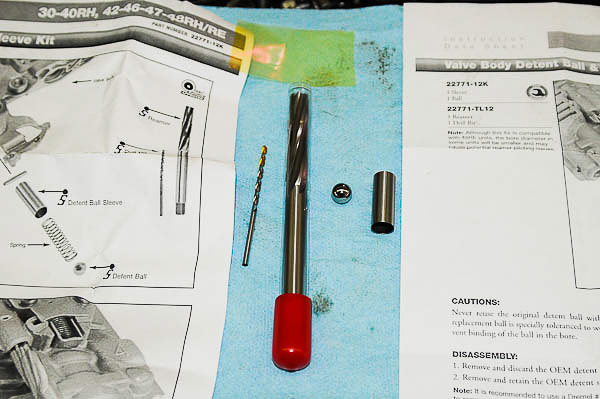
Illus. 13: The Sonnax 22771-TL12 Reamer Kit and 22771-12K Detent Sleeve and Ball Kit provide the solution for ‘stuck in Park’ troubles. The valve body must be removed for this repair, as the reamer cuts and creates particles of aluminum. If debris is not removed completely, it could easily cause precision valves to stick and other malfunctions.
Caution: Do not attempt to ream and install this kit with the valve body in the transmission. To thoroughly clean away debris, the valve body should be disassembled on the bench.
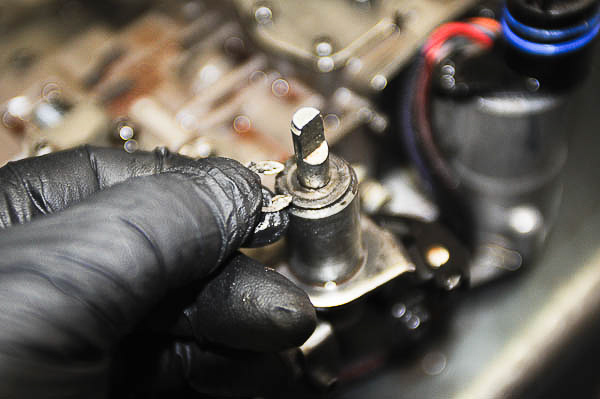
Illus. 14: Remove the E-clip from the throttle valve shaft and slide the shaft through the support bushing…
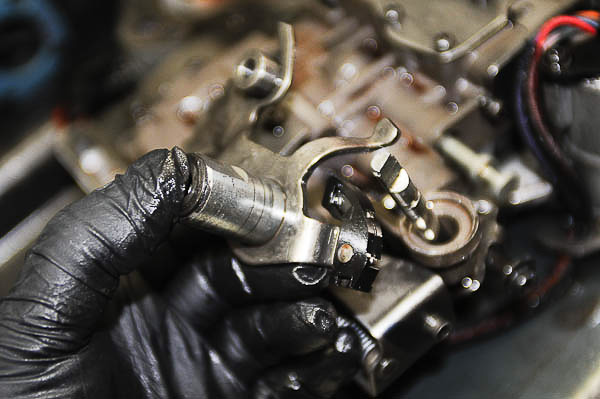
Illus. 15: The manual lever assembly with bushing, detent comb and manual valve tang can now lift loose from the throttle pressure shaft. Do not damage the gear selector plastic parts. Do not disturb the tang.

Illus. 16: Manual lever and detent plate removed, the detent ball and spring are now loose from the bore. Bore wear is not dramatic, still enough to lock the ball in the comb’s Park slot.
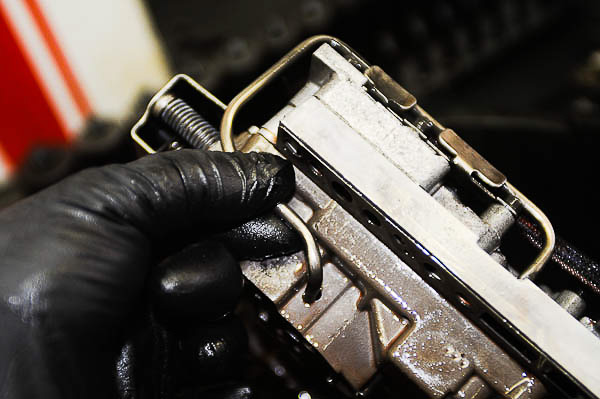
Illus. 17: To assure a thoroughly clean valve body after reaming, I elect to completely disassemble the valve body. Here, the fluid tube comes loose from the two valve plates.
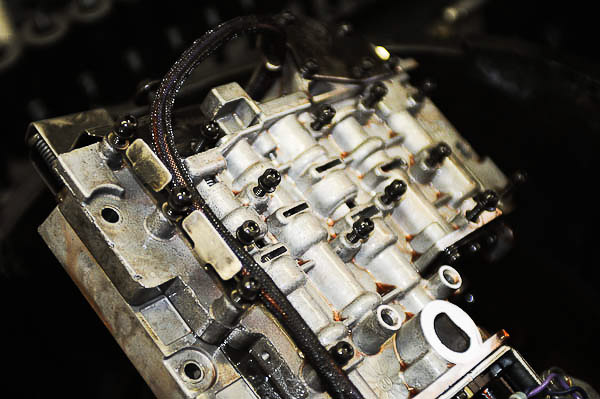
Illus. 18: Valve body screws are of different lengths for various areas of the plates. Note the lengths and locations. Make sure the plates go back together correctly, with the right hardware in place.
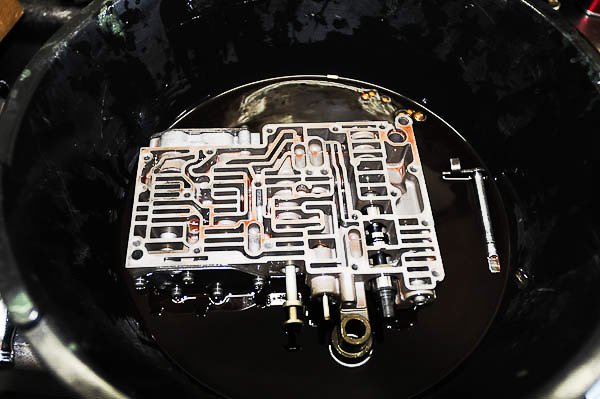
Illus. 19: Do not lose parts when disassembling the valve body! Check balls and plate locations are illustrated in a Jeep or Dodge/Ram factory workshop manual. To save time, use the factory guidelines when you perform this kind of work.
Note: Unless you do this work every day, it is impossible to memorize the many valve body parts, their relationships and assembly sequences. The schematics and steps noted in manuals are essential.
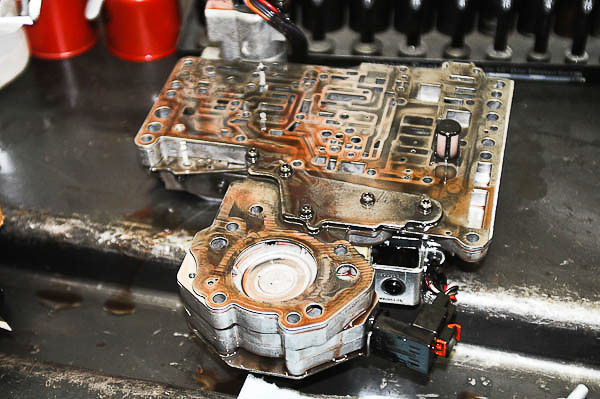
Illus. 20: This is another reason to disassemble the valve body: After 90,000 miles, the clutch and band friction material finds its way, in ultra-fine and soluable form, into the interior of the valve body.

Illus. 21: Check balls are either plastic or hard steel. Each is sized. Know the positions or consult the factory workshop manual for details. Mopar TechAuthority is a data resource for shops that perform Jeep or Dodge/Ram related work.
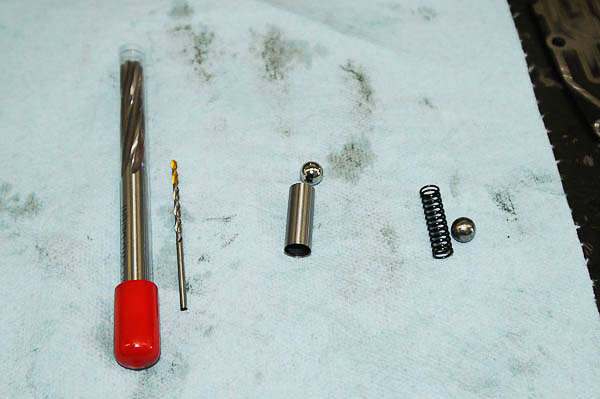
Illus. 22: The reamer kit at left comes with a sized drill bit. At center is the new, hard stainless sleeve and custom detent ball kit. At right is the original detent ball and detent spring. Spring is reused.
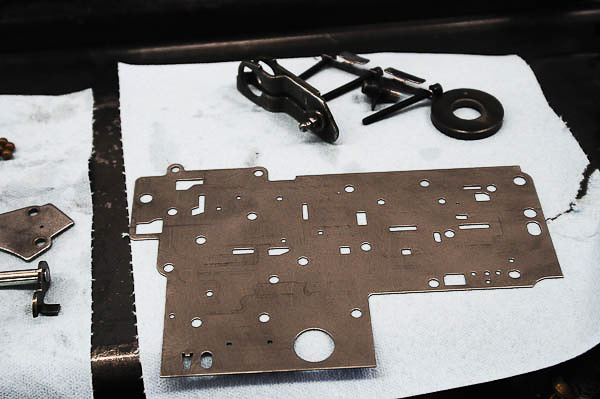
Illus. 23: Separator shims must be flat and free of burrs and wear. The check balls sometimes wear these shim plates. This shim is in excellent condition and readily reusable after cleaning. Remove burrs with ultra-fine crocus cloth; do not use sand paper or emery cloth, as either would scratch the shim plate’s surface.
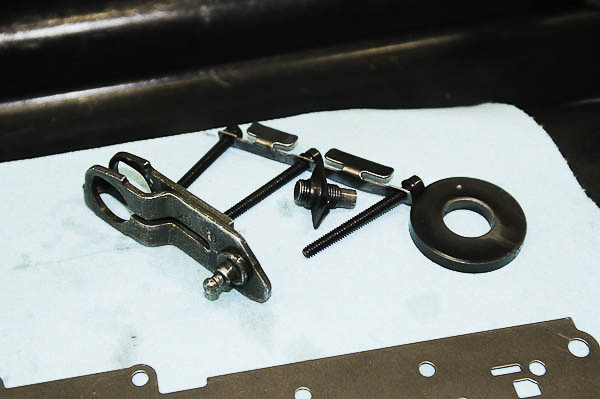
Illus. 24: Clean all parts thoroughly. Remove burrs and debris. Note wear. Do not tamper with adjustments on a transmission that has never been apart. If previously serviced or overhauled, check all adjustments carefully. Verify adjustments, using factory specifications.
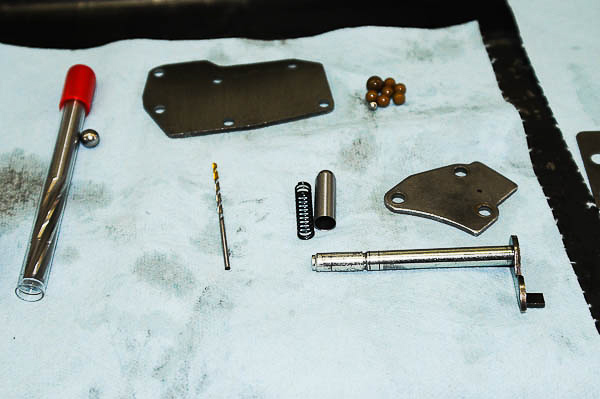
Illus. 25: Polish shafts and wear surfaces. If your transmission gets stuck in Park and the shift/BTSI cable is not the issue, the Sonnax Detent Ball & Sleeve Kit will be the fix. The reamer is a separate part number, an essential tool for this work.
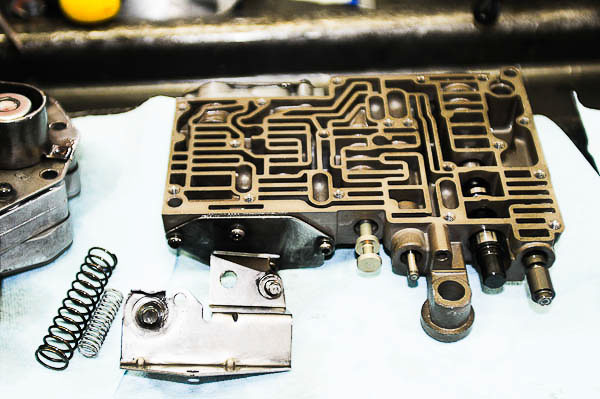
Illus. 26: Parts must be clean. Torque screws to specification—no more. It is easy to warp a valve body by forcing parts together or over-tightening hardware. Plates must be flat, without warp. If necessary, lay plates on a flat deck or glass plate to confirm flatness.
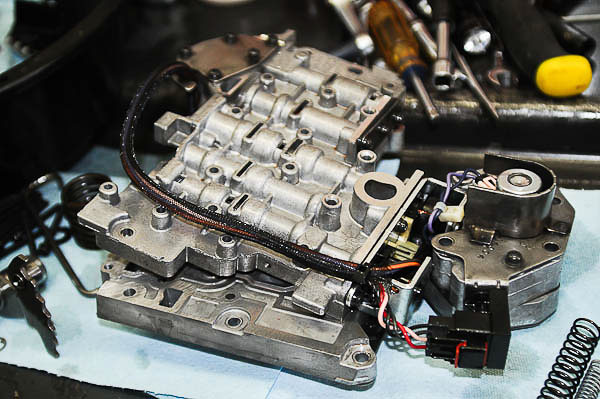
Illus. 27: Here, the parts, plates and electrical fittings go back together. Clip and electrical connector hook-ups must be secure and seal properly. Electronically activated solenoids and switches must perform reliably on these later transmissions.
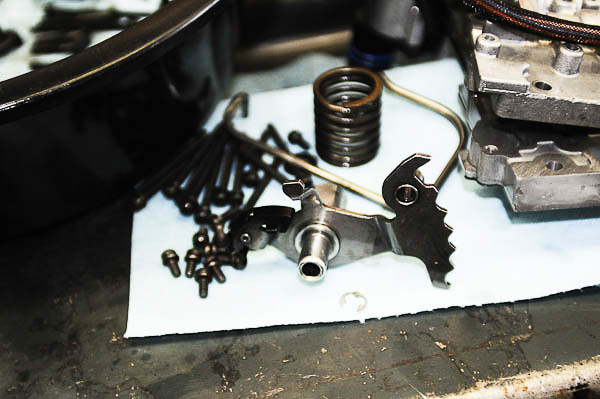
Illus. 28: This lever now has polished detent notches.
Do not grind away ridges! Instead, polish the contact surfaces. I use a medium wire brush (powered) to remove microscopic burrs and any roughness—without removing metal or reshaping the comb detents.
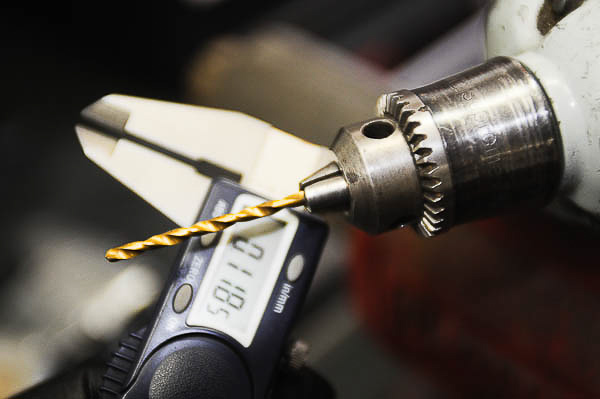
Illus. 29: This is not the drill provided with the Sonnax reamer kit. This drill is sized for relieving the swaged metal above the detent spring’s backup pin. Remove just enough metal to permit pin removal.
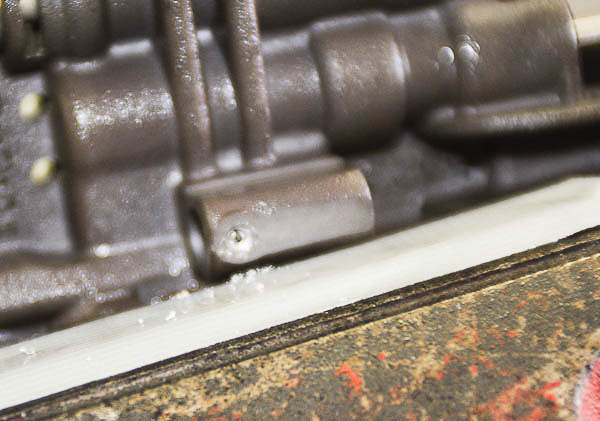
Illus. 30: Detent spring pin is now accessible. Peened metal removed, the pin will slide out of the valve body housing.
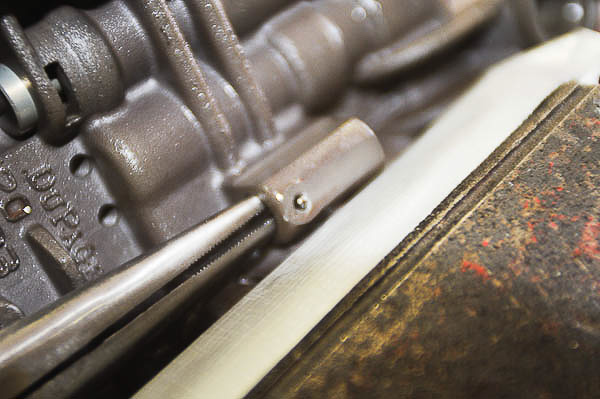
Illus. 31: Needle nosed pliers grip the pin. If relieved properly, the pin will slide out of its valve body hole. The new sleeve fits through the detent ball bore, end to end.
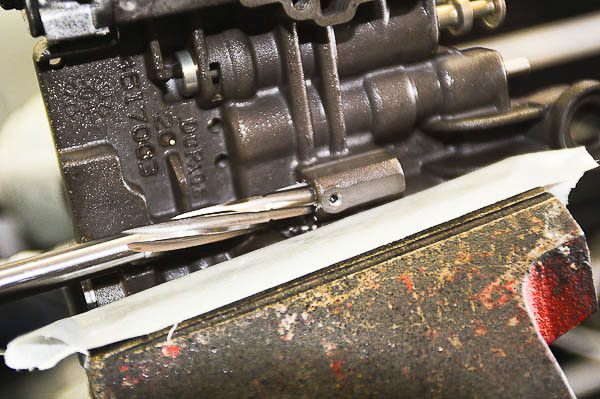
Illus. 32: Used carefully and properly, the Sonnax custom reamer will align in the bore and gradually step up in diameter. As the tool works through, it maintains a true center with the valve body detent bore. This is crucial to preserving the valve body!

Illus. 33: The reamer moves at the steady speed range indicated in the instructions. A speed handle wrench turns the tool in the cutting direction. Never run this tool backward!
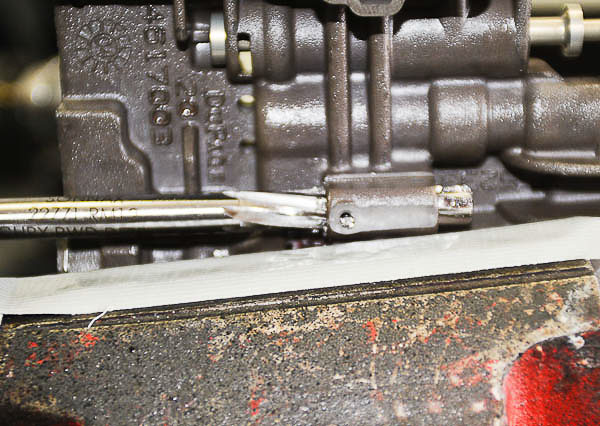
Illus. 34: As the reamer passes through, the tool is precisely on center. The 48RE valve body housing has limited casting support in the detent area. Keeping the reamer on center is crucial. Use cutting oil to keep the reamer from galling or chattering.
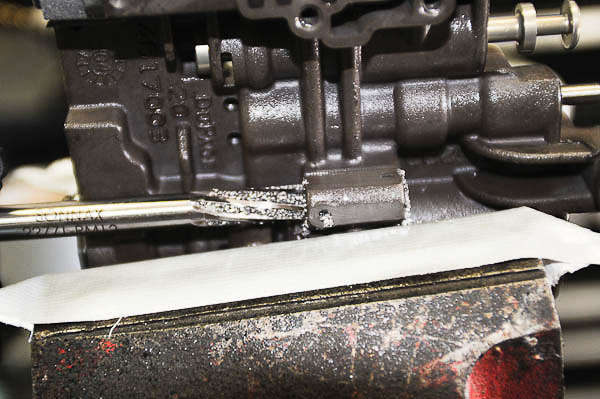
Illus. 35: Cut aluminum is granulated and accumulates on the reamer flutes. Imagine this debris within the valve body—preventing valve movement and grinding away at sensitive casting bores!
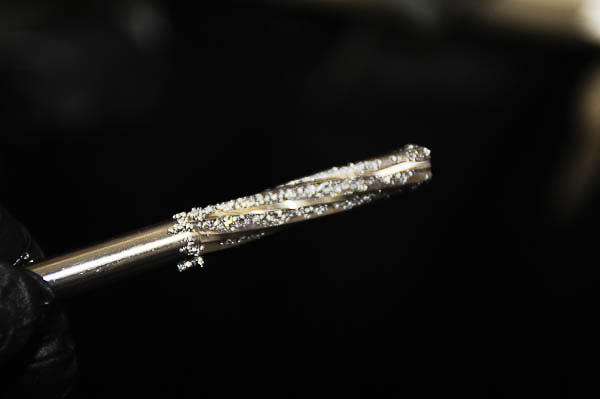
Illus. 36: Granules of aluminum on the reamer—use a shop vacuum to remove any residue from the valve body. Remove all debris and flush thoroughly with clean solvent.
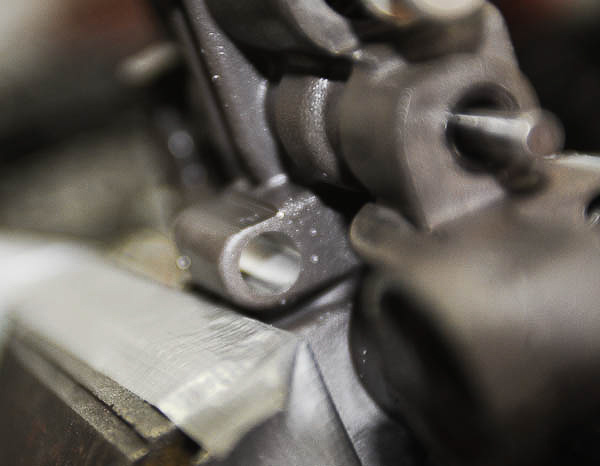
Illus. 37: The bore is concentric, true and shiny! This reamer tool, the costlier part of the detent repair, is well designed. For the shop performing repairs on Chrysler transmissions, the detent reamer should last for years. The tool is a must for accurate work.

Illus. 38: The bore is now ready for the stainless steel sleeve. Sonnax recommends Loctite. I will use Permatex Sleeve Retainer.
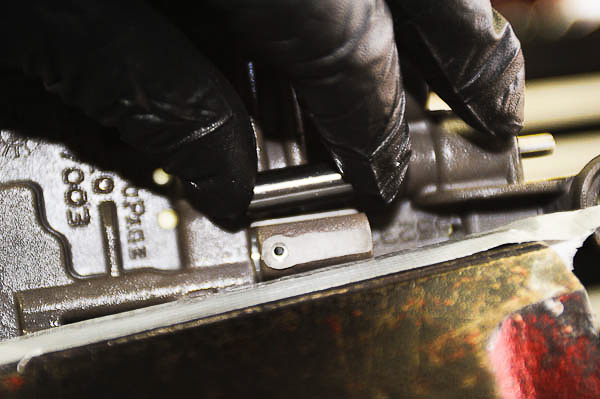
Illus. 39: Hard, thin-walled sleeve is the length of the reamed bore. Make sure parts fit squarely. The sleeve will slide through readily.

Illus. 40: Permatex Sleeve Retainer plus Klean ‘N Prime make the right combination. The cleaner/primer strips oil from the alloy bore and reduces Sleeve Retainer curing time. Sleeve Retainer fills minor gaps and provides superior force. This will be a permanent repair!
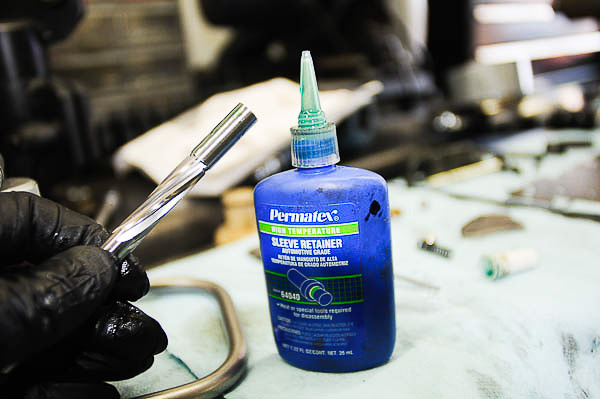
Illus. 41: The Sonnax reamer supports the sleeve. Note the coating of green Sleeve Retainer, uniform and thin. Bond will be a permanent fix, locking the stainless steel sleeve to the aluminum bore.
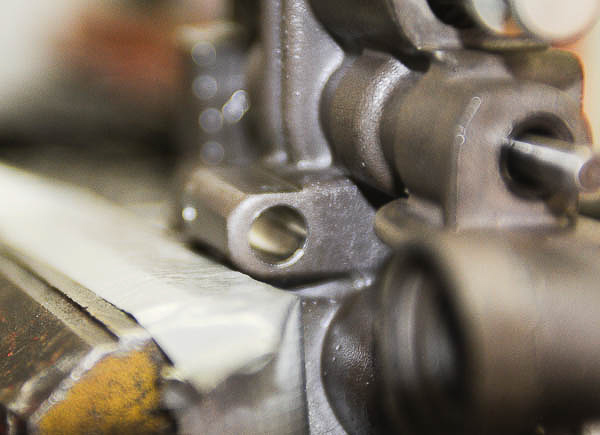
Illus. 42: Here, the sleeve aligns with the bore ends. A secure fit, the Permatex Sleeve Retainer cures and locks this sleeve in place. Excess bonder has been removed with a lint-free rag.
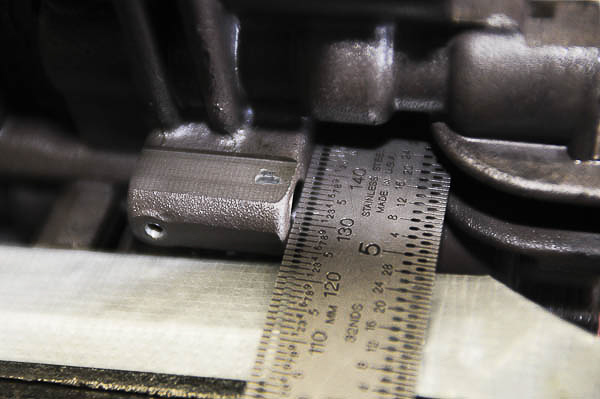
Illus. 43: Before Permatex Sleeve Retainer begins to cure, make sure the sleeve aligns squarely with the leading edge of the bore. The detent ball will ride just inboard of this sleeve end.

Illus. 44: The drill provided by Sonnax is for the diameter of the spring retainer pin. Use care and drill on dead center. Make sure the drilled holes align with the pin hole. Avoid removing aluminum material.
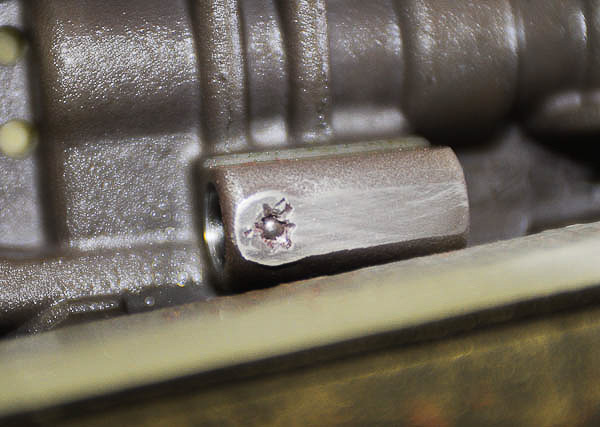
Illus. 45: Install the original spring retainer pin. Using a blunted, narrow chisel point, peen edges to lock the pin in place. Between the Sleeve Retainer and the peened edges, the pin is now secure.
Caution: A sharp chisel point will cut soft aluminum. Stake the pin in place with a blunted, dull chisel. Do not gouge or scarf metal from the casting. The goal is to press the aluminum toward the rounded pin end.

Illus. 46: Also available for 1978-up Chrysler rear wheel drive (RWD) automatics is this full-lubing Sonnax Pressure Regulator Valve #22771A-02. Precisely machined with an internal, pressure regulated oil feed line, this valve keeps the torque converter charged at low rpm and high throttle openings. The valve helps eliminate start delays and risk of a starved converter, which leads to front pump bushing failure.
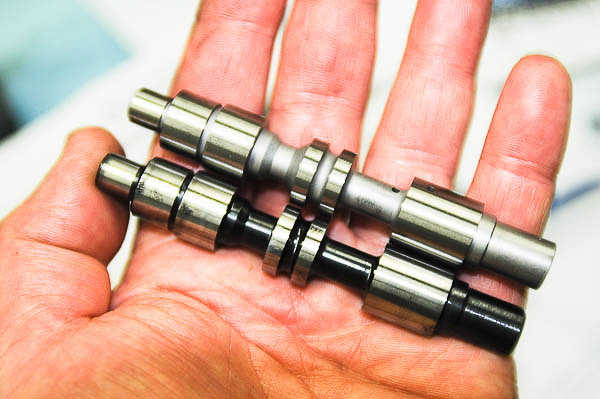
Illus. 47: Lower valve is stock type. Top valve is Sonnax’s pressurized and regulated valve with feed and bleed orifices. Regulating pressure from within the valve body helps eliminate converter drainback and starvation. In conjunction with a Sonnax Manual Valve, improvements provide prompt converter lubrication and ATF flow in Park mode.
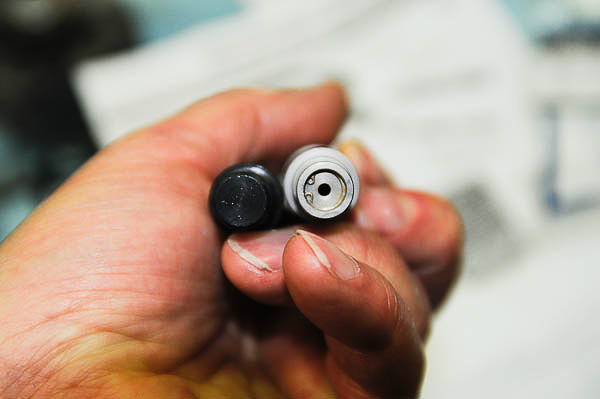
Illus. 48: At left, the stock valve has no feed bore or internal check valve. The Sonnax Pressure Regulator Valve (right) has an internal oil feed passage and check valve system. Ingenious, precisely machined, this full pressure control within the valve body will eliminate gear engagement delays and save the front pump bushing. ATF will also circulate better at low rpm and full-throttle applications.
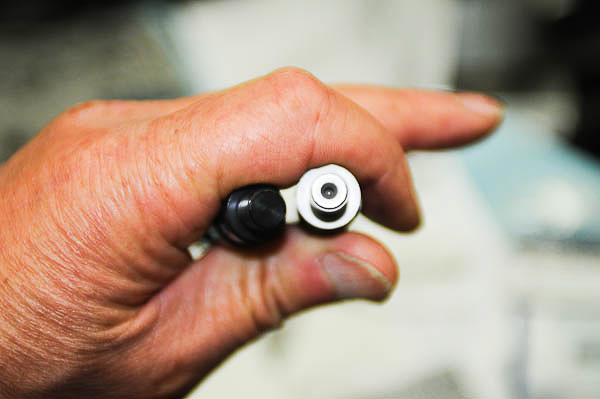
Illus. 49: Feed port is visible at opposite end of the Sonnax Pressure Regulator Valve. Sonnax manufactures niche upgrade products for all modern automatic transmissions. These products fill manufacturing and design voids. The 904/999, 727 and RH or RE Chrysler transmissions were well engineered, yet they still have room for improvements.
Note: To access the Sonnax website and more product details, click here! Sonnax offers a full line of upgrades for popular automatic transmissions.
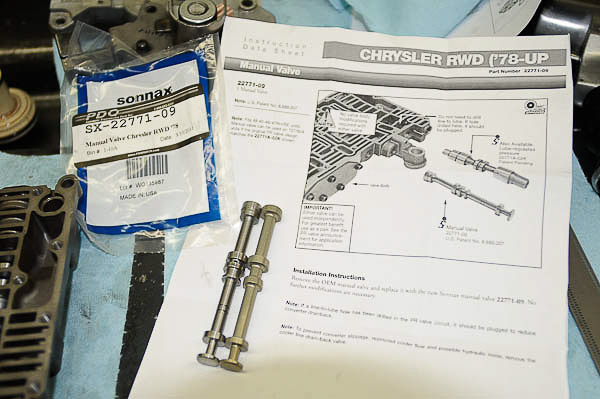
Illus. 50: Sonnax’s improved Manual Valve #22771-09 is a cure for delayed gear engagement and no fluid charge to the torque converter in Park. For Jeep or Dodge/Ram automatic transmissions, the valve installs without modifications.
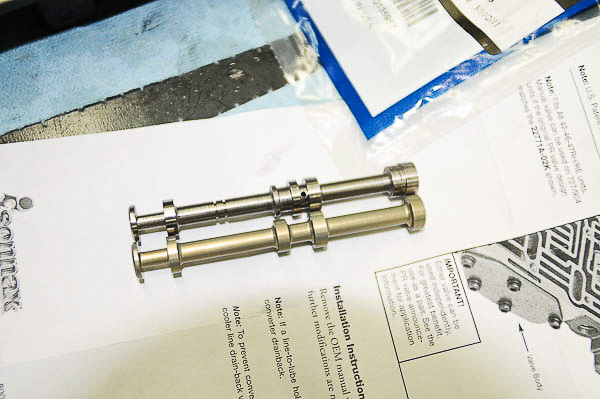
Illus. 51: Sonnax Manual Valve (top) has precise passageways for charging the torque converter in Park mode. This valve eliminates the lag when shifting to gears from Park. It also provides fluid to the torque converter, preventing starvation and damage of the front pump bushing.
Note: Since you are already within the valve body, I recommend using this valve in conjunction with the Sonnax Pressure Regulator Lube valve. Together, they will help keep your RE/RH, 904/999 or 727 Torqueflite alive! On those applications that accept these parts, the valves install without modifications.
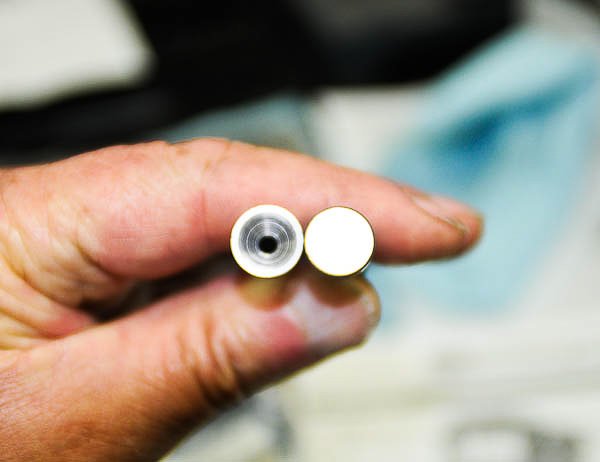
Illus. 52: Sonnax Manual Valve (left) has an internal lube passageway. This kind of precision machining makes the modification parts worth every penny! Transmission rebuilders use Sonnax parts as innovative solutions that fit properly.

Illus. 53: Check balls must fit into correct passages. Valve body work is precise and detailed. The slightest error in assembly will result in malfunction and parts failure. Use factory schematics to confirm parts locations and fit-up. Keep parts clean and free of debris and lint!
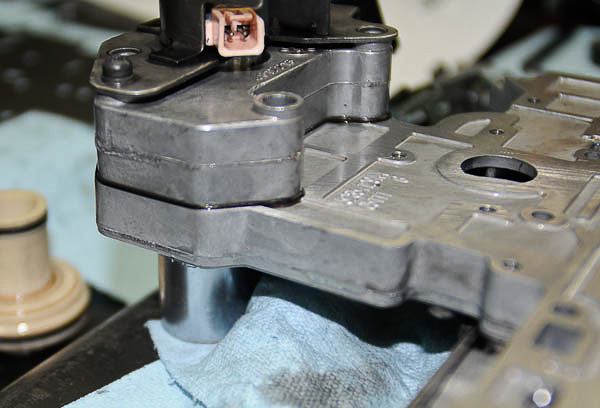
Illus. 54: Align parts carefully to assure proper pressures and fluid flow. When tightening hardware, bring screws to factory torque in sequence and gradually. Do not over-tighten hardware—warpage will occur!
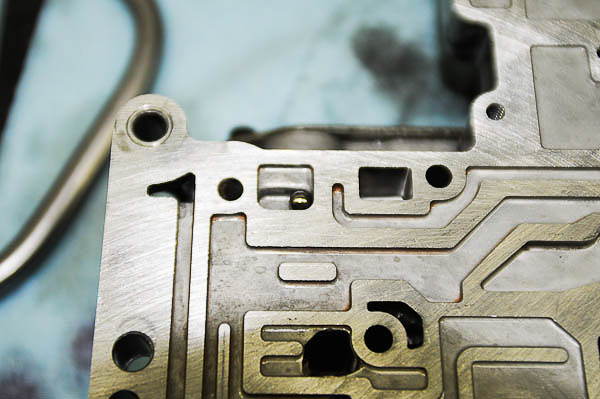
Illus. 55: On this 48RE Dodge Ram Cummins diesel 4WD application, the steel check ball fits at this location. Other balls at this valve body section are hard plastic material.

Illus. 56: Spacer shim plates must be clean, free of burrs and perfectly flat. Fluid passageways must be open and unrestricted. Align shim plates in their original positions to assure good seal.
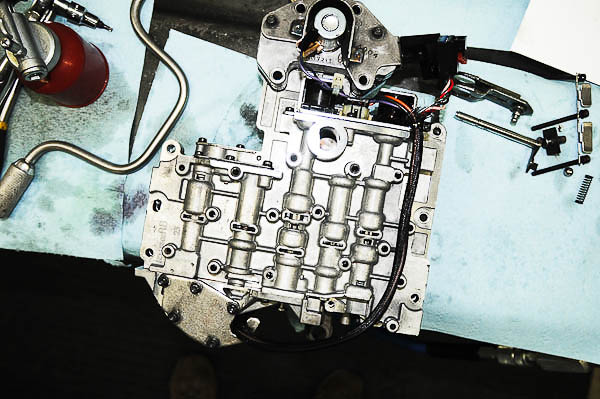
Illus. 57: Valves installed, end plate screws secure, lay the valve body section atop the shim spacer. Align screw holes precisely to assure fluid passage through channels and orifices.
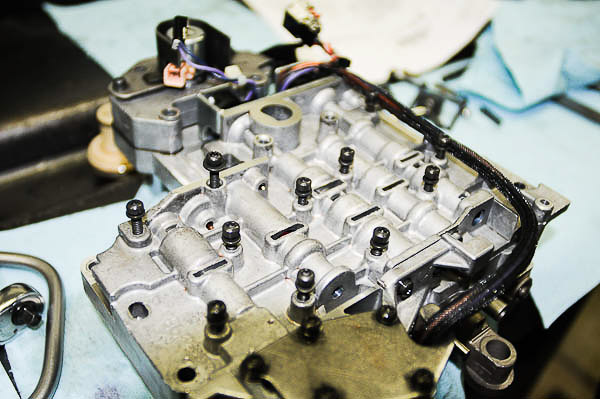
Illus. 58: Screw lengths vary. Use the correct screws at each point to assure a secure fit and no damage to soft threads. Finger start all hardware. Do not over-tighten screws; bring them to torque setting in stages and proper sequence.
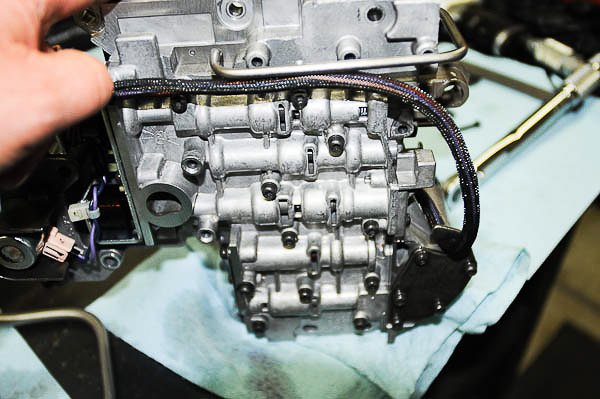
Illus. 59: Wiring, plugs and clips must be routed with care. Imagine this transmission shaking over time. Along a remote trail or when pulling a load, your Jeep 4WD or Dodge/Ram must be reliable. Protect electrics.

Illus. 60: Parts shown are now clean. Inspect springs for fatigue or sag. The accumulator piston at right will be replaced with Sonnax pieces.

Illus. 61a: I replace the three full-thread screws at the tube/cable retainer plate (right side) with black oxide, graded socket head cap screws (shown at center). These black oxide screws have a shoulder for improved parts alignment. Use matching (black oxide) high-collar split ring lock washers designed for machinery use. The combination assures true parts alignment and prevents parts creep.
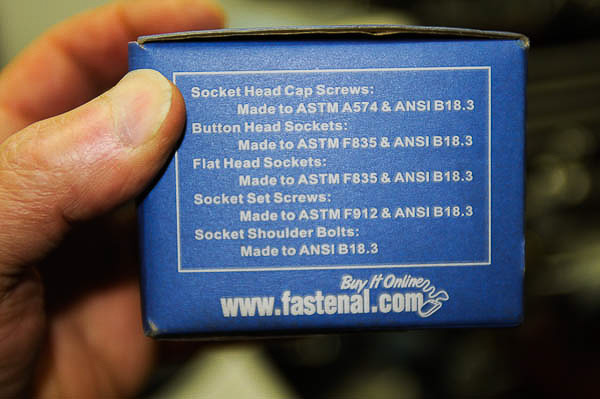
Illus. 61b: Specialty black oxide, alloy screws are available from Fastenal. In addition to these high-grade socket head cap screws, Fastenal is the source for high-collar split ring lock washers. This hardware is for precision machinery applications, offering better grade and finish than OEM screws. Torque to factory specifications.
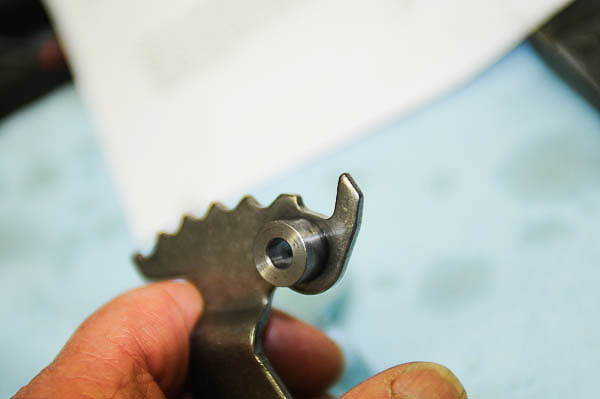
Illus. 62: I polish the detent plate notches. Some forum chats describe “grinding the ridges away” to allow the detent ball to roll easier. Do not remove metal from the comb. This is not the problem with Park stick.
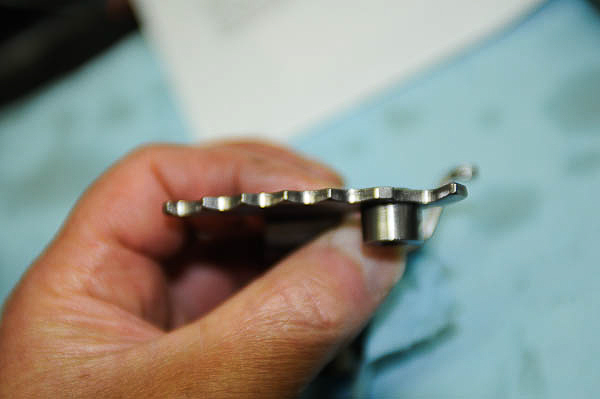
Illus. 63: Ridges accumulate burrs over time. I use a medium wire brush on a grinder to polish away burrs without removing vital metal. You do not want to “round off” the ridges, as they help align the manual valve and provide a firm, safe detent for each gear position.
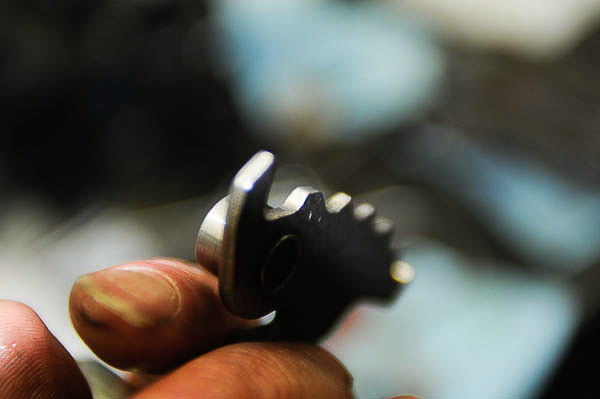
Illus. 64: This is the polished Park ridge. When the casting detent bore has the slightest wear, the chrome ball will wedge against this ramp and not allow a smooth shift from Park. The lever plate is not the problem; address the loose detent bore.
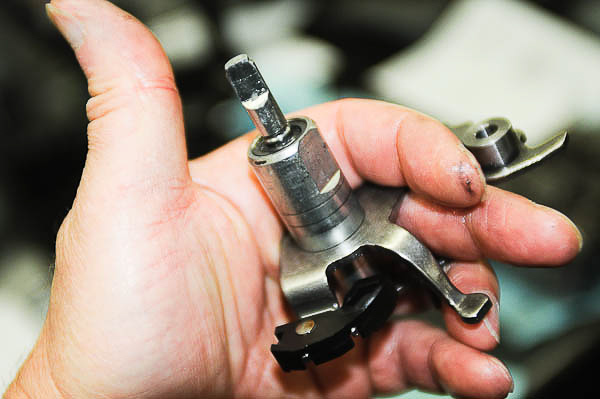
Illus. 65: Here, the throttle pressure shaft and lever assembly are shown together. Make sure parts are clean and move freely. Be sure the shaft seal is in good condition and seated properly.
Note: Use clean petroleum jelly on the shaft and seal to prevent seal nicks during assembly. The throttle shaft is installed after the lever assembly is in the valve body.

Illus. 66: The OEM detent spring and Sonnax custom ball are now inserted into the valve body bore. This is tricky, as the spring pressure is ample, enough to launch the ball across your shop!
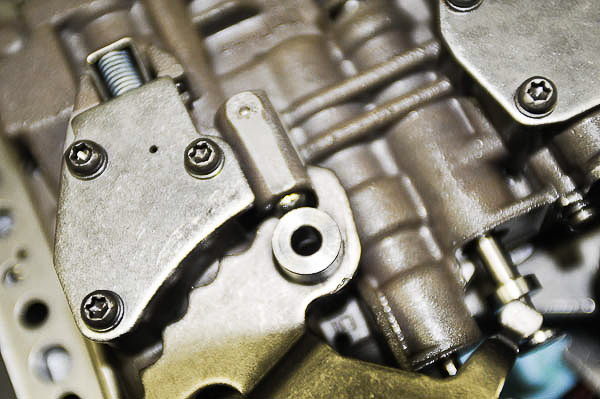
Illus. 67: With some care, the compressed ball fits the Park notch of the shift lever. Keep comb centered and aligned to prevent the ball from flying loose. Throttle shaft lever will install from the bottomside.

Illus. 68: Detent ball, lever comb and manual valve tang are each aligned and in their places. As you assemble these parts, keep the manual valve slot and lever tang aligned. On the 48RE, this is the finished layout. The throttle lever shaft is installed next.
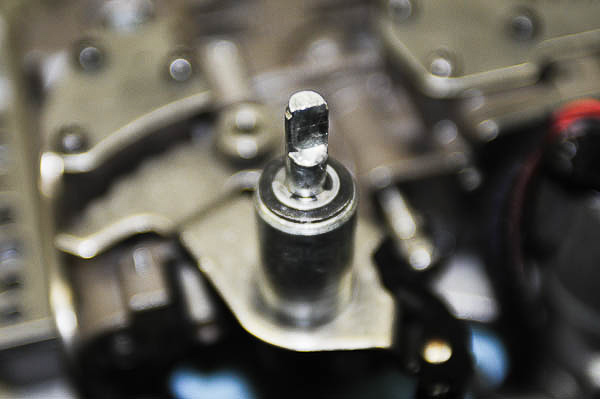
Illus. 69: Throttle lever shaft installed, the E-clip secures the shaft. Parts can now be tested. The detent lever’s comb clicks through each position with ease—including the Park-to-reverse shift!
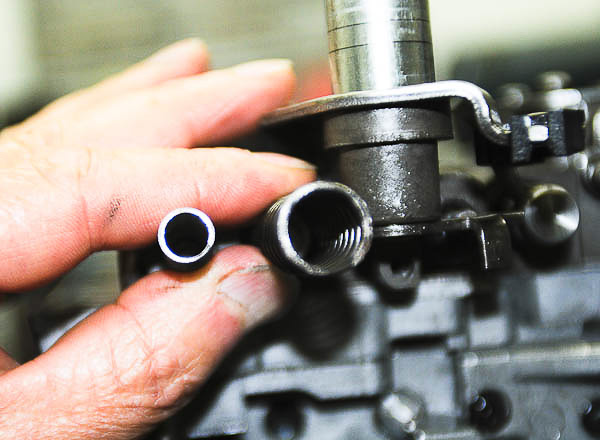
Illus. 70: Pressure regulator springs must be clean and proper length. (Compare to factory free length specifications if necessary.) Make sure springs fit smoothly, without bind or waver.
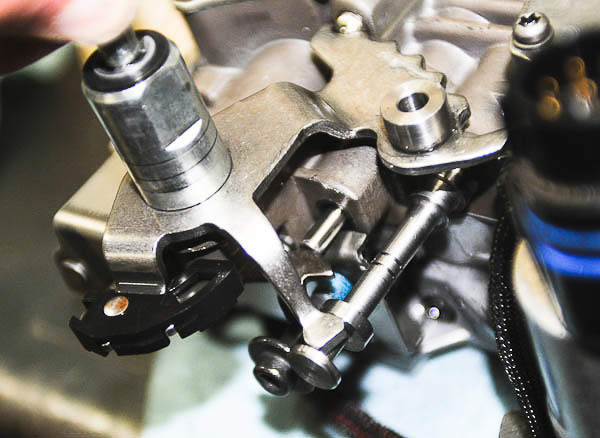
Illus. 71: New Sonnax manual valve, polished OEM linkage and the throttle pressure lever are visible here. On the 48RE and other RE/RH transmissions, parts relationship is close and precise.
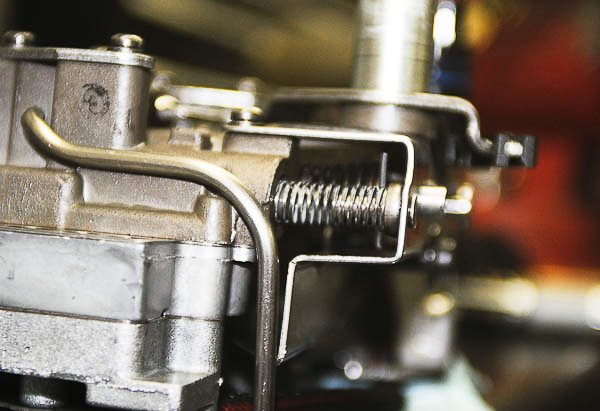
Illus. 72: Line pressure and throttle pressure are each adjustable. If you did not disturb these settings and they were correct, leave them alone. If adjustment is necessary, follow the guidelines in your factory workshop manual.
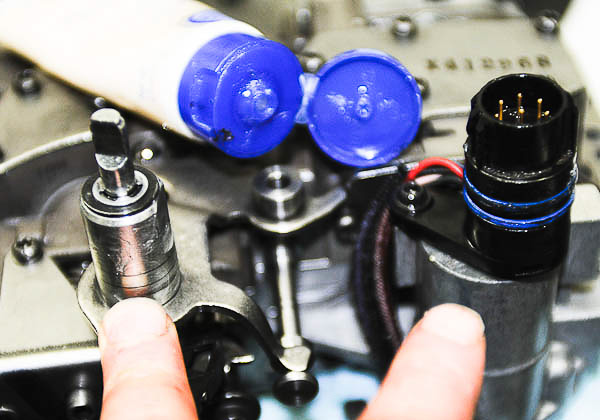
Illus. 73: During installation of the valve body into the transmission, use petroleum jelly on O-rings and bushings. This will ease installation and help prevent nicks or damage to sensitive parts.

Illus. 74: On this RE transmission, the pressure regulator spring height is specified. Here, I measure the spring stop height. The spring stop is adjustable. Follow factory guidelines—adjustment affects shift points and harshness, changing line pressure throughout the system.
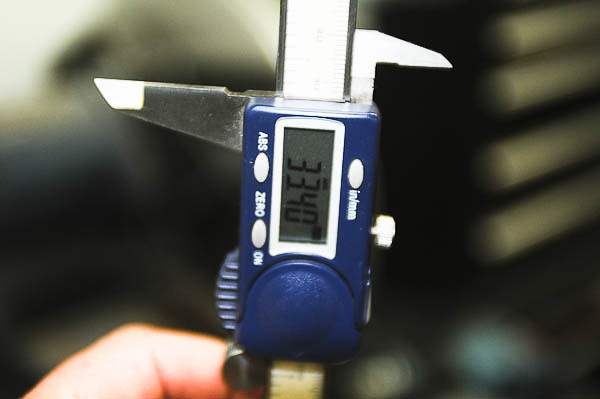
Illus. 75: Measurements for the pressure regulator spring’s stop height are in inches and millimeters. Here, I check height against the OEM specification. The adjuster was not turned during service work, which should retain the factory setting.
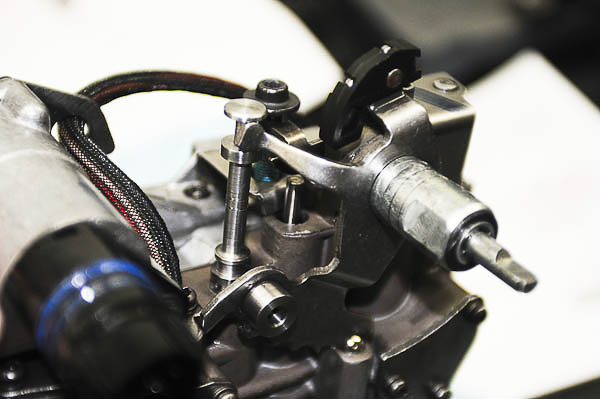
Illus. 76: Completely assembled and properly adjusted valve body is now ready to install. Bench adjustments assure quality performance.
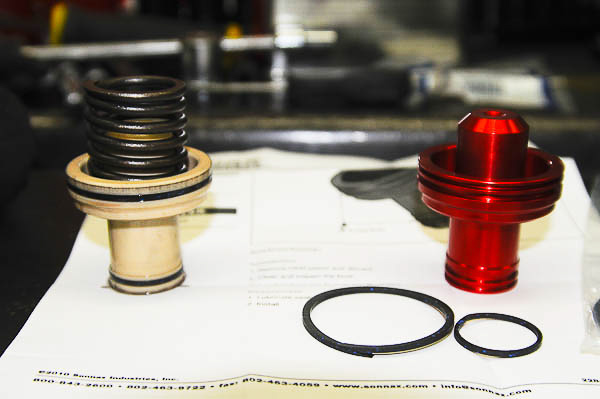
Illus. 77: At left is the original (plastic) accumulator piston, seals and spring. At right is the Sonnax anodized aluminum replacement piston and improved sealing rings. On this 48RE diesel application, the spring fits as shown.
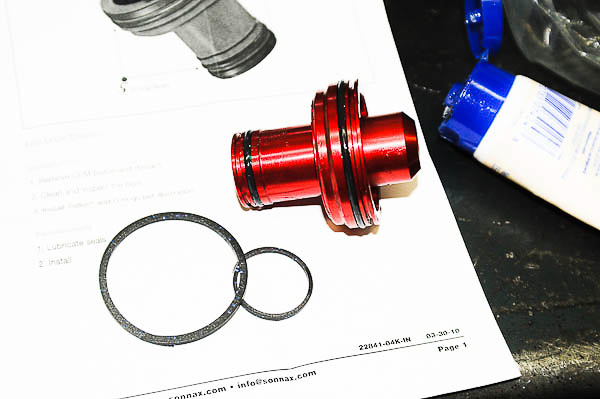
Illus. 78: Sonnax has improved both the piston and the seal design for the accumulator. Valve body removed, this is a good time to replace and upgrade the accumulator piston and seals.
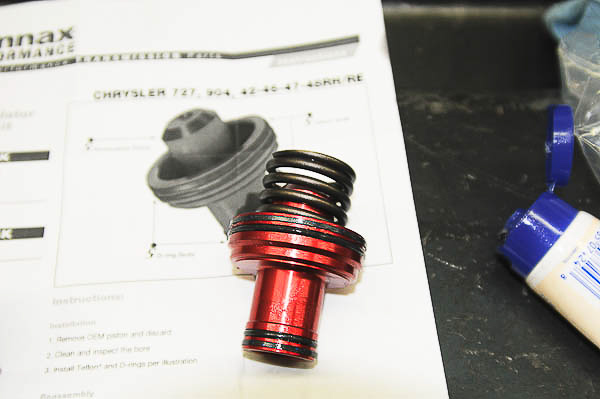
Illus. 79: Sonnax seals fit grooves as shown. There are two style seals included. Furnished instructions are thorough and detailed. On this application, the 48RE for diesel Rams, a single spring fits as shown.

Illus. 80: This is the Sonnax accumulator piston with parts positioned in relationship to the valve body. The seals are generously coated with petroleum jelly. Accumulator piston should press into place squarely, using firm, even finger pressure to prevent new seal damage.
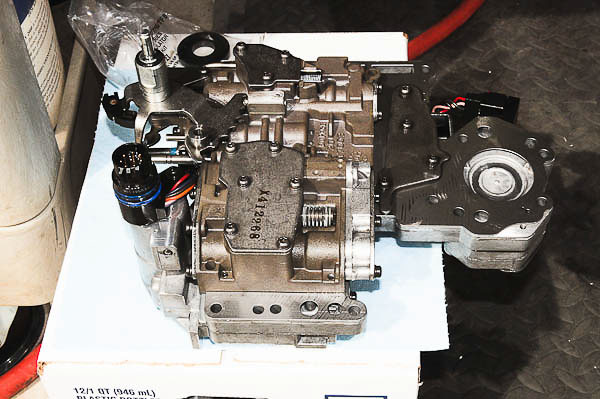
Illus. 81: This is the assembled valve body. All electrical connections are secure, with assembly fasteners torque’d to specification. This valve body is ready for installation in the transmission.
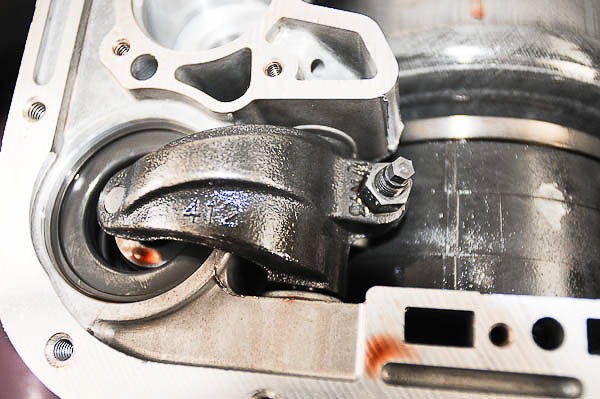
Illus. 82: This is a sensible time to adjust the bands. The 48RE in our Ram 3500 has over 90K miles and is due. This rear band adjuster is easy to access with the valve body and filter out of the way. Adjust each band carefully, to factory specifications.
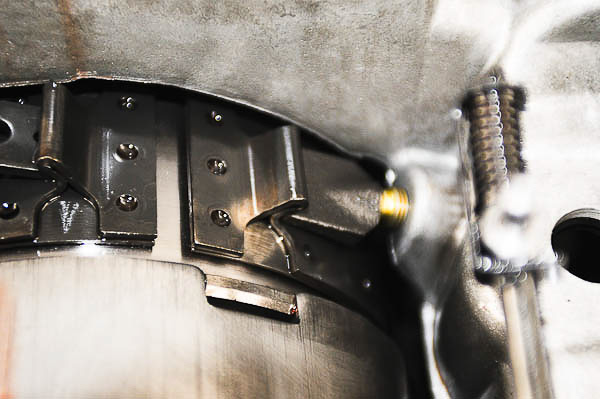
Illus. 83: Front band is visible here. The adjuster screw (at right) is accessible from the outside of the transmission case. Using the factory workshop manual as your guide, adjust the band precisely. You need an inch-pound torque wrench to perform band adjustments.
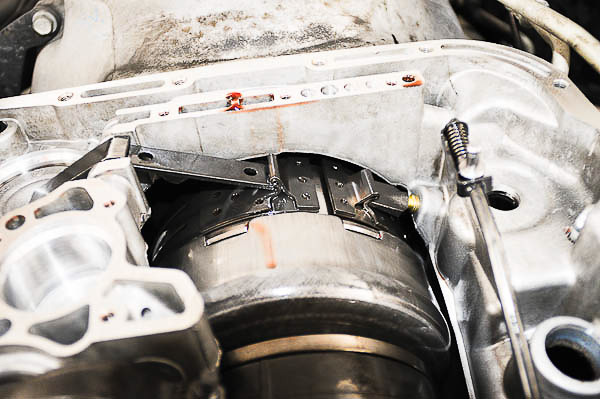
Illus. 84: Visible is the front band, the adjuster (right) and the piston strut. Sonnax and others make improved pistons, strut bars, actuator pins, input shafts and other parts. The RE/RH upgrades described within this article are simply to keep the ’78-up Chrysler RWD automatic transmissions alive—these are not high performance modifications.

Illus. 85: Make sure the accumulator spring is in good condition, with no sign of wear, fatigue or sagging. This spring seats in the valve body pocket and must align with the piston during installation.

Illus. 86: Here, the Sonnax accumulator piston rests in the clean, burr-free bore. Always inspect case bores for minor blemishes, which can be smoothed with ultra-fine crocus cloth then wiped clean. The case is aluminum and susceptible to scratching and nicks. Handle with care!
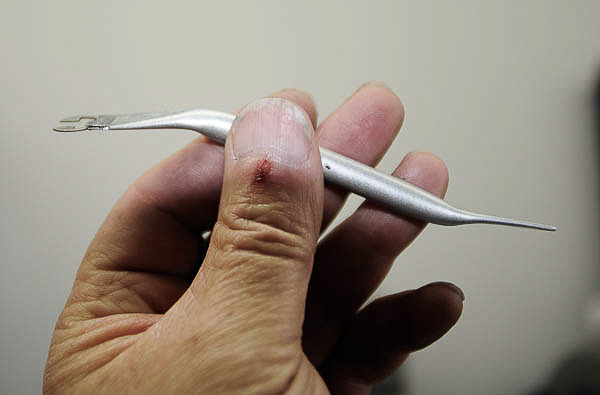
Illus. 87: The E-clip for the RE transmission Park rod is impossible to install with your fingers! This tool tip from BD Diesel Performance makes installation easier. Described by the Canadian company as a “hockey stick”, you can make the device in minutes from a piece of steel fuel pipe.
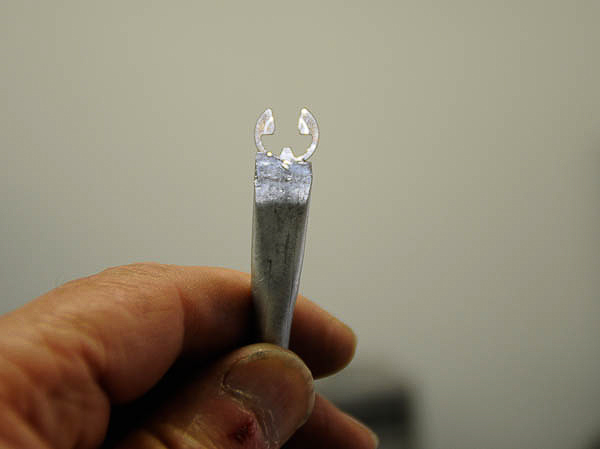
Illus. 88: Crimp the tubing end with a hammer or vise, leaving just enough room for the E-clip to press into the end. As the valve body goes into place, with the Park rod fitted into the shift lever, carefully insert the clip in its slot. With care, you can do all of this, including the compression of the accumulator spring, with just two hands!
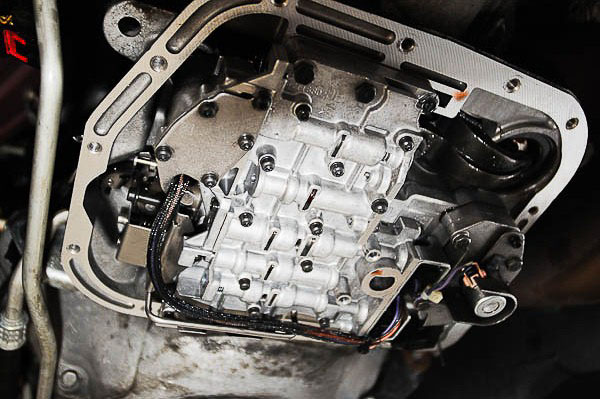
Illus. 89: Valve body bolts should be installed with fingers until threads are secure. Tighten bolts in sequence, gradually bringing them to final torque specification found in your factory shop manual. Re-torque fasteners after parts have settled for a few minutes.

Illus. 90: With the shift lever in the low gear position, install the gear indicator switch from the outside of the case. Make sure all parts are clean, and protect the seals with petroleum jelly. Note the Neutral and Park index notches on the plastic cam face.
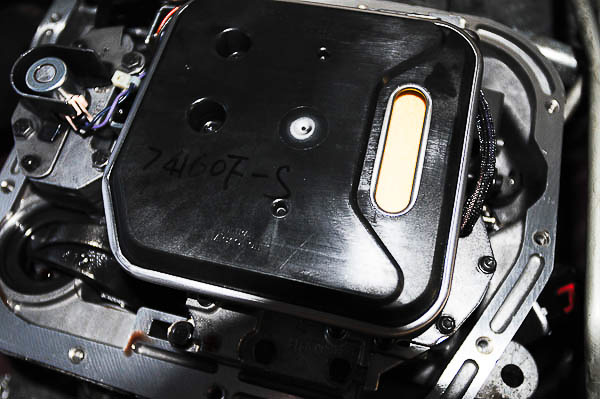
Illus. 91: A new fluid filter is mandatory! This routine service item is new. Use your inch-pound torque wrench to secure the filter screws, and be sure the filter seals against the valve body properly.
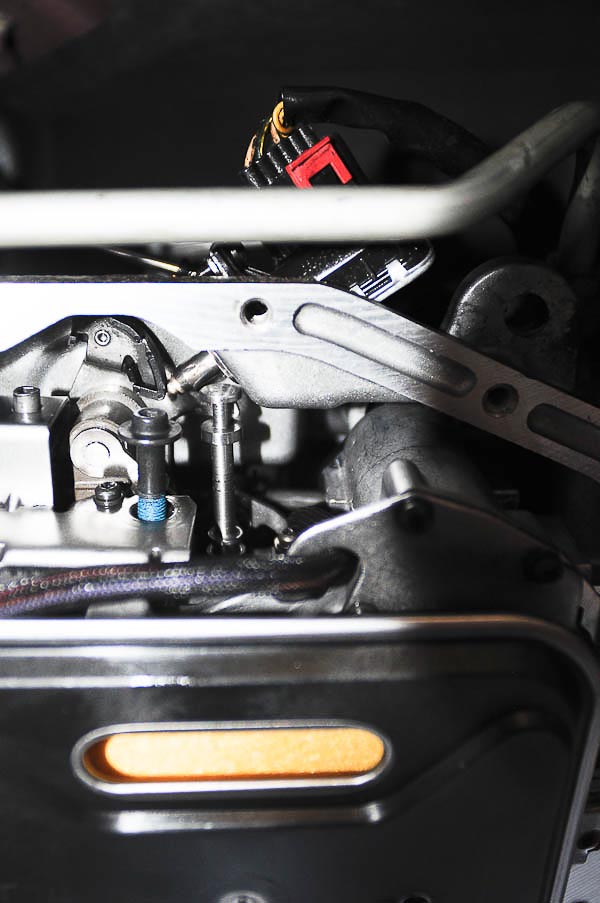
Illus. 92: Inspect or replace the pan gasket, clean the pan and debris magnet thoroughly, install the magnet and pan, then torque bolts to specification. Re-check bolt torque and fill the transmission as described in the shop manual for your Jeep or Dodge/Ram truck. Be sure to use the correct fluid for your transmission.
Note: The 48RE uses Mopar ATF-4 specification fluid, and the fill after draining completely, including valve body work, took a total of 12 quarts. Beginning with five initial quarts, I then started the engine and added fluid steadily until full. Always check fluid hot; in the case of the 48RE and some other transmissions, check fluid in Neutral, not the Park position. The dipstick will usually note the gear position for checking fluid ‘Hot’. Selector position and which gear matters.
