How-to: YJ Wrangler 4.2L Six Two-Barrel ‘BBD’ Carburetor Rebuild!

The 1987-90 YJ 4.2L inline six cylinder engine carries forth the late CJ-era carburetion and induction system. This is a feedback BBD Carter 2-barrel carburetor that works with an MCU (micro-computer unit) and a series of engine sensors. A closed loop design, this is the last generation carburetor. The ignition uses a distributor. Focused on lower tailpipe emissions, these fuel and spark systems were complex.
BBD carbureted 4.2L/258 inline sixes found in 1980s CJs and YJ models through 1990 are rugged, highly reliable engines. Seven main bearings and a fundamental pushrod OHV design distinguish this AMC powerplant. The 4.2L served as the platform for the 4.0L engine introduced in 1987 XJ Cherokee and MJ Comanche models.
258 engine architecture dates to the 1964 232 six and the extended family of AMC 199/232/258 and 242 (4.0L) cubic inch engines. The 4.0L survives through the TJ Wrangler era. 258 cubic inch/4.2L engine applications, dating back to 1971, provide the platform for the 1981-90 inline sixes. Distinctions surround the Federal ’49-State’ versus California models—mostly tuning and required fuel and ignition devices to curb exhaust tailpipe emissions.
Late CJ Jeep models and the YJ Wrangler 4.2L engines have a BBD carburetor with a feedback MCU system and conventional ignition distributor. The distributor and spark wiring is familiar and easy to service. This electronic distributor uses a rotor and distributor cap—each requires periodic replacement. Spark plugs and spark wires are replaced in routine fashion. Engine misfire, poor fuel efficiency and lack of power can result when this basic maintenance is not performed.

4.2L distributors feature a vacuum canister. This is the last Jeep ignition to use a vacuum advance mechanism in conjunction with a mechanical-centrifugal advance unit within the distributor. When spark timing fails to meet engine needs, a faulty vacuum canister or sticky centrifugal weights and springs can be the cause.
During the early YJ Wrangler era, I tested many new YJs with 4.2L inline sixes. I drove the Rubicon Trail and other high altitude venues in the rugged backcountry. New, these engines ran well with their stock ignition and fuel delivery systems. To this day, I believe that a properly restored YJ 4.2L engine will run well and provide excellent service. Although the Mopar Performance MPI conversion provides a major improvement over the restrictive carburetor and conventional distributor of a 4.2L six, many owners will benefit from simply restoring the stock Jeep 4.2L components to meet OEM standards.
If routine ignition service and a fresh air cleaner and PCV valve do not bring your 4.2L engine into tune, there are three possibilities: 1) the engine may have significant wear, 2) the emission and/or vapor system devices may not be working properly or 3) the carburetor has a malfunction.
On a later CJ or YJ Wrangler’s chassis and 4.2L engine, begin troubleshooting with the vacuum circuits and emission system. Devices may have failed. Perhaps a former owner eliminated some of the components. Restore the emission and evaporative systems if you intend to keep the original carburetor, induction and ignition.
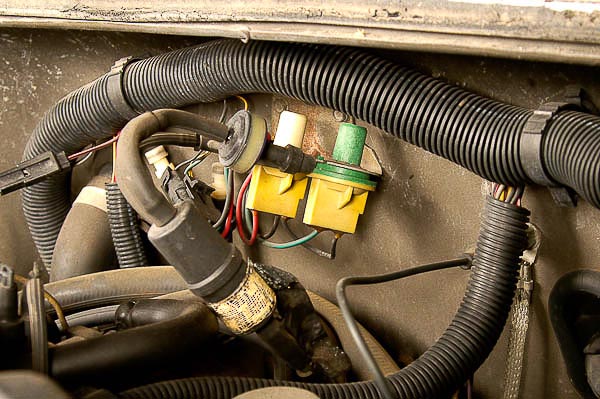
The emission system’s gaggle of vacuum devices and electrical solenoids can create a variety of troubles. Check for vacuum leaks and split hoses, loose connections and defective components in this system. The vapor canister can create a variety of faulty carburetor symptoms as well. Even a defective gas cap will cause trouble. Look the system over from the fuel tank to the engine devices. Compare the hoses and circuits with the factory vacuum diagrams for your Jeep model.
When the problem narrows to the Carter BBD carburetor, consider restoring this unit. The BBD took us over trail obstacles, high passes and muddy bogs. It can do so again if rebuilt to factory, “blueprint” standards. Toward that end, I focus here on the details that can make your BBD perform like new.
Note—In the Jeep CJ Rebuilder’s Manual: 1972-86 (Bentley Publishers), I detail the step-by-step procedure for a BBD carburetor rebuild. Rebuild specifications are available in a genuine Mopar or Echlin premium overhaul kit. A factory Jeep Service Manual also covers carburetor specifications. For remote trail fixes or work at your garage, bookmark this article and these other resources!
‘Blueprint’ Rebuild for the Carter BBD Carburetor
Despite myths about the poor quality of a Carter BBD unit, this is a reliable carburetor when in good working order. Often condemned and even discarded as “defective,” the BBD can prove reliable and worthy when rebuilt to factory specifications. Other problems can masquerade as faulty carburetor symptoms. Emissions-related devices, evaporative system malfunctions, a weak mechanical fuel pump, a clogged fuel filter or a plugged fuel tank sock can each mislead diagnosticians. In haste, the two-barrel BBD carburetor gets tossed.

The 4.2L YJ models were the last to use a mechanical fuel pump. Although the fuel tank provided for an electric pump on 2.5L TBI models, the 4.2L continues the use of a traditional diaphragm fuel pump (shown here). Do not overlook the low output of a high mileage, worn mechanical fuel pump! Replace the pump if flow volume is low. Make sure the camshaft lobe that operates the pump is in good shape as well.
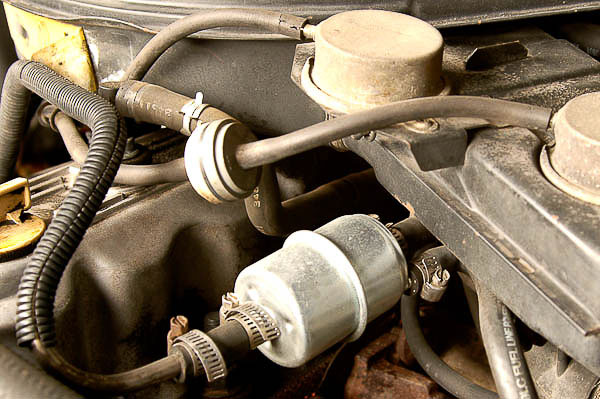
A clogged fuel filter can cause symptoms of a defective fuel pump or carburetor. Change the filter regularly. One bad tank of fuel or winter’s damp condensation will provide enough moisture to clog a fuel filter. For safety and reliability, I use genuine Mopar fuel filters.
Note: The vacuum hose splitting at the air intake vacuum motor (see photo) can be troublesome and difficult to diagnose.
If you have narrowed a performance problem to the BBD or simply wish to restore like-new performance to an aging carburetor, what I call a ‘blueprint rebuild’ is beneficial. Unless the carburetor’s throttle body and throttle shaft have excessive wear (leading to vacuum leaks), the carburetor can usually be rebuilt with no more expense than the cost of an overhaul kit and carburetor cleaner. Follow the steps in a quality rebuild kit and this section for the best results.
Note—Before removing the carburetor, I run the engine at an idle and check for throttle valve and shaft leaks by spraying a low-volatility penetrant near the ends of the throttle shaft. If there is excessive wear, enough to create vacuum leaks and erratic idle characteristics, the engine speed will change significantly. Do not spray directly into the shaft ends, as this will force penetrant into the induction system and give a false reading. Create a light mist and allow any wear areas to draw the penetrant. You can quickly find an intake manifold gasket or carburetor base gasket leak this way. Do not use flammable sprays around a hot engine or exhaust manifold! Rule out vacuum leaks of any kind before rebuilding the carburetor.
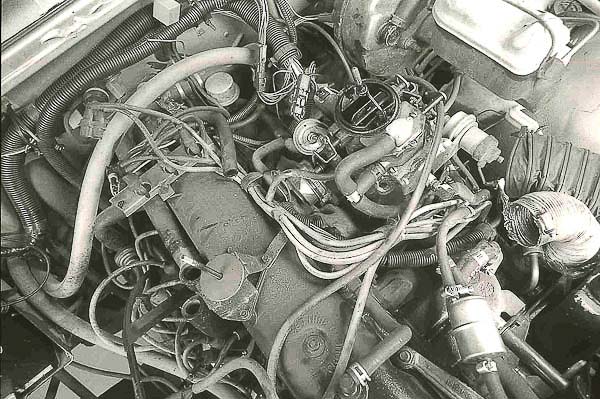
This 1986 CJ 4.2L engine helps YJ Wrangler owners understand how all of the vacuum hoses and emissions gadgets came into play on the 1987-90 4.2L sixes. To meet emissions requirements, the carbureted 4.2L became weighted with vacuum and electric solenoids, engine sensors (including an oxygen sensor) and an MCU/micro-computer unit for regulating the closed loop functions of the BBD feedback carburetor. The 1987-90 YJ 4.2L engine layout looks identical to this system.
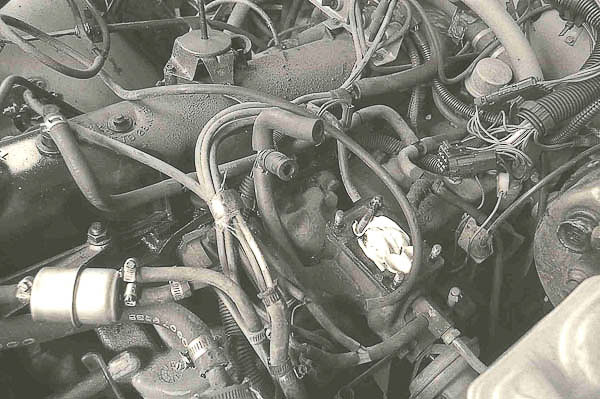
Throttle rod disconnected, these hoses and wires disconnected, I loosen the mounting nuts and remove the carburetor. One nut drew out the stud—not uncommon on an older engine. Note the relationship of these parts. I cover the intake ports to prevent any debris or hardware from falling into the engine while the carburetor is on the bench.

My rebuild kit of choice is a genuine Mopar part. This kit comes with all vital pieces plus a detailed instruction sheet. There is virtually no need to consult any other manual. A Mopar kit brings this carburetor to OEM ‘factory’ standards. For best results, do not compromise quality. If a Mopar kit is not available for a trailside fix, an Echlin ‘premium’ kit from NAPA would be my next choice.
Note—A carburetor rebuild kit does not contain electrical devices, emission control items, carburetor body parts, jets, metering rods, the throttle body/valve assembly or other “hard parts.” The industry standard for a kit includes the needle/seat assembly, the accelerator pump assembly, check balls, gaskets, diaphragms and other small wear items. Hard parts and some emission control parts are available through Carter and Mopar outlets. Many emission devices have found their way into the aftermarket. Mopar and NAPA/Echlin are good sources for emission control devices and choke units.
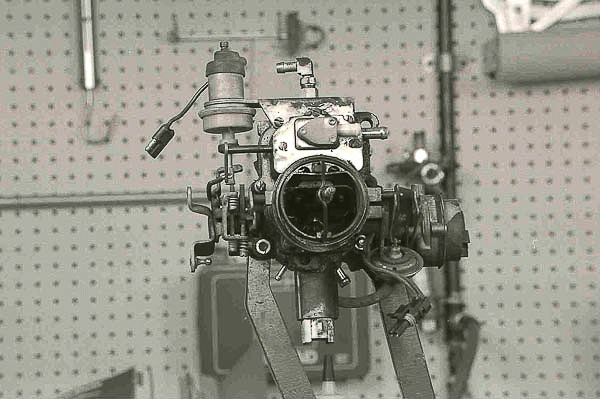
This is the top view of the removed carburetor assembly. Note the amount of oil that has gone down the carburetor throat and into the induction system of this engine. On this carburetor, the air and fuel passageways will be clogged with dirt and oil. A closed crankcase must remain tightly sealed to prevent this kind of damage. Poor crankcase ventilation forced oil into the induction system. Always renew the PCV valve and worn hoses at higher mileage!

Bottom side view of the BBD shows the relationship of the Sole-Vac (upper right) and the stepper motor (bottom center). Note accumulated grime. This carburetor has not been cleaned or serviced for a very long time (if ever)—and you can tell it! These two components are important and require special consideration.
Note—The Sole-Vac unit and Stepper Motor play a crucial role in idle speed and low-speed engine performance. This engine stalled every time the throttle came back to idle after warm-up, so I will carefully consider the function of these two components. During the carburetor’s overhaul, I check these devices with electrical power (12-volts D.C.) and a vacuum hand pump.

Disassembly begins with identifying the idle mixture screws and removing them from the carburetor body. (Soft dowel plugs are installed at the factory. You can remove the dowels for access to these screws.) If the idle was right before an overhaul, I will run these screws to the light seating position, counting the exact amount of turns to seat the needles. Make a note of the turns for quick tuning upon reassembly.
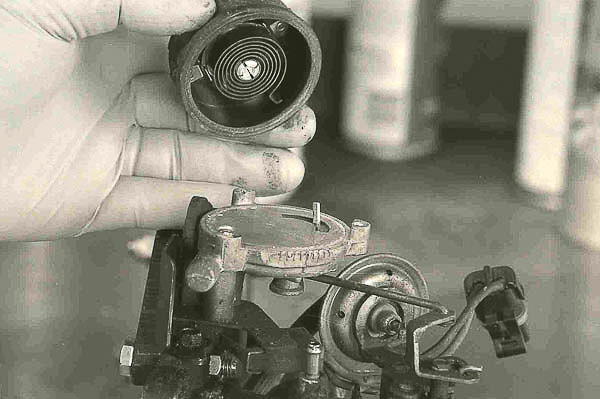
This choke has been serviced before, not a surprise at 142,000 miles! The attaching hardware is a set of sheet metal screws found in cheaper rebuilding kits. The Mopar kit will upgrade the attaching method. I will restore the choke setting during assembly.

Vacuum choke pull-off is an important item. Devices like this do not go into the carburetor cleaner! Carburetor cleaner would cause the diaphragm to swell up and fail. For cosmetic purposes, I will clean the metal shell with denatured or isopropyl alcohol. Such parts can also go through my parts washing machine, which uses a hot, citrus-based aqueous solution. Do not lose small parts!
Note—I have learned to use disposable mechanics gloves. Years ago, mechanics, myself included, soaked up solvents and VOCs in products like carburetor cleaner. I’m older now. Today, we can enjoy this work without risking our health. Wear mechanic’s gloves!
Footnote on ‘BBD’ Choke Attachment Methods
Note: The Mopar ‘BBD’ rebuilding kit has special choke cover screws. Once the choke is set to factory specification, you tighten these screws to the point that their heads twist off. Future choke service will require drilling out the soft screw heads.
Some carburetor kits come with pop rivets for the choke unit. On these carburetor applications, you set the choke to specification and install the rivets with a pop rivet gun. Future service requires drilling out the rivet heads.
The intent with either of these approaches is to meet emission compliance standards. Choke setting will impact the incoming air/fuel ratio, which in turn affects the tailpipe emission output. To make the choke more “tamper-proof,” rivets or breakaway screw heads are used. Despite the extra work, such chokes are serviceable. Always set the choke to specifications listed in the overhaul kit instructions for the carburetor’s “list number”.
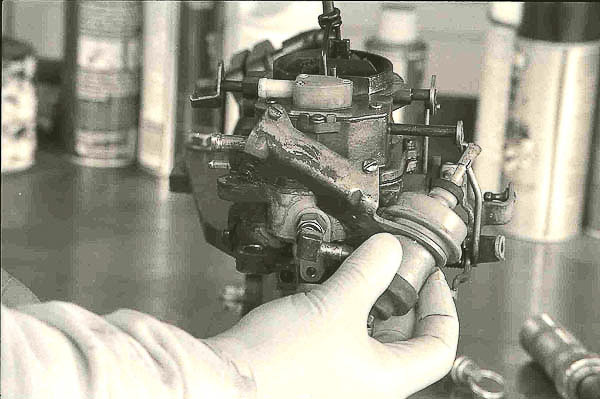
Sole-Vac unit comes off next. Part of this device is a vacuum diaphragm. The other part is an electro-magnetic solenoid actuator. This unit works when the microprocessing unit (MCU) feedback signals set the throttle position for various engine operating and load conditions.
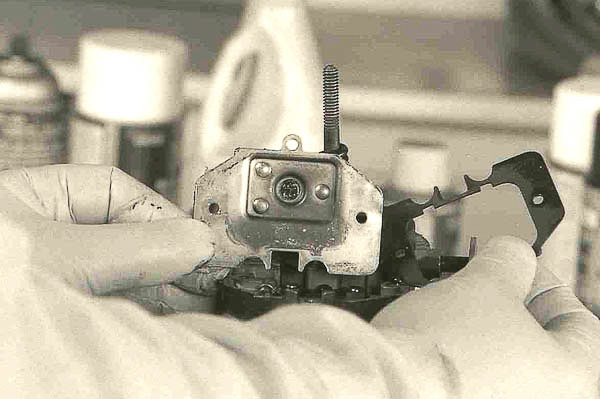
This is the rollover check valve. It also serves as the bowl vent. The valve is a safety item. In the event of a vehicle rollover, the valve closes to prevent dangerous fuel spillage. This device helps protect the driver and vehicle occupants from severe injury and the risk of a dangerous vehicle fire. Make sure this valve functions properly!
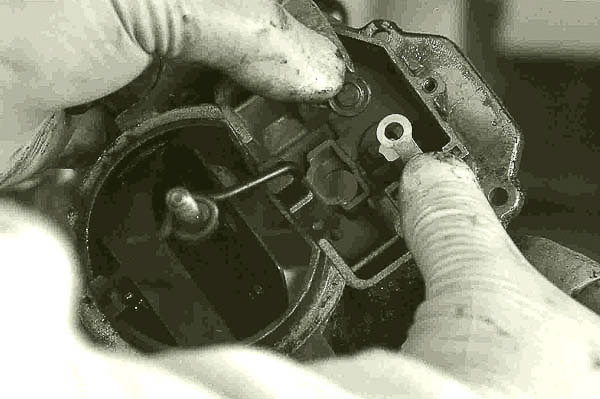
This vent grommet is in the carburetor kit. I always remove rubber pieces before dipping metal parts in carburetor cleaner. Carburetor cleaner contains mineral or petroleum solvents and VOCs that will immediately damage rubber. Dropped in carburetor cleaner, this grommet would swell severely and be useless.
Caution—Many carburetor parts should not be dipped in carburetor cleaner. I separate the electrical, rubber and plastic components, cleaning these pieces with a milder approach. (Avoid dipping electrical contacts and rubber!) An aqueous cleaner like my parts washing cabinet serves well here. Hand/brush cleaning with denatured or isopropyl alcohol will work, too. Denatured and isopropyl alcohols are suitable for work around brake parts and rubber assemblies. Always wear gloves and eye protection when handling alcohol or carburetor cleaner!
Beware: Denatured alcohol is highly toxic! Wear chemical-resistant gloves and safety goggles when handling denatured or isopropyl alcohol. Do not use a commercial parts washing machine around electrical or electronic devices! Pressure and moisture will damage sensitive parts.
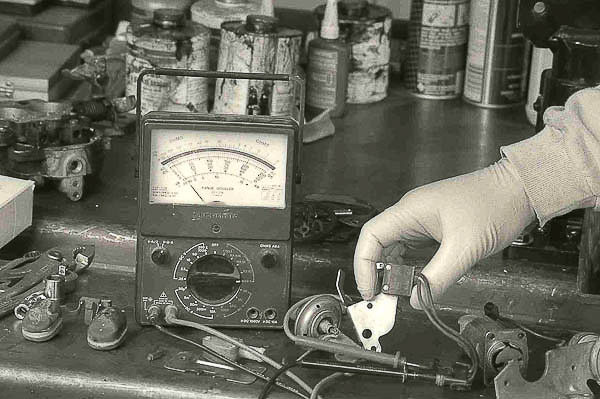
Here, I check the function of the wide-open throttle (WOT) switch. A simple ohmmeter check for continuity also works well. I will check all vacuum and electrical devices. The WOT switch is common to closed-loop, feedback carburetors and some EFI systems. This mode enables adequate fuel enrichment when there is a demand for full-throttle performance.
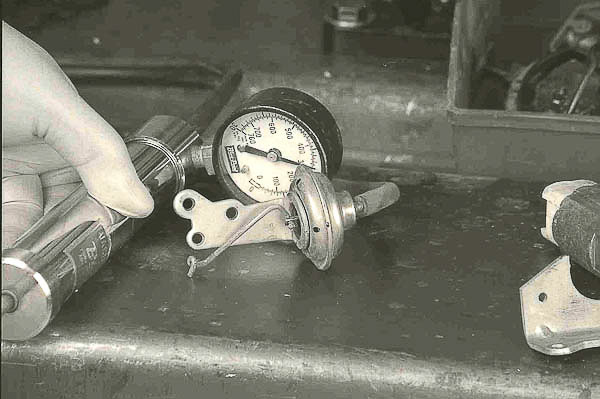
Vacuum choke pull-off requires testing with a hand vacuum pump. Make sure that vacuum holds. (First be certain your vacuum pump will hold steadily by itself!) The plunger should move properly and stay in position while under vacuum. Vacuum pull-off enables the choke to open as the engine fires and when heavier throttle application calls for less fuel enrichment with the engine still cold.
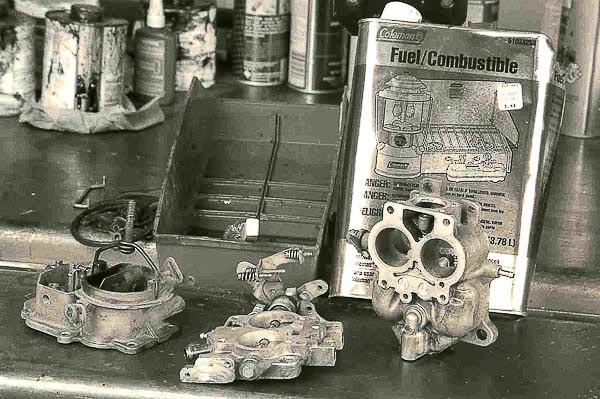
I keep carburetor cleaner as clean as possible. To remove the surface grime from these parts, Coleman stove fuel (pure white gas with naphthalene) works well. I wear goggles and mechanic’s gloves and use a brass wire brush to remove debris. After metal parts dry, I soak them in carburetor cleaner then rinse the parts in a stream of lukewarm water.
Warning—Stove (“white”) gas is very volatile, so use extreme care and keep this process away from sparks and any heat source. Stove gas contains naphthalene, which evaporates rapidly. I use Coleman stove gas to wipe up oil from my shop’s cement floor. Stove gas will draw up the oil and leave minimal, if any, residue. Again, this is a highly volatile liquid and must be handled with extreme care! Dispose of used stove gas and rags properly.
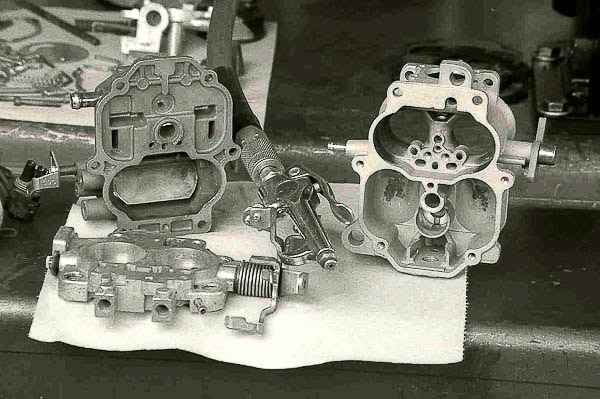
To dislodge stubborn debris, I use compressed air. Do not blow toward yourself, and wear safety goggles. Passageways may contain harmful carburetor cleaner or residue. Small passageways are difficult to clear and sometimes require careful plunging with a fine wire. When clearing debris, do not drill or scrape away metal from body parts, brass tubes, jets or small orifices.
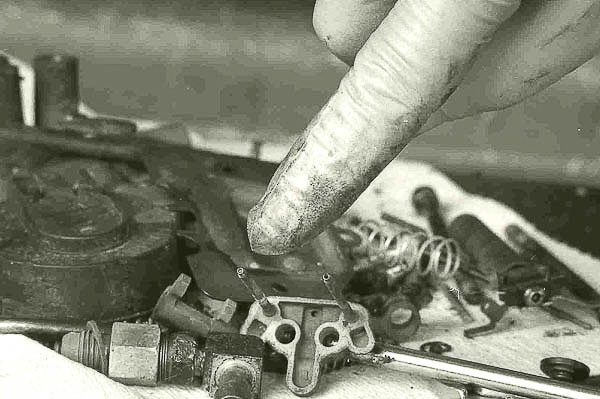
A crucial discovery: One of the idle fuel pickup tubes is fully clogged! This engine stalled whenever the clutch pedal was depressed. A clogged idle fuel pickup is a valuable find. Always look for the cause of rough engine performance. I will clean this tube carefully, leaving metal intact while fully clearing the passageway.

The venturi cluster has small passageways that benefit from a compressed air blast. Dry the parts and clear all tubes and passages. Care here helps solve drivability problems and eliminates the carburetor as a source of trouble. Wear eye protection when air-blowing parts.
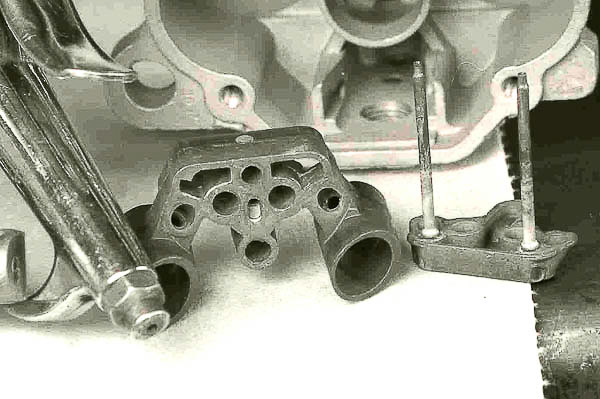
Remember the idle fuel pickup tubes? These require a strong blast of compressed air. (Wear eye protection.) Do not attempt to remove these tubes. If they need cleaning, run a strand of wire or even a fine jeweler’s drill through the tube. Do not remove brass material from any jets or tubes!

Needles and passageways now cleaned, I install the springs and idle mixture screws. Gently screw each needle to its bottoming point. (Do not over-tighten, or damage to needles will occur!) Turn each mixture screw outward the exact number of turns that you noted during disassembly. As an alternative, you can use the adjustment specification listed in the overhaul kit instructions. This is a base adjustment.
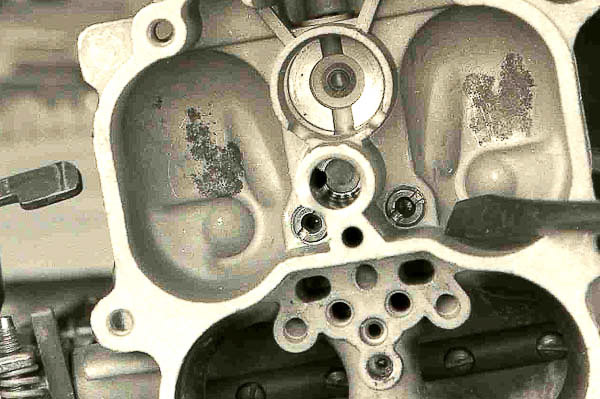
Install the main metering jets. The screwdriver blade must fill the slots. Hold the driver squarely, and tighten these jets securely. You do not want a jet to loosen in service! If any brass sloughs off, vacuum or air blow the debris away from the carburetor body.
Caution—Main metering jets and metering rods are a vital part of proper fuel flow. Always use the original jets unless you know which jets will clearly improve performance without compromising engine reliability or emissions requirements. The factory jets are usually the best overall size. On feedback carburetors, fine-tuning is accomplished with the onboard computer (MCU).
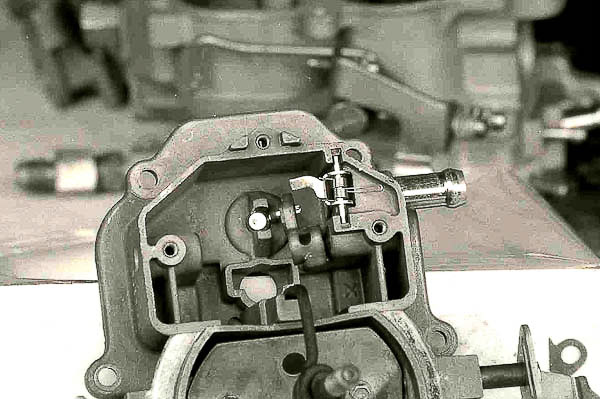
Now you can install the new accelerator pump. The spring in place beneath the air horn, press the shaft through the air horn hole and catch the shaft with the S-link and pump arm. The S-link will keep the accelerator pump in place.

This is a bottom side view of the new accelerator pump with spring in place. Make sure the spring seat and seal are located properly and securely. Lubricate the seal lip with a light coating of fine penetrating oil during installation. Be certain the lip faces downward as it enters the bore of the main body. Always install the right size check ball, in correct order, at the proper location!
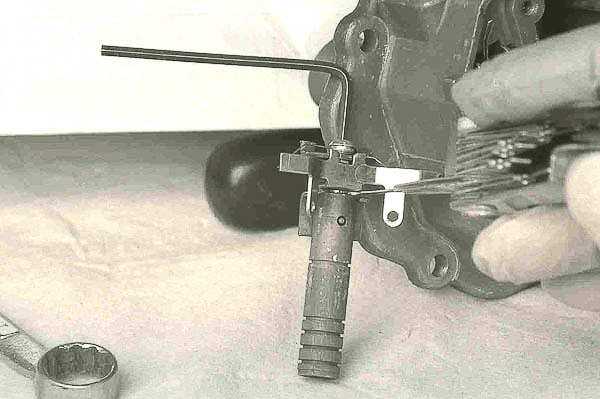
Check the vacuum piston gap with a feeler gauge. Set gap to specification noted in the rebuild kit instructions. Time spent making these adjustments will pay off in quality performance and the knowledge that this carburetor is built to factory specification, the aim with “blueprinting”.
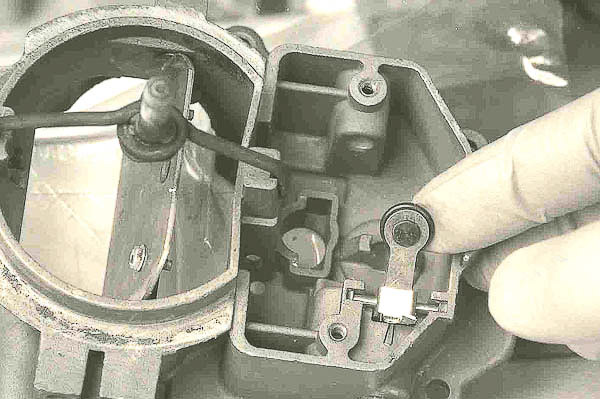
New vent grommet is placed on the lever. Position vent grommet carefully. This rubber grommet must seal properly when the lever closes. Make certain the lever moves freely. Confirm that the vent grommet seals against its seat when the spring presses the lever downward.
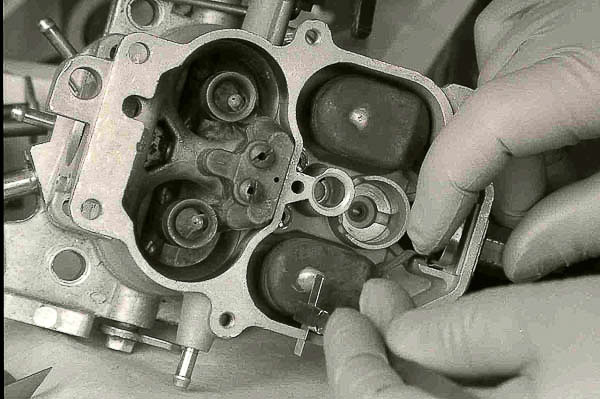
Float height is measured with the float lever pressed very gently against the needle. (Do not damage the needle by applying too much pressure!) Measure to the specification noted in the carburetor kit. I use a metal T-gauge, not the cardboard gauge that often comes with kits. If you want accuracy, use quality tools.
Caution—If float height needs adjustment, bend the float lever. Do not press against the needle when bending the lever. If necessary, remove the float and bend the lever/tang with a needle nosed pliers. Unlike many other carburetor designs, the BBD does not require a float drop adjustment.
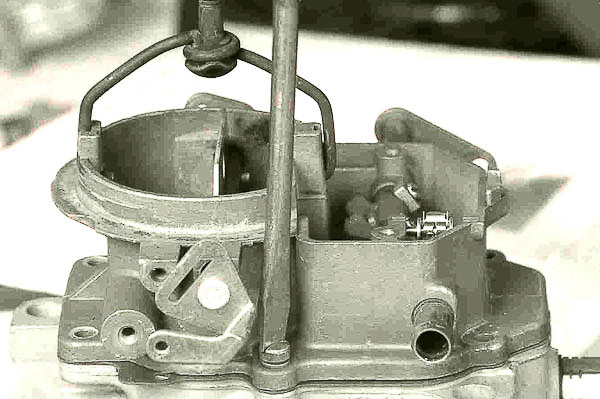
Once the float is set to specification, you can install a new air horn gasket and carefully fit the air horn to the main body. Before dropping the air horn into position, make sure the new check ball is beneath the accelerator pump in the main body well. Secure a couple of air horn screws lightly to keep the air horn in place at this stage.
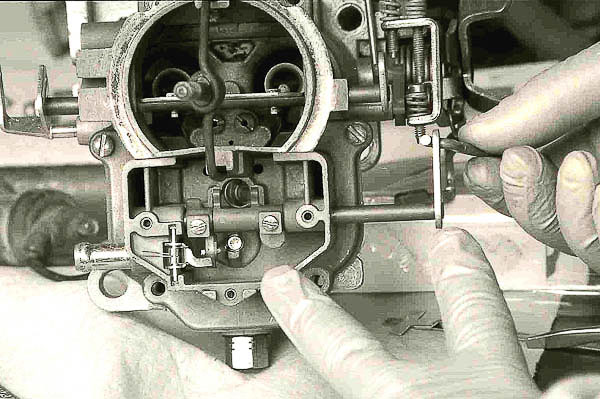
Hook the pump link into position. Use care here: The link must attach to the correct hole in the throttle linkage. A common error on the BBD carburetor is to hook the link into the throttle return spring hole.

Remove the lock plate from the metering rod lifter. Roll the lifter up far enough to allow installation of the power piston assembly and metering rods. Make sure the coil spring is inside the vacuum piston before setting the piston in its bore! Use extreme care and make certain the metering rods drop squarely into the main jets. Do not damage these rods!
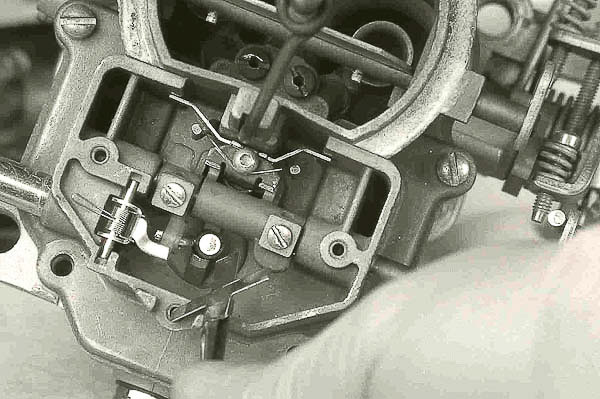
Metering rod lift arm is now in place above the vacuum piston and metering rod rack. Install the lock plate and screw as shown. This is the proper relationship of these parts. Note the hairspring that catches the backsides of metering rods. Power piston gap is set already. You can now set the accelerator pump height and metering rod lift height.
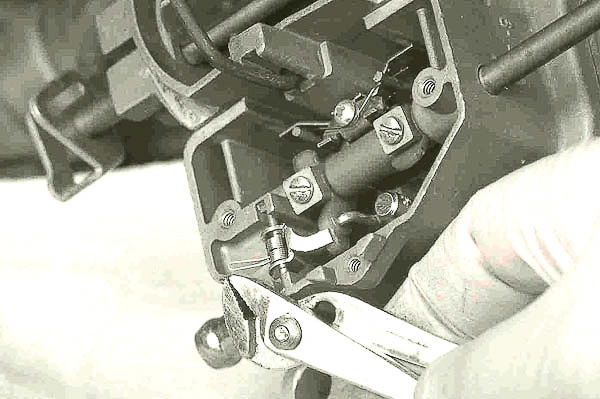
Vent lever is adjusted after the accelerator pump height and metering rod/power piston adjustment. I use a small ChannelLock pliers to bend the tab. This allows for proper movement and correct timing as the vent closes and opens. Specification for your Jeep application is in the carburetor kit.
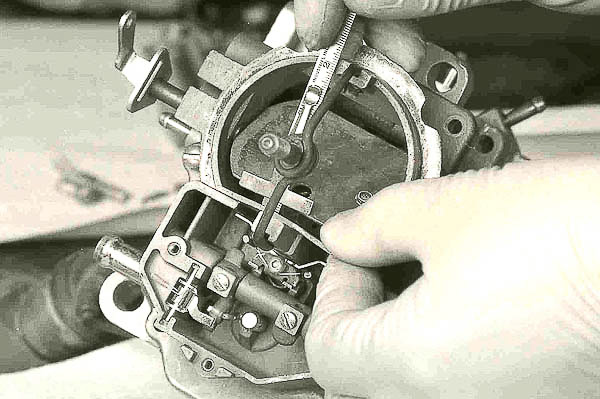
Choke valve specifications are given in valve-to-body gap or the choke valve angle, measured with an angle gauge. I use a metal T-gauge to set the proper gap. Instructions for adjustments and specifications are in the rebuild kit. This T-gauge measures to within 1/64th of an inch.
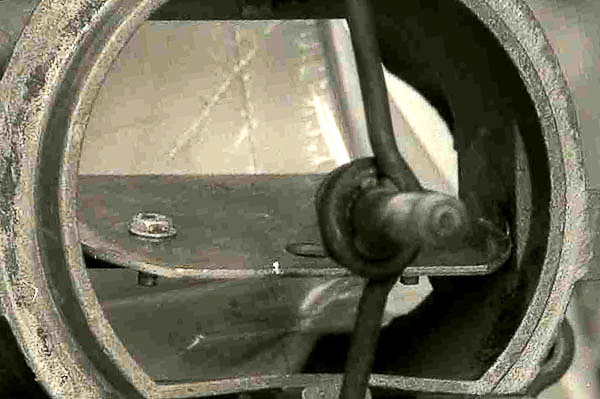
The choke valve is an important part of the cold start and warm-up cycle. When cold, the valve must close to the specification as noted in the kit instructions. The gap measured is at the top of the valve to the flat edge of the air horn’s bore as shown in the last photo. Here, the valve is partially closed, a position that would apply during choke pull-off phase or as the engine warms. An electrically actuated choke should stand straight up, reasonably fast, with the ignition switch in the ON position and the throttle open.

The vacuum diaphragm for the vacuum pull-off brake has an important function that effects cold-start and warm-up drivability. Test the device with a hand vacuum pump. Check for holding vacuum and the diaphragm’s ability to keep the valve open. A leaking diaphragm will not allow the brake to hold the choke valve open, causing over-enrichment of the engine, flooding and spark plug fouling.

Choke assembly and all linkage hooked up, the choke valve performance can be checked on the carburetor. Once again, hook the vacuum hand pump to the choke pull-off brake. With the vacuum off, check the choke valve position by opening the throttle to allow the valve to close. With the choke housing in its correct index position, the choke should close up. Throttle shut, pull vacuum on the brake, and note the gap setting of the choke valve. Compare this measurement to the specifications in the overhaul kit’s instruction sheet. Refer to the carburetor’s identification number.

The stepper motor is critical to BBD carburetor performance and maintaining correct air/fuel ratios. I have thoroughly soaked and cleaned the non-electrical segments of this device, using isopropyl alcohol. There is a gear rack in the stepper motor that gets gummy and sticks. Move the rack lightly as you clean this unit, freeing up the gear and rack teeth. This is a major source of performance trouble on the BBD! Cleaning and making sure the rack moves freely can often cure flooding and starvation problems.
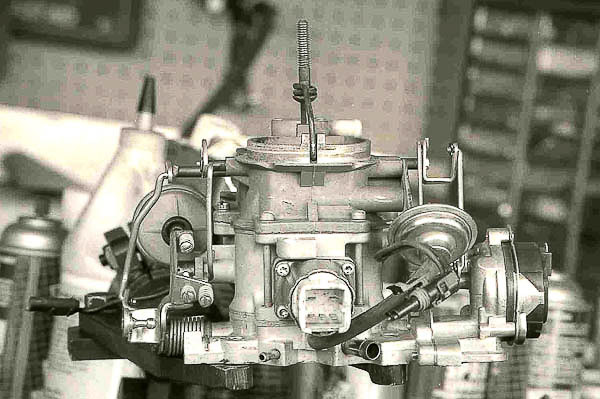
WOT switch, vacuum pull-off, stepper motor and Sole-Vac unit are now in place. Check remaining linkage measurements, comparing them to specifications and instructions in the overhaul kit data sheet. Make certain gaskets align and check torque on all screws. Be certain that the stepper motor, Sole-Vac and WOT switch electrical connectors are clean and straight.
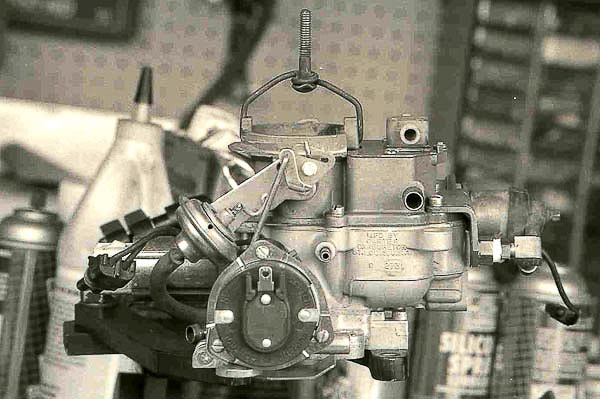
Stepper motor is seen behind the vacuum brake. (Sole-Vac is at the right of the carburetor body in this view.) Stepper motor needles have been soaked in carburetor cleaner, rinsed in water and dried. I cleaned the motor housing carefully with Coleman stove gas, avoiding the electrical connectors. This device needed attention: I freed up the rack rod, which was sticky. Install the stepper motor with a new gasket. Make certain the spring and needles are in their proper places!
Note—A sticky rack rod in the stepper motor and the clogged idle fuel pickup tube were two areas that created idle problems in the carburetor I have illustrated. I thoroughly cleaned and slid the rack in and out until it moved freely. I cleaned the idle fuel pickup tube carefully with a strand of wire and carburetor cleaner. (Never remove metal when using wire to clean out a tube or orifice. You do not want to alter the size of carburetor passageways!) A severe and chronic idle problem disappeared completely after this overhaul.
Tip: Perform Choke Testing on the Bench!
The choke is now in place with adjustments made. Sole-Vac and stepper motor installed, the carburetor looks complete. Air horn screws are all in place and secured snugly. Once on the engine, I will recheck screws after the engine has run for a while and warmed up.
I use Teflon tape on the fuel inlet elbow fitting. (Keep tape on threads, away from fuel passages.) The elbow fitting attaches to the needle/seat fitting. I tighten this elbow fitting securely while holding the needle/seat fitting with a wrench. When securing the elbow, do not over-tighten the needle/seat fitting. It threads into the carburetor main body, which is made of pot metal and vulnerable to thread stripping. Over-tightening the inlet needle/seat fitting will also alter the float setting on a BBD carburetor.
Test the choke thoroughly on the bench. I discovered that the choke was malfunctioning after mounting the carburetor on the engine. Although the unit might have worked for some time, it was sensible to install a new choke cover/element. I installed the new choke cover and adjusted the unit to specification on the engine—no easy feat.
Choke testing could have been done on the bench with a 12-volt electrical source. (Attach 12 volts ‘+’ to the choke terminal and the ‘-‘ ground to the carburetor body.) My hearty recommendation: With the carburetor assembled, test the choke unit’s function on the bench before installing the carburetor on the engine.
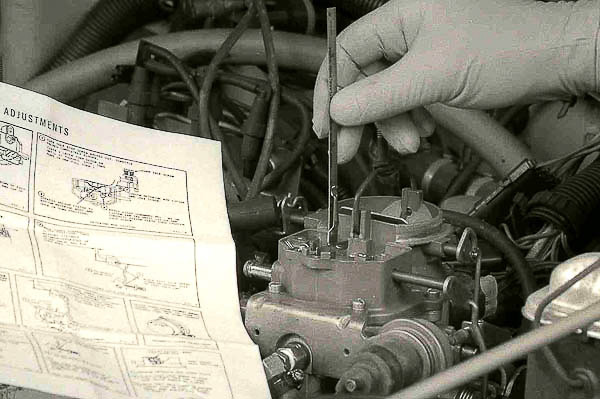
You can adjust the pump height and metering rod lift with the carburetor on the engine. I am sharing this point, as you may need to make this adjustment in the backcountry. Secure the lock plate screws and confirm your adjustments. Make certain the gasket seats and seals properly when you put the rollover check valve/bowl vent cover back in place. The instructions from a carburetor kit should be in your tool box!

Hoses attached, the installation is nearly complete. Be sure that the throttle valve opens and closes freely without binding. Install the two OEM throttle return springs in their original locations. A new base gasket installed, nuts are torqued to specification with Loctite 242 on threads. All linkage is adjusted properly with new clips on the link arms. Correct power valve and accelerator pump settings have a large impact on performance. This unit is now ready to run.

Engine fully warmed with the choke valve wide open, I can now set the idle mixture. Install the air cleaner assembly or tape off air cleaner vacuum lines before attempting to adjust the carburetor. Otherwise, you will experience vacuum leaks and not be able to accurately adjust the mixture. On this 258/4.2L engine, despite the busy appearance of the installation, the idle mixture screws are accessible with the air cleaner assembly in place. Note the wire bundle exiting the Stepper Motor (back of carburetor) and myriad vacuum hoses. Protect the wires and hoses.
‘MCU’, the Distributor and Feedback Devices
The Micro Computer Unit (MCU) is constantly reading engine functions. On BBD carbureted models that have the MCU, this microprocessor receives a host of signals from various engine-sensing devices. The MCU with a closed-loop, feedback carburetor was a step toward EFI.
In 1991, after years of CJ and YJ 4.2L engines with BBD feedback carburetors, the Jeep YJ Wrangler adopted the 4.0L MPI/EFI powerplant. The Wrangler’s 2.5L four had earned TBI in 1987; it also advanced to MPI/EFI in 1991.
The late CJs and the YJ 4.2L engines equipped with BBD carburetion depend upon the MCU and thirteen sensing devices for proper engine performance:
1) The coolant temperature switch
2) The thermal electric switch
3) 4- and 10-inch/height vacuum switches
4) An oxygen sensor
5) The Wide Open Throttle (WOT) Switch
6) A Closed Throttle Switch (only on four-cylinder models—without the BBD carburetor)
7) A knock (detonation/ping) sensor
8) The ignition distributor
9) Mixture Control Solenoid (“Stepper Motor”)
10) Idle relay
11) Sole-Vac Throttle Positioner
12) Gangs of upstream and downstream solenoids
13) The PCV solenoid
Add to this the vacuum hoses and electrical wiring that support these devices. The thermal air cleaner is an emission device in itself. So is the evaporative emissions system, which spans from the fuel tank through the vapor canister to the carburetor. Each of these devices must interface properly with each other. Sub-systems must function reliably.
If you overhaul the carburetor with certainty that it should perform like new, and if the performance is still short of optimal, carefully consider and troubleshoot these devices, hoses, switches and electrical connectors. The BBD carburetor is only part of the 4.2L six’s interactive fuel-and-spark management system.
The carburetor overhaul depicted turned a high mileage, stalling 4.2L engine into a dependable Jeep 4×4. Compression being adequate and uniform, tuning was not a problem. Start-up is immediate, hot or cold. Cold start requires nothing more than stepping down on the gas pedal and releasing it (to set the choke) then cranking the engine. On warm restart, the engine fires with just a bump of the key.
Acceleration is impressive, the highway mileage has improved, and the engine is frisky for its 142,000 miles and overall condition. This was well worth the cost of a carburetor kit! Even the blow-by has slowed considerably, as the air/fuel ratios returned to normal, and the cylinders are no longer fuel washing. While the Mopar MPI/EFI kit would clearly add more versatility and horsepower to any 4.2L engine, this inline six performs very well and will easily serve until engine overhaul time. At that point, perhaps a Mopar EFI/MPI conversion would be a consideration.
Rule Out Ignition Problems
Before condemning the carburetor, make sure the ignition works well. Spark plugs should be clean and gapped properly. The spark plug wires, conventional coil, cap and rotor must be in good shape. Be sure the distributor advance mechanisms function properly.
Spark wires and the coil can be readily tested for ohms resistance readings. If these components test okay, the other devices associated with ignition performance include 1) the ignition module (a common source of trouble on Motorcraft ignitions), 2) the MCU (microcomputer unit) and 3) an array of emission control devices with solenoids and vacuum switches.

You can check the distributor advance unit performance with a conventional timing light and a common hand vacuum pump. With the vacuum advance hose disconnected and taped, hold the timing light on the timing mark while increasing the engine speed. The centrifugal spark advance unit should show a steady timing advance to 2000 crankshaft rpm. (Stay safely away from the engine’s fan and do not exceed 2000 rpm during this test.)
To test the vacuum advance, turn the engine off and disconnect the three-wire connector at the 4- and 10-in/hg switches on CEC systems. (See the underhood emission decal for CEC information.) Hook a hand vacuum pump to the vacuum canister on the distributor. With the engine at an idle, apply vacuum to the canister. There should be smooth timing advance at the marks on the crankshaft damper and a noticeable increase in engine speed as you increase the vacuum supply. The vacuum should hold steadily if the diaphragm is in good condition.
Note—If you need to replace the vacuum canister, note that these units have adjustable diaphragms. Carefully count the rotations as you turn the original vacuum canister adjustment screw to seat the diaphragm. Match the new diaphragm to this setting.
The BBD Carburetor Versus Mopar MPI Conversion
I recommend the use of EFI systems, especially the well-conceived, 50-State emission-legal Mopar MPI Conversion kit. For the YJ owner expecting peak horsepower output, maximum fuel efficiency and optimal performance at all altitudes, EFI can be worth the cost! Many 258/4.2L Jeep engines have undergone the Mopar fuel-and-spark management conversion with highly satisfactory results.

The AMC/Jeep-design inline six dates to the mid-1960s! Originally a Rambler passenger car engine, the 232 cubic inch displacement, seven-main bearing design was outsourced by Jeep Corporation for the 1965-up J-trucks. The 2.5L AMC/Jeep four, 258/4.2L six and the 242/4.0L (4.0L shown here) engines share common features with the 232. A proven overhead valve, two-valve per cylinder “pushrod” design, the 232/258/242 platform has provided Jeep vehicles with more than four decades of reliable, efficient powerplants! Its most efficient and advanced six-cylinder form is the MPI 4.0L package.

The intake plenum cutaway of a 4.0L manifold shows why MPI brings out the full potential of 4.2L and 4.0L engines. Port fuel injection eliminates the inherent fuel distribution problem of inline engines with carburetors or TBI. Uniform fuel delivery at each cylinder allows more control of air-fuel ratios plus a cleaner tailpipe. This was the measure that turned a superior engine into the most reliable, versatile powerplant in Jeep history. MPI engines will often run well beyond 200,000 miles.
In my experience with the MPI systems, an otherwise purely stock 258 engine can gain up to 50 additional horsepower and several miles per gallon in improved fuel efficiency from the retrofit of a Mopar MPI/EFI conversion. A clean-burning 258 with Mopar MPI/EFI easily meets 50-State emission requirements and is fully legal. Jeep CJ and 1987-90 YJ Wrangler 4.2L owners will benefit from this Mopar Performance conversion package.
EFI conversions are not for every builder. Cost may be prohibitive. For some, there is another type of engine planned for the next phase of the Jeep’s life. Regardless, many owners want to stay with carburetion and also meet emission compliance. Carburetor retrofit kits that meet 50-State emissions requirements are difficult to find. Many Jeep owners either restore the factory BBD carburetor and emission system or convert to an emission legal EFI or MPI system.
While EFI adds horsepower and distinct high altitude improvements, the carbureted 4.2L six with BBD carburetor (even those loaded with OE California emissions equipment) can run well. For nothing more than the cost of a quality Mopar carburetor kit, a new Echlin choke unit and several hours of labor, the exacting carburetor overhaul depicted here did pay off. You may want to try this before condemning your CJ or YJ’s original equipment emissions hardware or the BBD carburetor!
Caution—If you plan an EFI or MPI (multi-point injection) conversion, make certain the engine is in good condition. Compression, oil sealing, valve lift and bearing clearances must be within specification. As for longevity, an EFI/MPI engine will typically outlast a carbureted engine, as air/fuel ratios are more constant and leaner overall. This prevents “fuel wash” of cylinder walls, a significant cause of engine wear (cylinder taper and ring failure in particular). Weigh the options!
Copyright 2011 © Moses Ludel…Enjoy this comprehensive, color-illustrated article and photography by Moses Ludel. The article is available solely at the 4WD Mechanix Magazine website and can be viewed here as often as you like. If you wish to share the article with friends or professional colleagues, please refer them to 4WD Mechanix Magazine website: www.4WDmechanix.com. As copyrighted material, this article and the photography cannot be copied or distributed in any other form.—Moses Ludel
