4.2L models use only a fuel gauge sender at the tank pickup. Although most installers hasten the MPI conversion with the use of the external fuel pump supplied, some owners may have a need for replacing the OE fuel tank and prefer the in-tank, 1991-95 combination fuel pump/sender module.
When sourcing an electric fuel pump, be aware that the tank size and sender unit must match. The 15-gallon and 20-gallon fuel pump/sender modules will not interchange—nor will the OE skid plates or straps for these tank types.
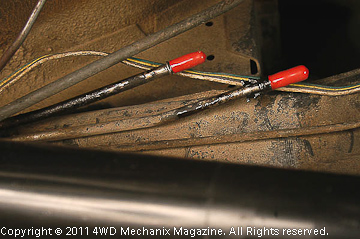
The four-cylinder TBI engines in 1987-90 YJs use a higher pressure fuel delivery system. On these applications, the engine supply and return hoses and pipes look more like the MPI system than the 4.2L carbureted engines. Conveniently, the supply and return lines run down the left frame rail, directly from the fuel tank and in-tank pump to the engine. There is also an OE fuel filter mounted at the frame rail.
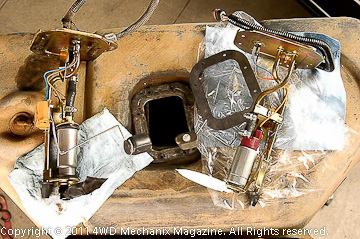
The original 2.5L TBI system’s in-tank, electric fuel pump may not provide the pressure output and volume needed for MPI. If not, the ’91-’95 YJ fuel tank has the same pump/sender mount as the ’87-’90 models. A 1991-95 fuel pump (right) will fit the earlier YJ fuel tank. Fuel tanks for the 1987-95 models were of 14-15 gallon capacity (steel) and the plastic 20-gallon capacity tank. The correct fuel pump relay and signals from the PCM must power up the fuel pump. This is not a simple key-ON/key-OFF fuel supply!
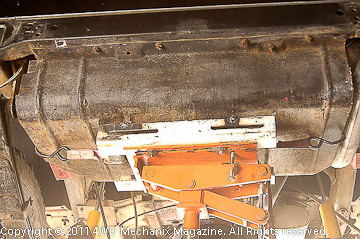
Always bleed pressure from an MPI fuel system before disconnecting fuel lines. (1987-90 4.2L carbureted and 2.5L TBI engines do not hold residual pressure in the lines after the engine is shut off. MPI does hold high residual pressure.) On all models, disconnect the negative (-) battery cable before disconnecting fuel lines and removing the fuel tank. Safely siphon fuel from the tank before dropping the unit. Always support the tank (as shown) to prevent stretching or weakening fuel hoses.
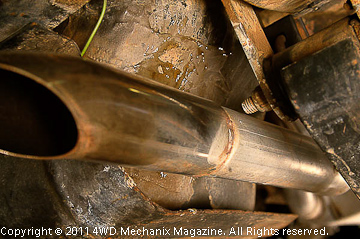
This 20-gallon plastic tank has damage from heat. The exhaust tailpipe got too close to the tank or too hot at some point in the vehicle’s history, causing the charred area to leak! Fortunately, leaking fuel did not ignite on the hot tailpipe. A previous owner attempted an epoxy repair, which worked for a while. Here, I will replace the tank with a unit from a 1995 YJ. 20-gallon tanks are in demand. It took several hunts to find a quality, recycled unit.

When removing the fuel tank, always support the skid plate and tank. Access to fuel hoses and filler neck is above a plastic shroud. The push clips that retain the shroud can be reused if you carefully pry the pin stem from its sleeve. Loosen the filler neck hose and fill vent hose clamps. I disconnect these hoses at the fuel tank end and remove both hoses. Use rags to prevent any fuel from spilling. There is nothing worse than gasoline in your armpit! Wear eye protection.

Remove the fuel tank and skid plate as a unit—do not release the straps that hold the fuel tank to the skid plate. I use a transmission jack and tie straps to support the assembly before loosing the skid plate from the frame. Lower the assembly toward the floor, disconnecting wires and necessary hoses as they become accessible. Loosen the hoses from their pipes: fuel supply, fuel return and vent hoses. At floor level, the fuel tank straps can be separated from the tank. Lift the tank free of the skid plate.
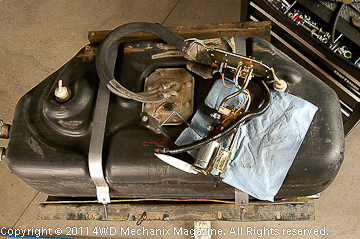
The 1991-95 fuel pump fits up like the ’87-’90 TBI type. At the right is a Mopar Reman pump assembly that will perform like new. A Wrangler depends upon its fuel pump in the worst possible environments, and here, I will use no other product than either a new or rebuilt Mopar assembly. This remanufactured pump includes the fuel gauge sender, the electric pump, a new sock filter and a mounting gasket. Pre-tested for volume and output, the pump will deliver new-vehicle levels of performance.
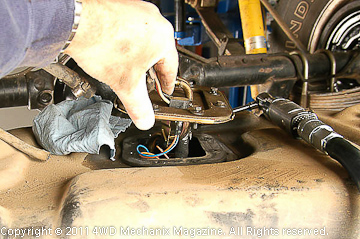
The fuel pump can be replaced once the tank is low enough. Here, I have loosened the fuel pump screws to lift the pump above the old gasket. A new gasket is supplied with the Mopar Reman fuel pump. Install an in-tank pump with great care. Protect hoses, wires and the tank from sharp edges and vibration. Install the gasket squarely, and torque screws uniformly. Imagine how vibration and trail flexing might affect these components. Route hoses safely in the original equipment manner.

If the pump is removed with the tank, loosen hoses and disconnect the fuel pump/sender module’s wiring harness at the clip away from the tank. (Do not try to pry the wires loose at the sender!) I am removing the tank for replacement, so the pump/sender can actually stay in place, its hoses and harness disconnected. This plastic 20-gallon YJ tank is charred at the tailpipe area and leaks. It must be replaced.

New genuine Mopar tank straps and skid plate hardware were necessary. This is the point where you have access to remote parts. A job like this one needs to be right the first time. Fuel leaks on a rocky forest trail, a loose strap or skid plate, wires frayed or detaching—each of these prospects would be challenging and possibly life threatening. Take your time, and do the fuel pump and tank installation properly. Hook up hoses carefully. Replace any worn parts with OE-caliber components.
