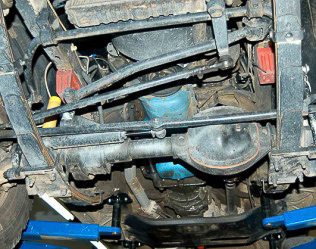
Despite its relatively small, 7.125” diameter ring gear, the Dana 30 is a sturdy axle assembly. Bearing sizing, tube castings, center housing and axle shaft diameters have withstood rugged use and weathered the torque of V-8 engine transplants and tires to 33” diameter.
For a Dana 30 axle to handle an ARB Air Locker, I recommend aftermarket, heavy duty axle shafts like Superior Axle & Gear’s “Super 30” package. This upgrade provides hefty, high tensile strength axle shaft assemblies with DuraCoat® finish, rolled 30-spline axle shafts and large Spicer U-joints. These precision-made axle shafts feature “torque equalized” loading from left-to-right side, crucial when a locker delivers true 50% torque to each wheel. This assures that the shorter shaft has similar ductility (“give”) to the longer shaft.
My differential of choice for this buildup is the ARB Air Locker, a traditional solution for maximum traction. Manually locked to provide the driver with control and discretionary use of the locker, the ARB Air Locker system has well-tested features and stamina. The air compressor can actuate either one or two differentials, delivering sure traction with maximum reliability. The Superior “Super 30” with ARB Air Locker offers stamina, full traction and versatility, providing the XJ Cherokee with a variety of on- and off-pavement gains.
Building a high- or low-pinion Dana 30 differential is similar for all applications. However, there are differences surrounding the YJ Wrangler and ’84-’90 XJ Cherokee’s use of a two-piece right side axle shaft disconnect system. (Differentials on ’91-up XJs are still the reverse rotation design until 2000-2001 models.) All TJs, Scouts and Broncos use a low-pinion Dana 30 design with one-piece inner axle shafts at each side.
The other significant difference between Dana 30 axle types is the use of either a shim pack or a collapsible spacer for pinion bearing preload adjustment. The ’99 XJ Cherokee axle depicted in this buildup uses the shim pack. Follow the highlights described to assure a safe, reliable installation for your 4×4!
My aim is to “demystify” this work and make it possible for Jeep owners and shops to perform axle and differential work with professional standards.—Moses Ludel
I set up my first Jeep axles in the late 1960s. The years since have revealed many ways to simplify this precision work, including the use of more common, less costly tools.
Does your Jeep YJ Wrangler need an axle restoration? Do you want to install a locking differential like the ARB Air Locker? My step-by-step guideline for rebuilding a Dana 30 “high-pinion” should prove helpful.
Use a factory workshop manual to disassemble the hubs, steering knuckles and axle shafts. Once you reach that point, follow my illustrated steps. They will take you through the disassembly, rebuilding, proper assembly and close tolerance fit-up of the differential and ring-and-pinion units.
As a bonus, I have included an ARB Air Locker installation. ARB Air Locker differential units deliver exceptional traction. The device meets severe off-pavement driving demands…

Step 1: Remove the differential cover to drain the oil. Despite overall good condition of this Dana 30 front axle, the oil revealed interesting facts: cooked and reeking oil suggested no oil change in 95,000 miles. Snug factory preloading on the differential carrier had kept the bearings plenty warm although all parts were working well. Solvent cleaning of empty housing will remove residue.

Step 2: I mark or scribe the components as they come apart. This assures an accurate reading after parts cleaning. Note and maintain the position of hubs, differential bearing caps and other close fit-up components. Removal of the axle shaft nut and three hub retainer bolts permits hub removal. I use a two-jaw puller to slide the unit bearing hub assembly from the axle shaft. Light puller pressure does the trick, as the splines are straight cut. Hold the axle shaft on center as you slide it out. (Note: XJ Cherokee axle depicted has link-and-coil suspension. A YJ Wrangler uses leaf front springs. All other axle features are similar.)
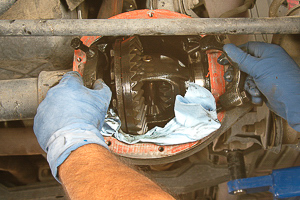
Step 3: Note the position of the bearing caps top-to-bottom and side-to-side. These caps have “Y” marks that match a horizontal or vertical “Y” on the axle housing face. Caps must go back in their original positions. On this differential, the carrier bearing preload is tight, and I have no concerns about the assembly falling out. Rarely will the carrier roll loose without either prying it or spreading the housing.
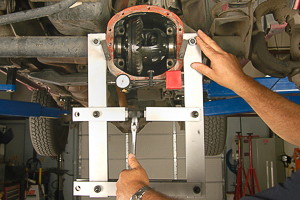
Step 4: If you want to do factory-level work, use factory level tools! I use a Miller-built axle housing spreader to unload this tight carrier fit. The maximum spread for a Dana 30 is 0.015”, which I monitor closely with a dial indicator placed laterally between the spreader arms. Overloading the axle casting with a spreader can damage the housing and leave it permanently stretched. Even with the use of this spreader, light prying with two pry bars was necessary. Be prepared to catch the differential and ring gear…Do not let it fall to the ground and get damaged!

Step 5: I have a tool to hold the pinion flange but demonstrate an acceptable alternative here. The hefty pipe wrench grips the flange on flat surfaces, well behind the U-joint bearing yokes. Do not damage the bearing saddles or yokes! By using an air impact gun, the tension on the pipe wrench is minimal, just enough to prevent rotation. Air tools can actually reduce risk of damage to parts. I use an air impact hammer (and safety goggles!) with a blunt-pointed punch to drive the pinion shaft forward and loose from its rear bearing.
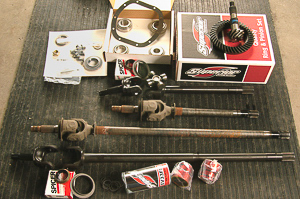
Step 6: This is the Superior Axle & Gear ‘Super 30’ package. Note the difference between the factory 27-spline axle shafts and these beefy, 30-spline upgrades! Spicer U-joint size and stamina also increase. The ring-and-pinion gear set is a 4.10:1* upgrade from 3.55:1 to accommodate 33” diameter tires on an XJ Cherokee. On a YJ Wrangler with overdrive manual transmission, 4.56 gearing would be advisable for 33″ tires. (A three-speed automatic would do well with 4.10:1 gears and 33″ tires.) Superior Axle & Gear’s Overhaul Kit includes vital bearings, shims, sealant, thread locker, a new pinion nut, seals and tooth contact pattern paste.
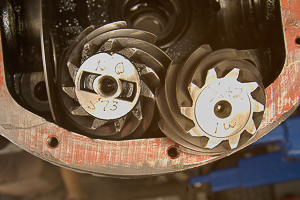
Step 7: I use special drivers and a solid hammer to remove the forward and rear pinion bearing cups. Marks at the pinion gear head provide a crucial reference. The OEM shaft at left shows a plus-0.003” mark. This says that the factory shim pack is 0.003” thinner than a zero or “0” stack would be. (This is necessary to pull the gear back from the axle centerline 0.003″). The new gear at right calls for only a plus-0.002” pull-back. This means that the new gear head needs to ride 0.001” closer to the axle centerline than the original gear did. I will add 0.001” to the OEM forward bearing shim stack’s thickness. This will place the new gear at the factory-determined pinion position.
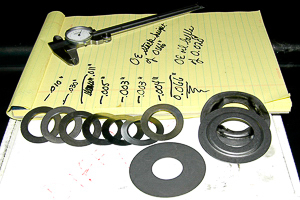
Step 8: I install a new oil baffle, as you seldom can remove the forward bearing cup without damaging the baffle. This baffle is part of the shim stack, as it fits between the forward bearing cup and housing bore. Most often, a new baffle is identical in thickness to the original factory baffle. Here, I measure the shim stacks carefully and account for the 0.001” increase in shim stack thickness to move the pinion gear head forward and deeper into the axle housing.

Step 9: The cleaned original oil slinger fits between the bearing and gear head shoulder. The bearing presses into place with the use of a sleeve tool and simple bottle-jack press. Oil the shaft to reduce friction and make sure the bearing seats squarely and firmly. Note that the sleeve tool presses only against the inner collar of the bearing—away from the cage.
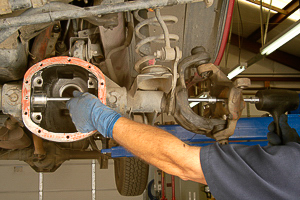
Step 10: Before installing the carrier, I replace the axle shaft seals. My technique is simple. Using appropriate sockets that will not damage the seal lips or shell jackets, I attach a long extension(s). Centered in the axle tube, the socket, extension and a sand-filled plastic hammer will drive the old seals out readily. Select the right socket to clear the new seal’s lip, a socket that will seat inside the steel shell. Tap squarely and drive the new seal to its seated position. You can use a special spreader to install both seals at the same time, but the socket-and-hammer method will work. New seals should be sealant coated at the outer jacket. Most seals come factory coated with sealant.
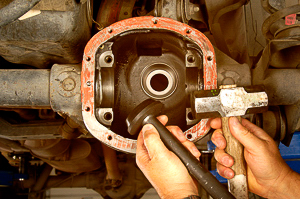
Step 11: This special factory-level bearing cup driver eliminates grief when driving the cups into place. The baffle and any added shims will go in the housing bore with the baffle’s indentation facing away from the bearing. Make sure the cup drives straight into the axle housing bore and that any needed shims are flat and squarely in the bore.
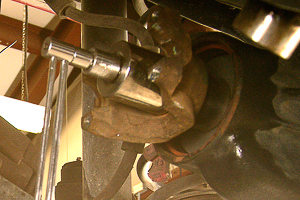
Step 12: Here, I check the pinion bearing preload. The flange is in place but not the seal. For trial fitment, you can carefully grind the inner collar of an old bearing cone until the bearing slides with finger pressure over the shaft. This dummy bearing can enable testing of the preload shim stack, which fits on the shaft’s shoulder just forward of the rear bearing (the same location where a crush sleeve would fit). Tighten the flange tightly with an old pinion nut then rotate the shaft with an inch-lb torque wrench. I made a final rotational torque, with a new bearing installed, of 23 inch-lbs, ideal for this application. Preload specifications are found in a Jeep factory or professional service manual.

Step 13: Bearing preload and pinion depth in the axle correct, I install the new, coated pinion seal using Super 300 sealant for insurance. I also coat the splines and flange face where it seats against the new oil slinger. Loctite 242 on a new self-locking pinion nut helps seal as well. Torque set to 200 ft-lbs or higher for this application, the pinion shaft rotates at just the right (23 in-lb in this case) preload. Position of gear head is correct, using the OEM and new pinion gear head markings to determine shim pack thickness.
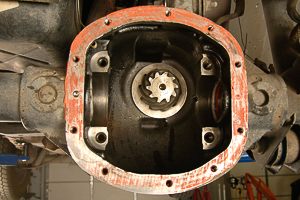
Step 14: Inner oil slinger is visible. This is the original slinger, cleaned and installed with the new forward pinion bearing cone. The oil baffle and shim, between the forward bearing cup and housing bore, now determine the pinion gear head’s position. There is 0.001” more stack thickness than the original pack to adjust for the markings. A tooth contact pattern will verify the accuracy of this shim adjustment. On a Dana integral axle rebuild, take your time and adjust the shim stack correctly. Assemble the axle only once if you can!
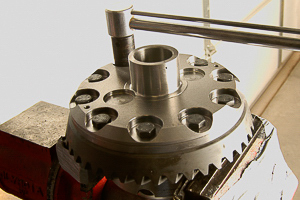
Step 15: I now install the new ring gear on the new ARB Air Locker carrier. The gear fits up snugly and on center, with the bolt holes aligned. I use the new Grade 8 bolts provided by Superior Axle & Gear, using Loctite 242 or 271 to prevent loosening. (I prefer red Loctite 271 for hard steel-to-hard steel thread fits like this one.) First, tighten the bolts in cross—gradually, to prevent risk of gear to carrier binding. Once cinched and flat, continue tightening in cross until the final torque specification is met. Recheck torque after the parts have settled for a few minutes.

Step 16: ARB Air Locker makes the Dana type carrier bearing installation easier than stock by placing the shims outboard of the bearings. This enables pressing the bearings into place carefully, square with the case’s shoulders. To avoid damage to the new bearings, do not press against the bearing cages! Oil the flanges and press only against the inner bearing collars as shown here. The lower bearing is supported on its collar as well. Seat the bearings firmly and securely.
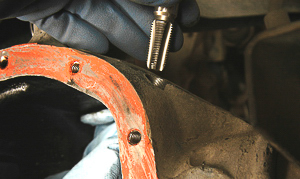
Step 17: Follow ARB Air Locker instructions carefully. I found this location to work best for the air fitting in the bulkhead. This is away from the axle housing’s link arm support (casting) and in an area that will not weaken the housing. Cover all areas of the housing with rags to keep metal filings from contaminating the fresh assembly or bearings! I vacuum the entire area carefully after drilling and tapping the hole. Use care to avoid damaging or breaking the tool steel pipe tap!
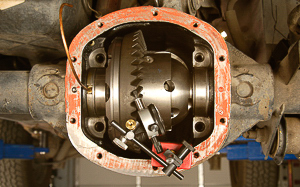
Step 18: Following ARB Air Locker instructions for locating the shims, you will need a dial indicator to check ring gear backlash before and after preloading the case bearings. For final fit-ups, I use the axle spreader to install the carrier. If you stack the shims properly and follow the factory preload measurement (0.015” in this application), the final ring gear backlash with preloaded carrier bearings will be correct. On a Dana integral axle, the axle housing pressure determines the bearing preload. Do not damage or misalign the shims.
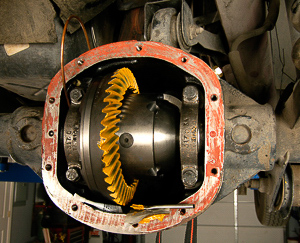
Step 19: Paste provided in the overhaul kit is now applied to the ring gear teeth. I place a strap over the pinion flange’s backside and maintain light pressure on the pinion shaft while rotating the carrier with a box-end wrench at the ring gear bolt heads. The light pinion drag helps make better contact impressions on the ring and pinion gear teeth. Read the drive and coast patterns after rotating the carrier in each direction. Here, I confirm that the pinion’s location and ring gear backlash have produced a correct pattern. (Illustrations of the correct pattern are found in a shop manual.)
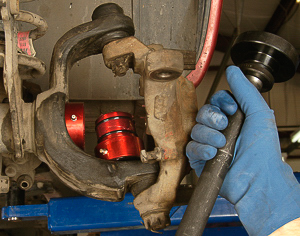
Step 20: Axle tube seals from Superior Axle & Gear help prevent debris and water from entering the open axle tubes. These anodized aluminum sleeves have a grease cavity and fitting for periodic greasing. I use a driver tool to squarely insert these sleeves into cleaned axle tube ends. Grease the O-rings first, then drive straight.
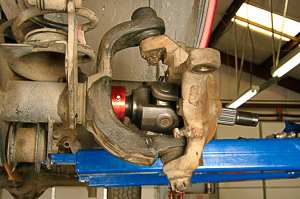
Step 21: Superior Axle & Gear axle shafts are obvious! These rugged shafts and U-joints elevate the stamina of a Dana 30 to ‘Super 30’ status. When you purchase the ARB Air Locker, match the spline count. Here, the 30-spline version works with the Super 30 kit. ARB’s Air Locker is available in both 30-spline and 27-spline (original) Dana 30 applications. More splines with a larger shaft diameter indicate a stronger axle shaft.

Step 22: I carefully bend the air supply tube to reach the bulkhead fitting. This routing clears the ring gear sufficiently and fits within the housing cavity. Protected and out of harm’s way, the tube will work reliably for the life of the system. Always use care in handling the ARB Air Locker’s air housing and tube. The tube is durable but made of malleable copper. It will scratch and pinch readily. Shape and route the tube carefully. Keep tubing away from any moving parts!

Step 23: Install the wheel hubs, using Loctite 242 on clean bolt threads. Replace any fatigued parts with OEM pieces, including these bolts if necessary. Torque bolts evenly and to specification. Install the axle shaft’s end nut and torque to a minimum of 175 ft-lbs. I use an air impact gun to approximate this setting. Final torque verification with a torque wrench, and installing the castellated retainer with a new cotter pin, can take place with the wheels and tires on the ground. Install rotors and calipers.
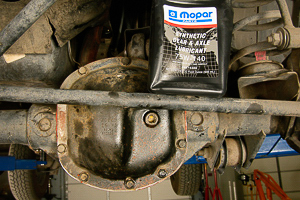
Step 24: There are many types of quality lubricants, including synthetics. I use Jeep/Mopar’s own 75W-140 Synthetic Gear Lube for this ARB Air Locker system. This oil is available at your local Jeep or Chrysler dealership. ARB Air Locker does not require friction modifier, as this is a mechanical locker that does not have friction plates.

Step 25: Hub-to-hub, this is a fully renewed and upgraded Dana 30 axle. At 95,000 miles, the unit was easily rebuildable. Upgrades from ARB Air Locker and Superior Axle & Gear have made this unit better than new. For a YJ Wrangler, a 4-inch lift permits use of 33″ diameter tires. 4.56:1 gearing would be optimal with a manual overdrive AX-5 or AX-15 transmission. 4.10:1 gears work well for the 3-speed automatic.
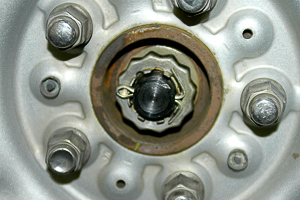
Step 26: On the ground with stock wheels mounted, I check the axle end nut torque before installing the anti-rattle spring, retainer and a new cotter pin. Corrosion of these retainers is common. Here, I install new, genuine Mopar/Jeep retainers. Both axle nuts now torque’d properly, the axle is ready for the air supply hook-up to be fully operational! With the addition of a rear axle build-up, which must include matching the ring-and-pinion gear set ratios, the job will be complete.

Step 27: ARB Air Locker installation kit includes a new compressor. This package will be installed with dual ARB Air Locker rocker switches and a dash panel. ARB Air Locker makes a high quality air system with optional braided hoses for the axle housing hookups. The wiring harness (shown here) is exceptional. These components complete the ARB Air Locker installation.
Copyright 2010 © Moses Ludel…Enjoy this comprehensive, color-illustrated article and photography by Moses Ludel. The article is available solely at the 4WD Mechanix Magazinewebsite and can be viewed here as often as you like. If you wish to share the article with friends or professional colleagues, please refer them to 4WD Mechanix Magazine website: www.4WDmechanix.com. As copyrighted material, this article and the photography cannot be copied or distributed in any other form.—Moses Ludel
