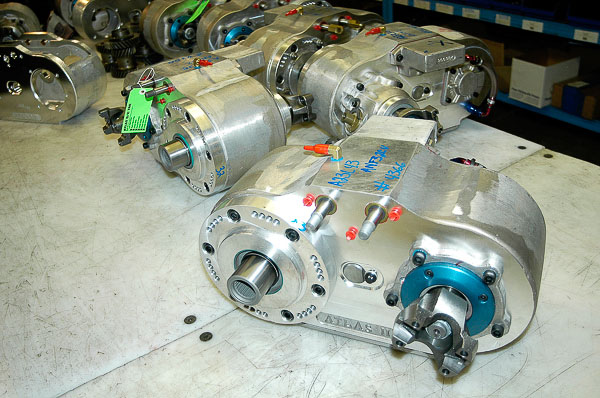
Low range is a crucial part of the Jeep four-wheel drive system. The ratio in low range determines the off-road tractability of your Jeep YJ or TJ Wrangler. Over the many years of Jeep production, common Jeep low range ratios have been in the 2.03:1 to 2.72:1 span. With oversized tires and taller axle gearing to meet fuel efficiency and emission requirements, low range has become a focus for aftermarket upgrades.
Ratios like 4:1 are now a norm, including the OEM Wrangler Rubicon transfer cases. Conversions to these ratios are available for CJ-era Dana 300 and the popular chain-drive NP/NV231 units of the YJ/TJ Wrangler and XJ Cherokee eras. For many, a gear ratio change is sufficient, but for those seeking a more rugged, higher stamina transfer case, the Advance Adapters Atlas II retrofit has become practical. If your Jeep requirements include a major increase in stamina, horsepower or torque, consider the Atlas II option from Advance Adapters.
A variety of Atlas II ratios are available, the most popular for trail running would be the 4.3:1 or 5:1 low range options. (Direct remains 1:1 ratio.) Racers will like the high performance upgrade pieces now available for the Atlas II, good matches for the 500-plus horsepower of rock crawlers and desert race vehicles. Click here to see the Advance Adapters online catalog and Atlas II details! Note the split shifting options for 2WD/4WD.
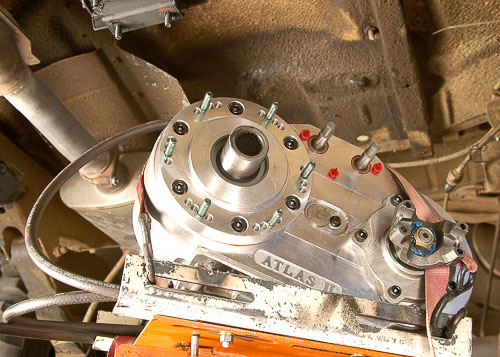
Atlas (1): Advance Adapters’ Atlas II transfer case is a valued accessory for severe off-pavement use. An extremely rugged, gear drive unit, the Atlas II is available in several low range ratios. The unit shown here boasts a 4.3:1 low range. It can be “clocked” to fit in one of four angle settings. Clocking is used to match factory bolt patterns and to achieve more ground clearance in extreme four-wheeling machines. Here, I have installed studs to place the Atlas II at the stock rotation for a YJ or TJ Wrangler NP/NV231 model.
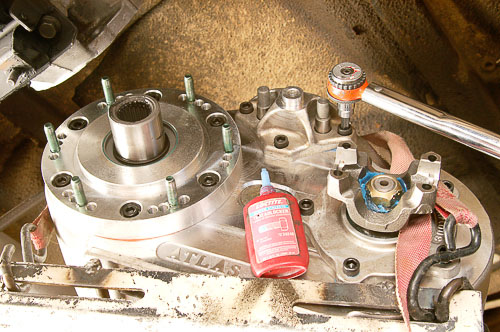
Atlas (2): The support bracket for the shift rails fits neatly over the rails. Housing and bracket are high tensile strength aluminum. I use Loctite 242 on hex-head screws and torque them to specification. Despite the aluminum housing, the hefty gears and shafts make the Atlas II a hefty unit to handle. The transmission jack eases installation and prevents expensive parts damage.
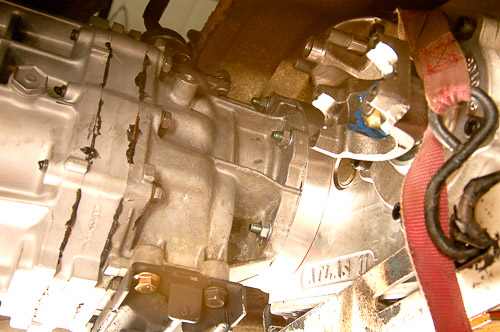
Atlas (3): Tilted and aligned carefully, the Atlas II moves readily onto the 23-spline output shaft of the AX-15 transmission. During the rebuild process, I cut the output shaft to achieve proper stick-out length. (This is no longer necessary with many of the Atlas II installations. See installation instructions provided by Advance Adapters.) With proper stick-out, the installation is identical to fitting a stock transfer case.
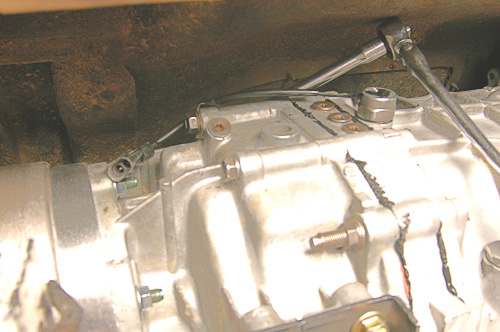
Atlas (4): Advance Adapters provides locking nuts for the new studs supplied. Five of the six nuts can be readily reached with either a box-end wrench or crow’s foot socket. Use Loctite 242 for insurance and secure nuts to torque specification, uniformly and evenly. Make sure the unit is flush and firmly attached. This top nut is accessible with a ratchet, extension and socket.
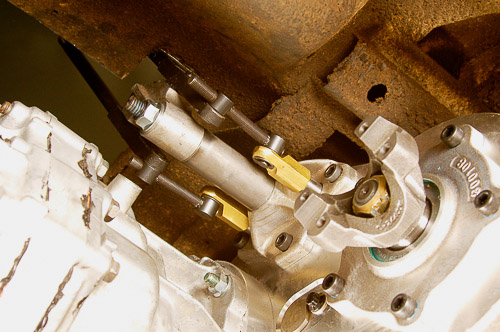
Atlas (5): Advance Adapters’ Atlas II transfer case with twin levers offers a number of unique driving modes in high and low range. Here, the linkage is in position with only minimal modifications to the YJ floorboard. Two levers provide 2WD High, 4WD High, 2WD Low/Rear Drive, 4WD Low (both axles driving) and 2WD Low/Front Drive only.
Note: Shift rods (above) are trial fitted at this stage. Final fit will include heat shrink tubing on each shift rod (between the pivot studs). This will permit necessary rod movement while preventing the rods from unthreading or coming loose.
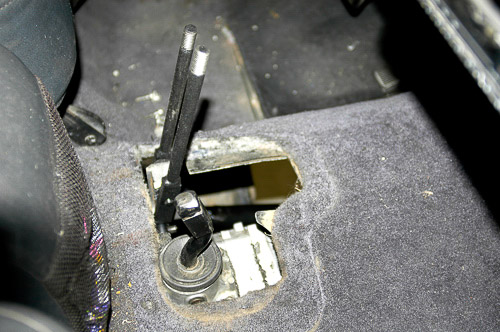
Atlas (6): Twin sticks are aligned carefully. The sticks, like the transfer case unit itself, can be “clocked” for various fit-ups. The transfer case is in approximately the 23-degree rotation of a typical New Process transfer case. Optional rotations of the Atlas II transfer case unit allow lower or higher position of the case and front output shaft. Some owners prefer more ground clearance than the stock rotation and clock the case accordingly. Front driveline location determines the clock options. Final fit will include a versatile floor boot and shift knobs, an attractive and distinctive look!

Atlas (7): The transfer case output yokes are common Spicer/New Process variety. This application uses double-Cardan yokes for the new front and rear drivelines. The double-Cardan (CV) flange differs from single Cardan types. With steeper driveline angles associated with suspension lifts, the double-Cardan reduces angles and helps prevent vibration and driveline failure.
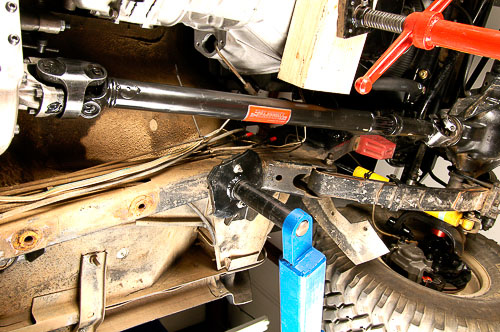
Atlas (8): Front CV-type driveline constructed by East County Driveshaft at El Cajon, California, is a rugged upgrade from the stock driveshaft. Tubing is 2-inch diameter and 0.125” wall thickness with a full 5” of spline travel on a heavy-duty coupler. A double-Cardan CV shaft replaces this YJ’s original single Cardan type. TJs use a double-Cardan as OE on the front driveline.
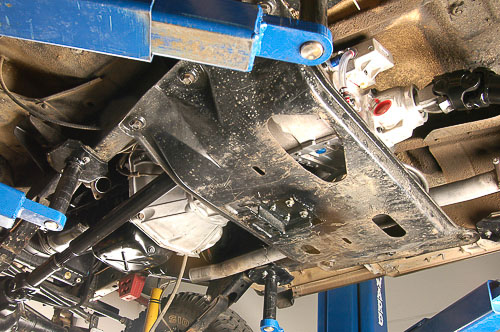
Atlas (9): The YJ’s OE skid plate has been modified to mount the later version of the AX-15 tailhousing. Skid plates on YJ and TJ models are similar and bolt in place to support the transmission and transfer case. (On an XJ Cherokee installation, consider reinforcing the factory crossmember to support the added weight of the Atlas II transfer case.) Many aftermarket lift kits include skid plate drop spacers to lower the plate. This reduces rear driveline slope and angularity. On the application shown, I could install skid plate drop spacers to accommodate the 3.5” spring/chassis lift.
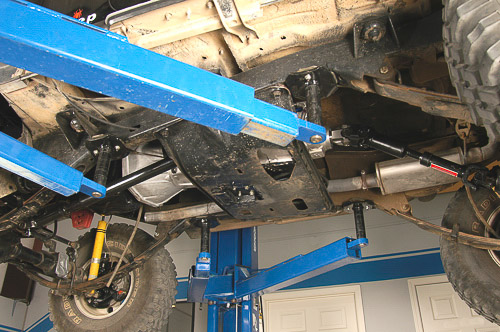
Atlas (10): Bottom alignment of powertrain and drivelines shows slope of shafts at full suspension drop. These are near the extreme angles for this suspension. When checking driveline angle and length on drop, you must disconnect the stabilizer bar links if so equipped. The aim is to get the suspension to the bottom of its trail use travel before checking angles. The shorter rear shaft has the more radical slope. This requires a CV driveline and an axle pinion shaft rotation (upward) to prevent driveline damage.
Copyright 2010 © Moses Ludel…Enjoy this comprehensive, color-illustrated article and photography by Moses Ludel. The article is available solely at the 4WD Mechanix Magazine website and can be viewed here as often as you like. If you wish to share the article with friends or professional colleagues, please refer them to 4WD Mechanix Magazine website: www.4WDmechanix.com. As copyrighted material, this article and the photography cannot be copied or distributed in any other form.
—Moses Ludel
