Does your Jeep lose air conditioning flow when you climb a grade or accelerate the vehicle? Does the A/C cold air suddenly blow from the dash panel louvers when you decelerate? There could be an A/C and heater air door problem or a vacuum circuit leak. Follow our troubleshooting procedure that can quickly find the problem—and save both time and money!

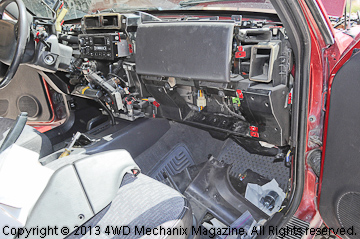
We had trouble with the A/C air flow on the magazine’s 1999 Jeep XJ Cherokee. Faithfully following the Chrysler TSB #24-12-99, we pursued a panel/demist air control actuator defect. (Click here for a PDF download of the official TSB.) According to this TSB, the vacuum motor diaphragm leaks and causes the panel door to remain closed or open erratically. This sounded right, since our A/C otherwise blew cold air from the dash vents when the panel door did open. Here is the amount of work necessary to completely troubleshoot the vacuum motor(s) and dash circuits! Do you really want to go here to find a problem?…Not if you can avoid it!

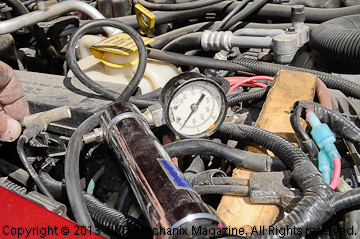
At left is the new Mopar #04864995 Panel/Demist Door Vacuum Actuator. Since Chrysler had an issue with this part when vehicles were still under warranty, we went ahead and ordered the vacuum motor in advance. At right is a vacuum hand pump tester. On our 1999 Jeep XJ Cherokee with air bags, the original vacuum actuator was located above a kick cover. We tested the original vacuum actuator, and vacuum held fine! There was no leak at the vacuum motor. This was not the problem, and we now have a new vacuum actuator for future use. The vacuum actuator is readily accessible if replacement is necessary. Chrysler gave three locations for this device in various references. Our application had the easier access.
We took the hand pump gauge elsewhere to test for a vacuum supply problem, a step that should be performed before ordering new parts or taking half the dash board apart! We began by testing the vacuum reservoir (mounts behind the front bumper) as shown at right. The bulb did not leak and held steady vacuum over time.

This is where troubleshooting is important…From the reservoir bulb, we moved to the vacuum lines running between the reservoir, the cruise control, the A/C evaporator junction and to the engine intake manifold vacuum source. If you begin testing from the reservoir end, break the test into segments. The cruise control “T” (shown at left) was our first junction. The vacuum test failed here, indicating a leak between the vacuum reservoir behind the bumper and the cruise control “T”. At right is the ruptured, brittle tubing that was the source of a major vacuum leak!
Once the tubing was repaired, the vacuum test continued, moving from the cruise control “T” to the evap “T”, then finally to the elbow at the intake manifold. All of this time, the A/C and heater panel control knob was in the “Off” position. Once the vacuum system tested no leaks with the control knob in this position, it was very simple to troubleshoot the panel control vacuum circuits—without removing a dash piece!
With the vacuum hand pump/gauge still attached at the intake manifold end of the vacuum tubing circuit, engine not running, have someone turn the A/C and heater panel control knob to each position and pump up the vacuum. If it holds, the device(s) on that circuit are okay. If you do find a leakdown at one of the positions, you have isolated the defective vacuum circuit and can access a defective actuator motor or other vacuum loss (tubing leak, loose connection, parts defect, etc.). In some cases, the vacuum control switch itself is defective or there is a loose/broken vacuum hose around that vacuum circuit. The switch helps to isolate the circuits.
After you find a vacuum loss, you can target just that circuit and minimize the energy and time required to fix the problem!…So much for TSBs and second guessing. Get a vacuum hand pump with a gauge and pinpoint vacuum problems quickly!
