Jeep 4WD How-to: DIY Lube-Oil-Filter Service and Chassis Inspection
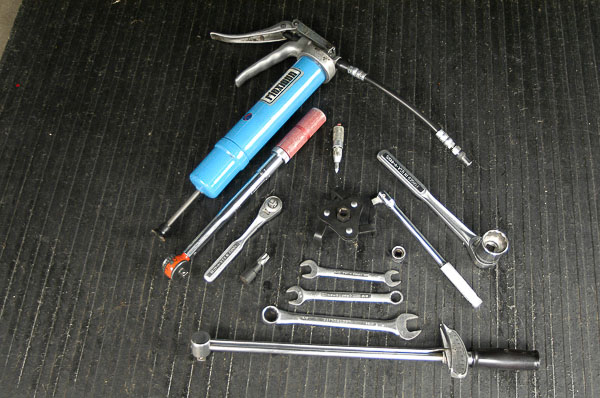
This heavily illustrated how-to article provides all details and steps you need for a Jeep 4×4 lube-oil-filter service (LOF) with chassis inspection. A hoist is handy, though you can perform routine service on ramps or even from your garage floor—I’ve done LOF chores each of these ways! Whether you have access to a vehicle hoist or not, the tools needed for this service are minimal. If you do not have the bare essential tools shown, you will need them for your DIY home garage or field service on your Jeep 4WD.—Moses Ludel
Note: My friend and aboriginal survivalist Cody Lundin (Discovery Channel’s “Dual Survival” star) once described his onboard tool kit at a workshop we conducted together. “My CJ-7 tools will fit in a fishing tackle box!” he shared. Your tool set should be at least that size! For severe off-pavement driving, strap tools and cargo down safely to prevent jostling and injury.
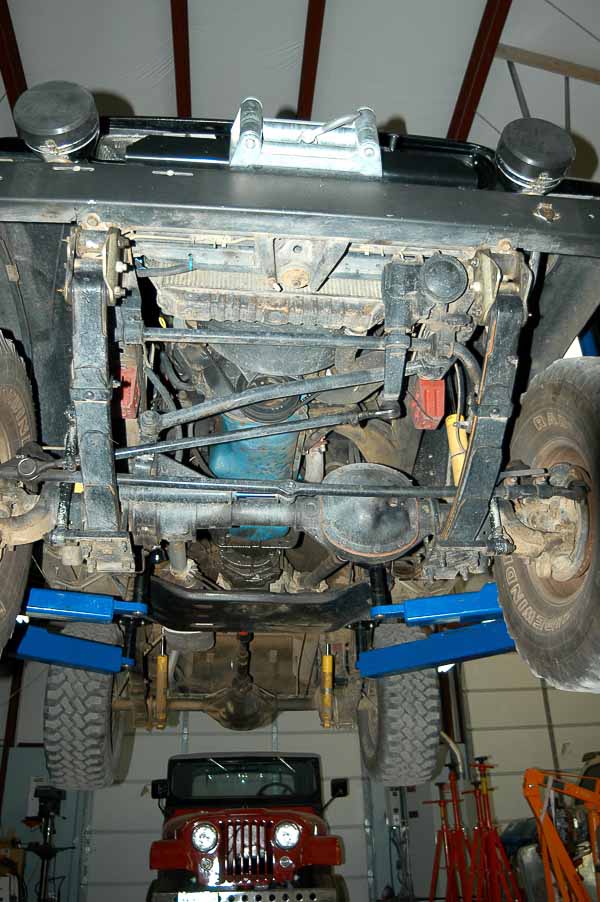
The chassis is the first area that receives attention. Shown here is the traditional Jeep 4WD ladder frame suspended by semi-elliptic leaf springs. Solid beam front and rear axles make a YJ Wrangler chassis easily accessible. An aftermarket 3.5″ suspension lift has been fitted to this 1987 YJ chassis. Jeep 4WDs with leaf springs and beam axles were well proven when the 1955 CJ-5 Jeep (background) was built!
Illus. 1: Basic tools for your Jeep 4WD lube, oil and filter (“LOF”) chores. LOF service is straightforward and insightful! Specialty tools are readily available at local automotive tool sources or through your local Jeep® dealership’s parts department.
Time-Honored “LOF” Service
Note: The earliest Jeep 4WD had a ladder frame or “driveable chassis” with leaf springs and beam axles. This traditional chassis layout prevailed through the YJ Wrangler era. Beginning with the TJ Wrangler, the ladder frame features Quadra-Coil®, link-and-coil suspension, a design patterned after the XJ Cherokee and Grand Cherokee 4WD models. On the XJ Cherokee and Grand Cherokee, a unitized body has eliminated the need for a ladder frame.
I first performed lubrication and service work on Jeep 4WDs in the mid-‘sixties. For lay mechanics and 4WD professionals alike, the outlined Jeep lubrication and service procedures will serve your Jeep well. As a preventive maintenance professional, I find this approach useful, a practical way to discover damaged or broken components. You can follow up with a needed repair or restoration work—before off-road trouble occurs!

Illus. 2: Rear-to-front view of YJ reveals the Dana 35 rear axle and drum rear brakes. The YJ Wrangler came from the factory with a rear track bar. Use of this aftermarket suspension lift kit eliminated the bar. Track and stabilizer bars enhance the vehicle’s handling on-pavement. “Lift kits” provide a wider range of wheel travel, which can cause track bar binding. There are always trade-offs with these kinds of modifications. Be aware of the effect such changes may have on highway handling, especially body roll and steering in corners. Understand how your Jeep 4WD handles!

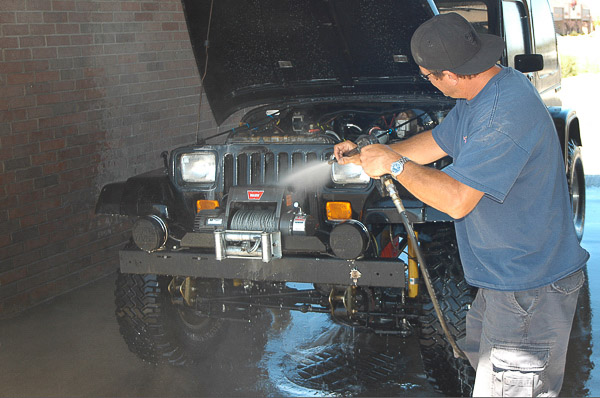
Illus. 3: Before performing service on a trail runner Jeep 4WD, my first stop is the local car wash. Dirt and abrasive material around chassis grease fittings, dust boots and spark plug areas can be troublesome.
Caution: Make sure the engine is not excessively hot prior to spray cleaning! Hot iron castings can crack when exposed to wide extremes of temperature. Most car wash water is lukewarm to mildly hot. Shut the engine off, and if necessary, allow it to cool down.
Illus. 4: Accumulation of bugs, dirt and debris can reduce engine cooling efficiency. Some owners install a bug screen here. Regardless, you need to clean the screen or radiator fins. If dirt has packed the fins, pressure wash from inside the fan shroud, toward the front of the vehicle.
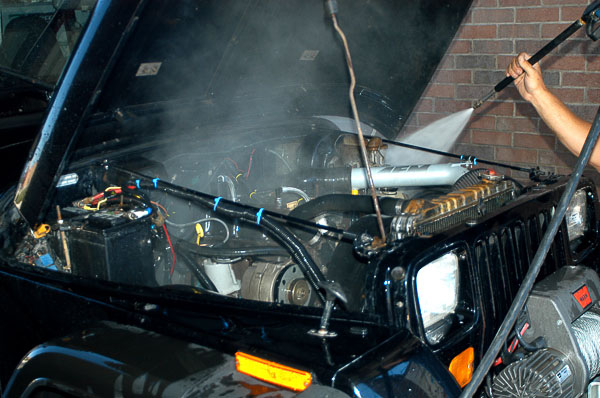
Illus. 5: When cleaning the Jeep engine bay, carefully avoid spraying near sensitive seams or vents at the distributor cap, master cylinder, power steering pump and electronic components. Do not drive water into delicate TBI or MPI connectors or processors! Jeep YJ Wrangler electrics are reliable; however, electronic devices require precise voltage readings. Corrosion from moisture can damage wires, connectors and switches. Use discretion and avoid damaging parts.

Illus. 6: Jeep 4WD front suspension and steering linkage have grease fittings and dust boots. A thorough cleaning, followed by insertion of fresh grease to dispel moisture, is a good policy. If you clean these areas with a pressure washer or car wash spray, always pump fresh grease through the fittings and joints to displace water and debris.
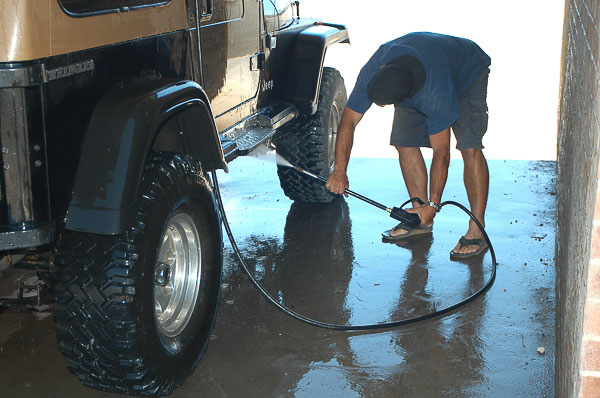
Illus. 7: Mid-section and rear of the Jeep 4×4 also require attention. Dirt, debris and grime cluster around the transfer case/transmission skid plate. Periodic cleaning is practical and makes your LOF job far more inviting! This is a dirty job—dress accordingly! Wear appropriate protection to avoid getting hot, soapy spray and debris in your eyes!
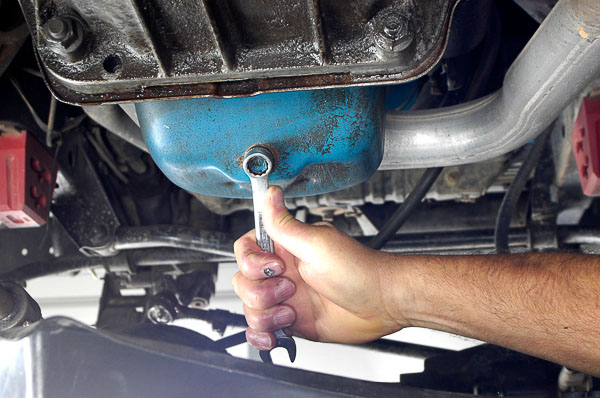
Illus. 8: With the engine warm but not scorching hot, loosen the drain plug carefully. Though it takes a while to get used to wearing mechanic’s nitrile or latex gloves, the effort is worth it! I began wearing gloves for handling cameras. Now, I wear mechanic’s gloves for all service work. Unlike the bare hand shown here, gloves prevent exposure to hazardous chemicals in drain oil. They also reduce the risk of cuts, nicks and burns.
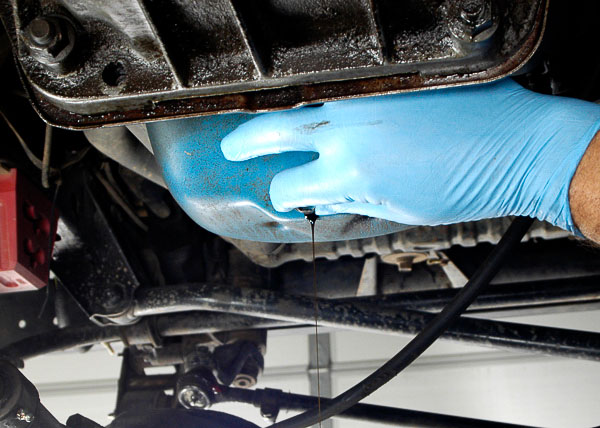
Illus. 9: Expect oil to spout outward with force when the plug comes loose. Keep slight pressure against the plug threads to help control initial flow. Set the drain pan to catch oil pouring outward from the drain hole. As the oil drains, center the pan beneath the drain hole to catch the rest of the oil. Dispose of waste oil properly. Use a hazardous waste outlet like the drain tank at the auto parts store.

Illus. 10: Oil filter access is not easy on the 2.5L or 4.0L engines. This is the oil filter seen from beneath the 2.5L four-cylinder engine. The oil filter on late Power Tech 2.4L fours is not much easier to reach. This chassis is an ’87 Jeep YJ Wrangler. Most modern Jeep 4WD models have similar oil filter access challenges.

Illus. 11: Some access the filter from above. On this 2.5L four, the topside approach makes some sense. You can get the oil filter wrench on this filter more readily from the top side. (Later, you may be crawling below the vehicle, wiping up spillage with cleaning rags.) Before loosening the filter, place a drain pan beneath the area of the oil filter.

Illus. 13: I use genuine Mopar® oil filters—for good reason. These filters match the engine design and specific needs of the lubrication system. By comparison, other aftermarket filters may fit a variety of engines and have generic pressure and flow settings. Mopar filters are a cost-effective approach, readily available at your local Jeep® dealership. Installation instructions are imprinted on the filter’s shell or packaging.
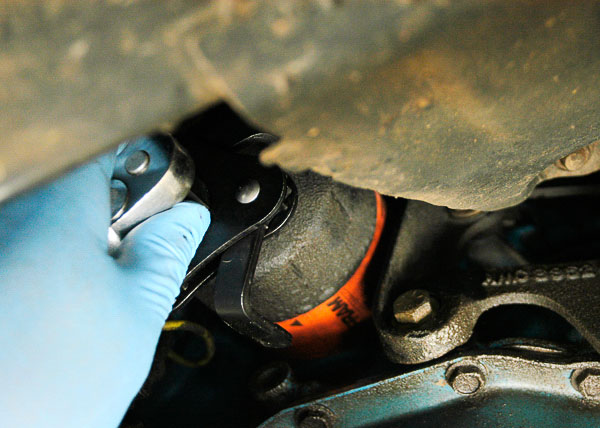
Illus. 14: This oil filter wrench is adjustable. It fits a wide range of filter diameters. There are end cap filter wrenches that precisely fit the oil filter. Whichever type you use, attach your ratchet at the center of the tool. There is little room alongside filters on 2.5L or 4.0L engines. The late TJ Wrangler 2.4L Power Tech four is no easier. Keep the new filter away from debris when bringing the filter to the engine mounting surface! A light film of clean, fresh engine oil on the filter’s gasket is sufficient. Tighten to specification.
Note for tightening a spin-on filter: Do not use the wrench for tightening! Instructions on the oil filter suggest running the filter to where it just mates with the mounting base; then turn the filter a specific amount (usually 3/4-turn or as recommended). I tighten a Jeep spin-on type oil filter as snugly as possible with one strong hand—or two hands cupping the sides of the filter canister if the fit is uncertain. Tightened this way, the filter will not leak or loosen from its mount. At removal time, the filter will not be overly tight. As a baseline, follow factory recommendations on the filter housing or box. You do not want an oil filter to leak or, even worse, come loose and fall off!

Illus. 15: Leave the oil drain plug out of the oil pan until you are ready to torque it! Finger tightening a plug is a bad practice. You may later look at it and believe that the plug is tight. Clean the plug, thread it carefully in place, and use a torque wrench to assure proper torque. (See torque specifications in an official Jeep® workshop manual.) If the drain plug gasket looks worn, replace it with a new, OEM type gasket or plug assembly.
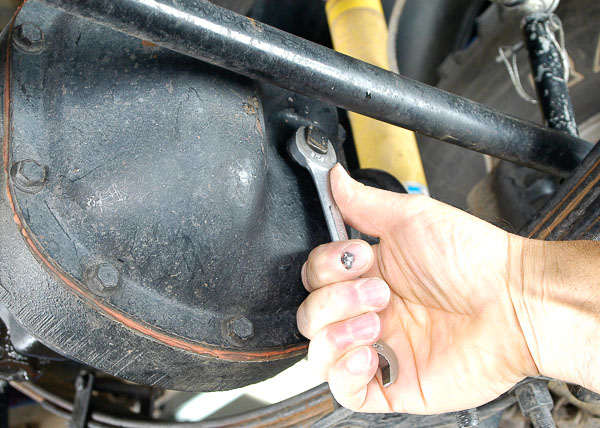
Illus. 16: Dana 30 front axle on this YJ Wrangler has the classic 9/16” square headed fill/inspection plug. If you’ve cleaned the chassis, the plug area should be free of debris. If not, clean around the plug before removing it.
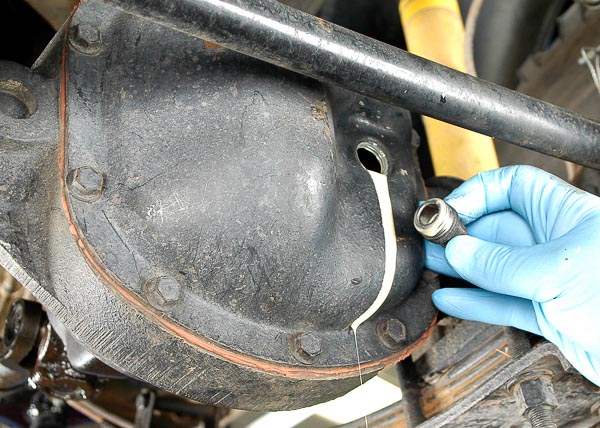
Illus. 17: Axle lubricant with a white or grey color is a mix of water and oil. If not removed immediately, this concoction will etch bearings, gear teeth and other critical pieces. If you discover water in any gear or axle case, drain and flush the unit immediately. On Jeep axle differentials, remove the inspection cover, flush with light (motor) oil and assess the damage. If a light oil flush does not work, try the axle flushing fluids recommended by Jeep and Mopar.
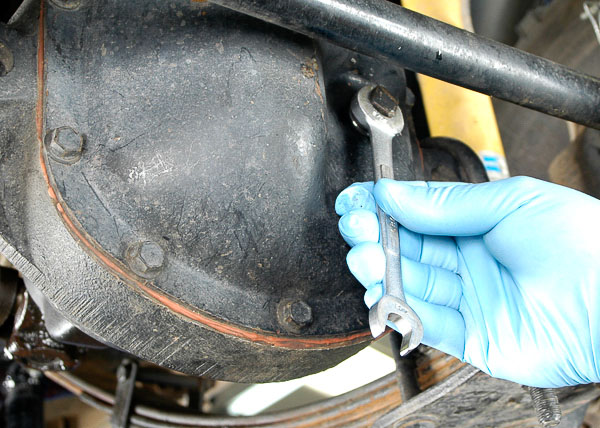
Illus. 18: Make certain that oil reaches the bottom of the fill hole with the vehicle level and at normal axle ride height or angle. Once you confirm or top off the oil, clean and install the oil fill plug. If you do not have a square head socket, tighten the pipe thread plug snugly or approximately 25 ft-lbs.
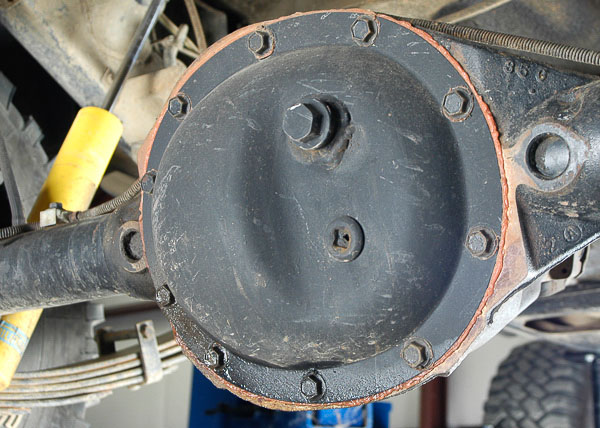
Illus. 19: Two inspection plugs on this Dana 35 rear axle are unique. The lower plug is the original. This axle housing has been rotated (pinion shaft aimed upward toward the driveshaft tube’s slope) to accommodate a suspension lift kit installation and new CV type rear driveline. Owner was unable to read the fluid level accurately. He created the upper plug from an oxy-sensor bung and plug. Do not under-fill or over-fill an axle assembly!
Note: On the axle shown in Illus. 21, you can confirm the fluid level by removing the cover, draining the fluid, and accurately refilling the differential to the factory fluid capacity. If you have this kind of pinion angle modification, consider raising the fill plug—otherwise, you will need to place your Jeep 4WD on an extreme down slope to check the rear axle at its original angle!

Illus. 20: Here, the upper plug is the only means for checking the axle lube accurately. The axle pinion shaft angle tilts so far upward that fluid would pour out of the housing if the lower plug were removed. If your Jeep 4WD axle housing has not been “rotated” to tilt the pinion angle upward, you will check fluid at the lower, original plug.
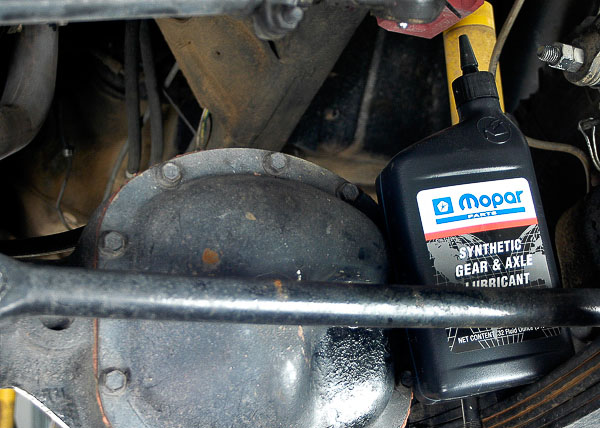
Illus. 21: Always use the fluid recommended for your axle. Mopar recommends this synthetic 75W-140 gear lubricant for severe duty use. If you have a Trac-lok™ factory limited slip differential, be certain to use the friction modifier recommended in the owner’s handbook. (Mopar’s Limited Slip Additive, P/N 04318060AB is the typical recommendation.) Quantity of modifier is typically 2%-5% of the axle fill capacity. If you neglect to use the additive, the friction plates will stick, and the axle will grab or chatter!
Note: OEM axle types are “open,” Trac-lok™ limited slip type or the air-lockers found on the Wrangler Rubicon models. If you purchase a used Jeep 4WD and suspect that the front or rear differential is either a Trac-lok™ or aftermarket traction differential, remove the inspection cover to confirm. In the Jeep axle rebuilding articles at this 4WD Mechanix Magazine website, you will find examples of traction axles. These upgrade lockers or factory limited slip axles may require special fluids or additives.
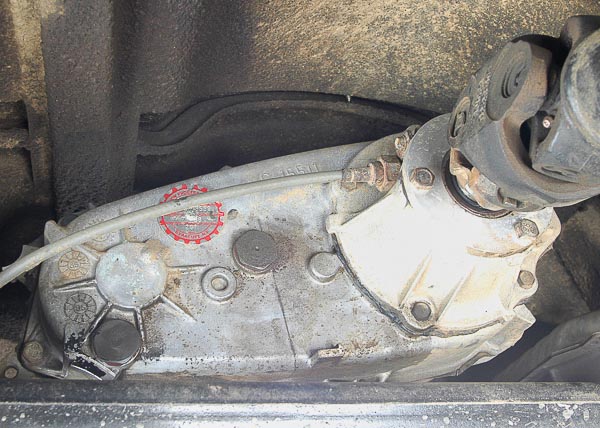
Illus. 22: The NP207 AMC/Jeep transfer case is a chain drive unit used for the first years of YJ Wrangler production. A carryover from XJ Cherokee engineering, this unit has a 2.61:1 low range ratio. NP231 and NV231 units have a 2.72:1 low range ratio. TJ and JK Wrangler Rubicon models feature the NV241 Rock-Trac™ with a 4:1 low range ratio. Service is similar for NP207 and NP/NV231 units.
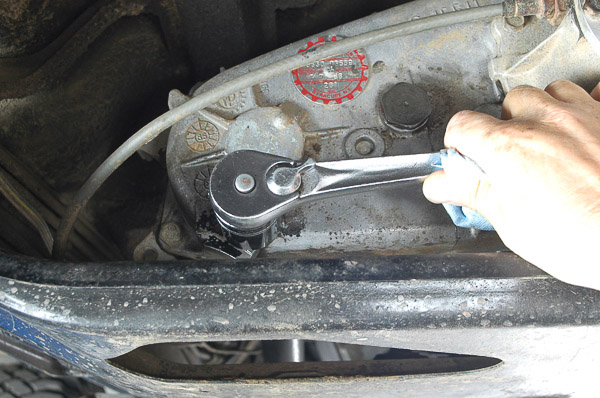
Illus. 23: The YJ Wrangler has a large hole in the skid plate beneath the transfer case drain plug. If you drain the case this way, shield the flow of fluid to prevent it from spewing out over the skid plate. The socket is large, a 1-3/16” size. Clean the plug and inspect the gasket. After draining oil, install the plug carefully and tighten to 35 ft-lbs. Do not over-tighten the plug—case threads are aluminum!
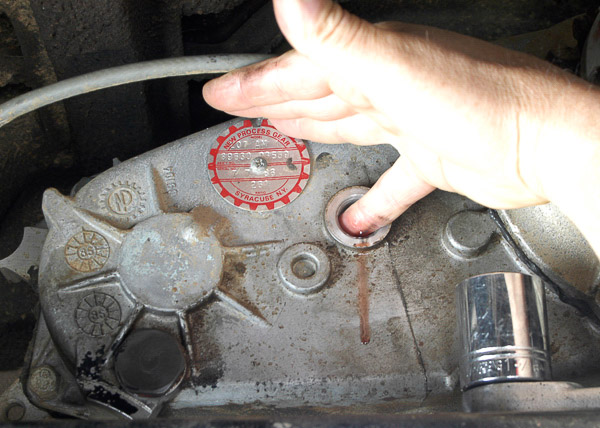
Illus. 24: Upper plug is fill and check point. With the transfer case level, fluid should be just below the plug hole. I stick a clean finger straight across the threads then dip my fingertip slightly downward. Be sure that fluid reaches this level. If fluid is any color other than bright red, change it! New Process or New Venture chain drive transfer cases use the ATF recommended in the Jeep® owner’s handbook. I use Mopar’s own Dexron-Mercon fluid or the current equivalent, available from my local Jeep® dealership.
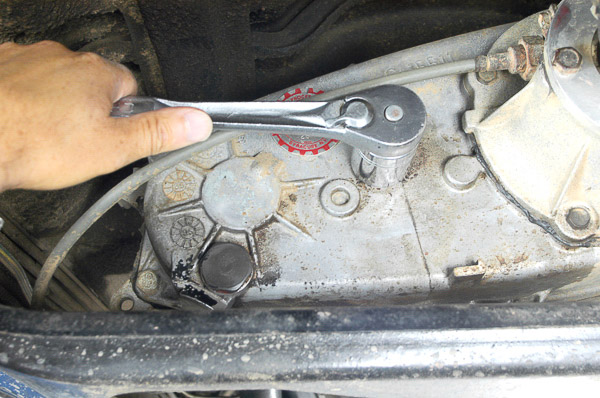
Illus. 25: Clean and install the fill plug with a new gasket if needed. Case threads are aluminum. Use caution. Thread in by hand then tighten to 35 ft-lbs with your torque wrench. This torque applies to all 1-3/16” hex plugs found in NP207 and NP/NV231 chain drive transfer cases.
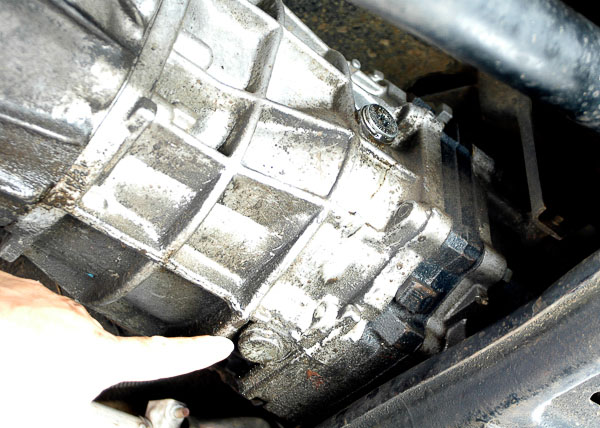
Illus. 26: The AX-5 and AX-15 transmissions were common during the YJ and earlier TJ Wrangler eras. Peugeot BA10/5 units are found behind 4.2L carbureted sixes in the ’87-’90 era. The AX-15 came on line near the end of 4.2L YJ Wrangler production. A stout, well-designed transmission, the AX-15 is a five-speed overdrive unit suited for six-cylinder engines and even lower horsepower V-8 transplants. The AX-5, shown here, is a popular five-speed unit found behind four-cylinder engines in YJ and earlier TJ models. Fill and drain plugs are readily accessible.
Note: For in-depth details on the AX-15 transmission, see my 4WD Mechanix Magazine articles on ‘step-by-step’ rebuilding, available at this website’s Jeep XJ Cherokee, Jeep YJ Wrangler and Jeep TJ Wrangler Workshop sections!
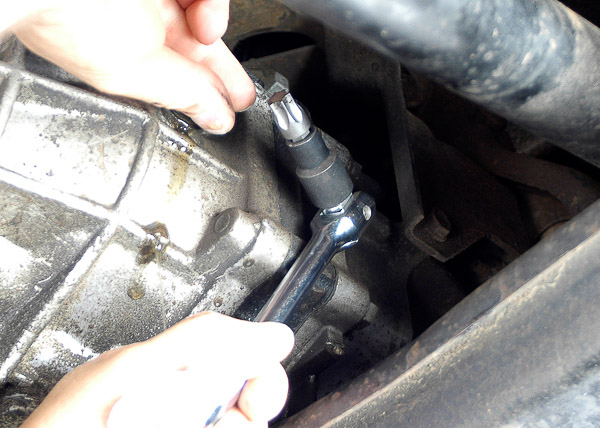
Illus. 27: Loosening the AX-5 fill plug requires a Torx™ bit. Do not use any other tool. If you intend to work on any later model Jeep 4WD, a quality Torx bit set is a necessity. Make sure the transmission sets level. Clean around the plug before removal.

Illus. 28: Check fluid level in the same manner as axles and the transfer case. Fluid should just reach the lower edge of the plug hole. Clean the plug, inspect the gasket for damage, and install the plug carefully. Threads are aluminum, and maximum torque on this AX-5 Aisin Jeep transmission plug should be 32.5 ft-lbs.
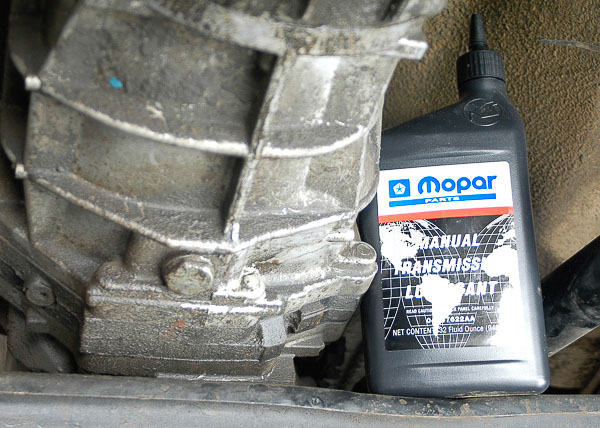
Illus. 29: Mopar Manual Transmission Lubricant P/N 04897622AA or its current equivalent is recommended for the AISIN AX-5 and AX-15 transmissions. This is specific oil for these two transmission types. The Mopar “Manual Transmission Lubricant” is my oil of choice for either of these gearboxes. Purchase 4 quarts for a complete refill after draining thoroughly. The AX-5 will take around 3.5 quarts; the AX-15 requires slightly less than this amount. Fill to lower edge of fill plug and recheck level after fluid sets for a while. Top off as necessary.
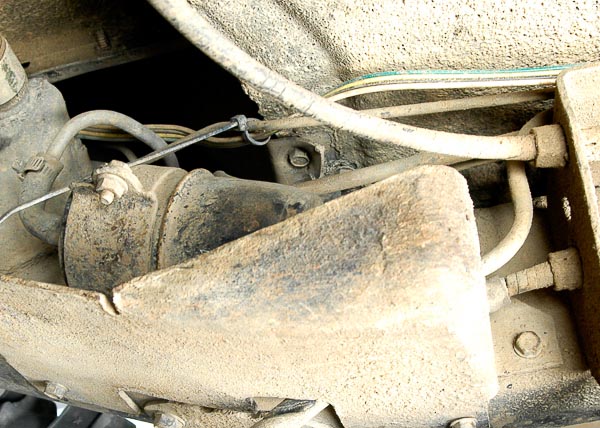
Illus. 30: This is the fuel filter for four-cylinder throttle body injected (TBI) 2.5L engines found in 1987-90 YJ Wranglers. As apparent here, the filter often gets overlooked! If your Jeep filter looks this neglected, change it! Follow service intervals described in the owner’s handbook.
Note: TJ Wrangler models use a combination fuel pressure regulator-filter mounted atop the fuel tank—above the fuel pump module. This regulator/filter is a long interval service item without a specific date for replacement.
Warning: On systems with MPI, always relieve the fuel pressure at the engine fuel rail before loosening the fuel filter hoses. Be certain not to spray gasoline on a hot engine!

Illus. 31: 1987-90 4.2L inline sixes use the same fuel filter as the late CJ models with this same engine. The fuel system consists of a mechanical fuel pump, fuel filter and carburetor. A common AMC-era, three-pipe replacement filter, located near the carburetor, is a routine replacement item. Do not neglect it! Replace worn hoses and clamps with proper gasoline-grade hose and clamps, (often supplied with the new filter). Use genuine Mopar filters whenever available!
Warning: A ruptured fuel hose near a hot exhaust manifold is a recipe for disaster! Let the engine cool before changing the fuel filter and hoses. Always use the correct hose and clamp type. See your Jeep® dealership parts department.
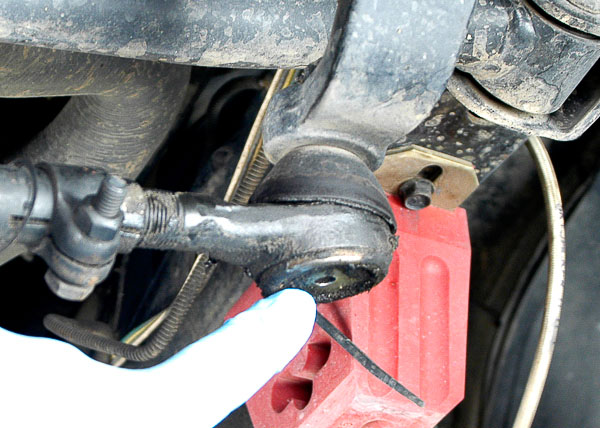
Illus. 32: Chassis lubrication is a critical maintenance need for 4WDs used in rough terrain. Water crossings, dirt, mud, snow, sleet and slush take their toll. Debris off-pavement rakes at the undercarriage. Here, chassis lubrication begins with the discovery that one of the grease fittings has actually broken off! A repair is necessary, as the joint at the pitman arm is now exposed.
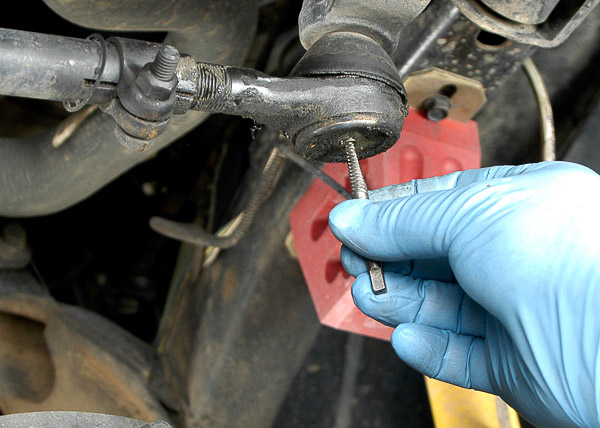
Illus. 33: The threaded shell of grease fitting is visible. Joint threads appear undamaged. A common screw extractor, tip shortened to fit the remains of the zirk fitting, has a left hand twist. Once the extractor takes a bite into the broken grease fitting, careful turning with a wrench or T-handle will unscrew the broken piece.
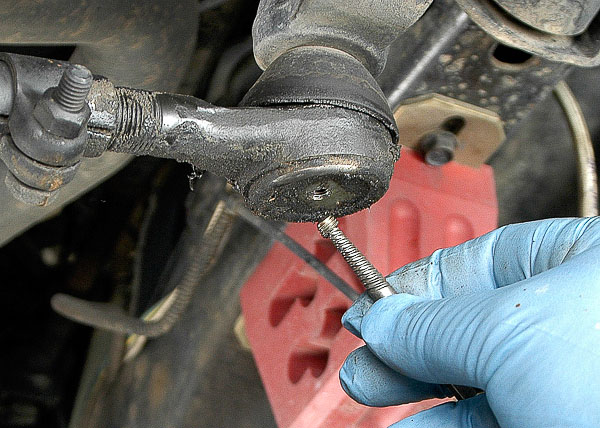
Illus. 34: Here, threaded shell of broken fitting is out. Note that the complete shell is visible; no fragments remain within the joint. If metal debris were within the joint, damage and joint failure could result. Use care to extract all metal!
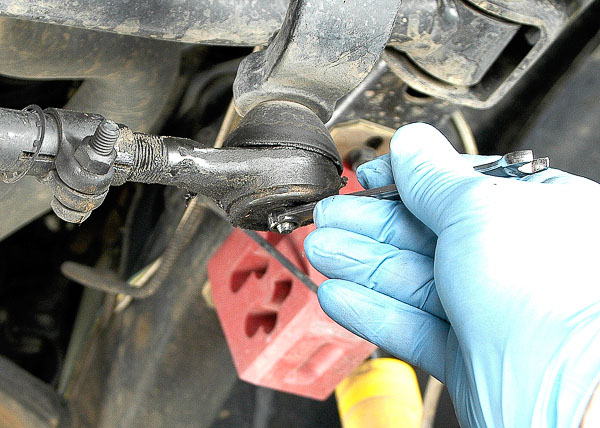
Illus. 35: I tighten the grease fitting with a box end wrench to eliminate the risk of over-tightening or stripping the threads. An inch-lb torque wrench would be an alternative. This repair is thorough. The joint needs nothing more than flushing with grease.
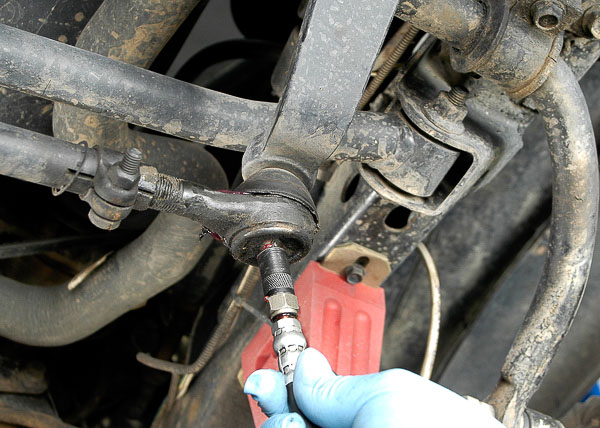
Illus. 36: A quality hand grease gun will work fine. You have better control and can use this type of gun for sensitive U-joints and bellows seals. Power grease guns should be used with discretion. Although fast, they do not afford the “touch” and pressure control of a hand gun. U-joint seals can rupture when exposed to high grease gun pressure.
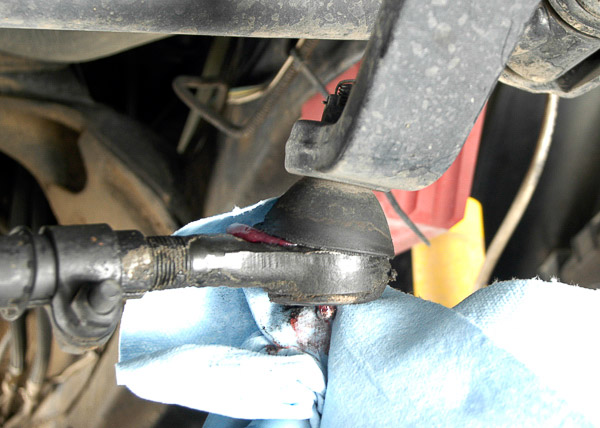
Illus. 37: This joint was dry; no “dirty” grease came out. Wipe off excess grease around the grease fitting and dust boot. Exposed grease will attract dirt, sand and trail debris. A Jeep 4WD is a prime candidate for dirt and grit exposure!
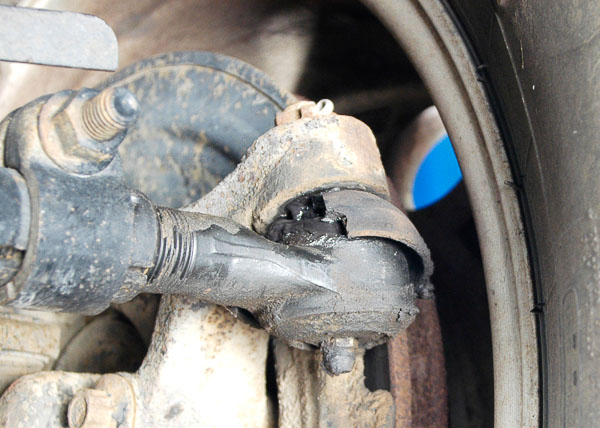
Illus. 38: While greasing the chassis, you have an excellent opportunity to inspect for wear and damage beneath the vehicle. Steering linkage is my first target, a time to check joints for excess movement and damage. Although this left tie-rod end is still within normal wear limits, the dust boot tear makes the joint vulnerable to rapid deterioration. A new boot will save this joint.

Illus. 39: Wipe off the grease fitting before lubing. Otherwise, you will drive dirt into the joint. Keep your grease gun tip clean. If necessary, lightly pump fresh grease out the tip and wipe away contaminated grease with a clean section of rag. Until this joint is properly repaired (new dust boot or a joint replacement), fresh grease will help prevent damage from exposure.
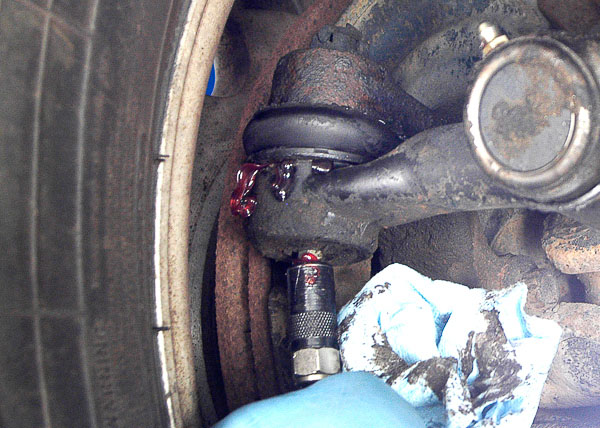
Illus. 40: Right tie-rod on this YJ has a bell-shaped dust seal. If the seal is a bellows type and has a tension spring or clamp ring around its base, do not attempt to force grease out like this! Expelling grease is only appropriate with seals that have a flap opening. Here, I apply enough grease to expel old grease from the joint. This joint was fairly dry but has no signs of excess movement or wear.
Note: A show of clean grease means old grease has been pushed out. Always clean excess grease away to avoid attracting dirt.
Caution: A sealed bellows type dust boot has a spring or clamp at its base. Such seals work very well. If not torn or ruptured, the joint requires just a few pumps from the grease gun, just enough to cause the seal to bulge slightly. That’s enough grease! Excess greasing can rupture the seal.
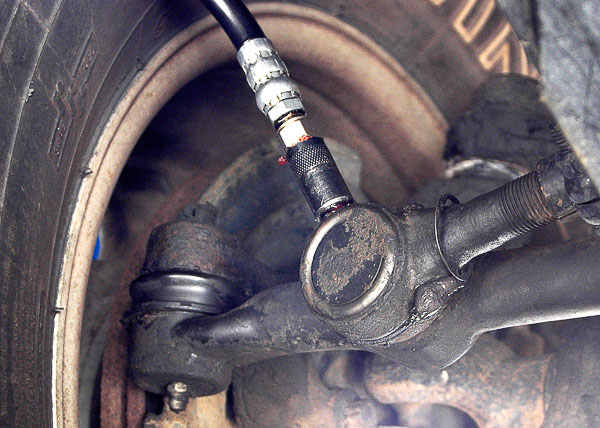
Illus. 41: This is the drag link that connects the steering gear’s pitman arm to the long tie-rod. (Some references call the drag link a “short tie-rod.”) Dirty grease becomes visible as fresh grease enters the joint. Flush the dirty grease from the joint. After filling the joint, wipe off the fitting and any exposed grease.
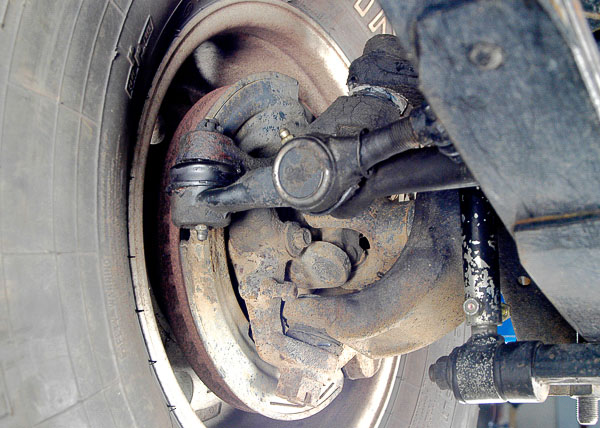
Illus. 42: Right side steering knuckle assembly reveals the axle shaft U-joint and both steering knuckle ball joints. Axle shaft U-joints are permanently sealed type and do not require periodic lubrication during their service life. The lower ball-joint may have a provision for the grease fitting, but the plug is not accessible without removing the axle shaft. Routine service will consist of greasing the upper steering knuckle ball-joint with its accessible grease fitting.
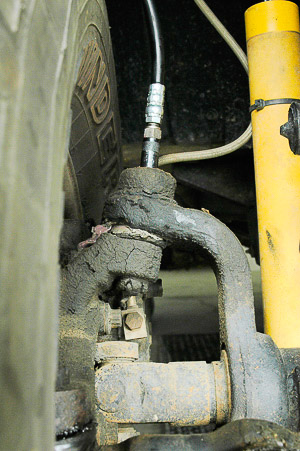
Illus. 43: Upper ball-joint at right steering knuckle takes grease. Note accumulated and encrusted dirt and grease at the knuckle. Pressure washing or steam cleaning would remove this debris. This joint has an open flap to allow grease to exit. Squeeze enough grease through to flush old grease out. Color of exiting grease indicates moisture in the joint, which must be flushed out.
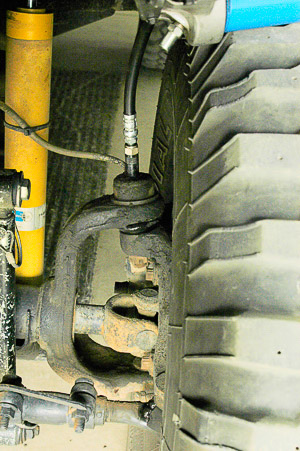
Illus. 44: Clean the grease fitting at the opposite upper ball-joint. On this YJ Wrangler, the dust seal has a flap opening. Grease can be applied until old grease is flushed through and only fresh grease pumps out. Make sure of dust seal type before applying grease. Do not rupture a sealed dust boot! The U-joints on these open knuckle Jeep axle shafts do not require grease.
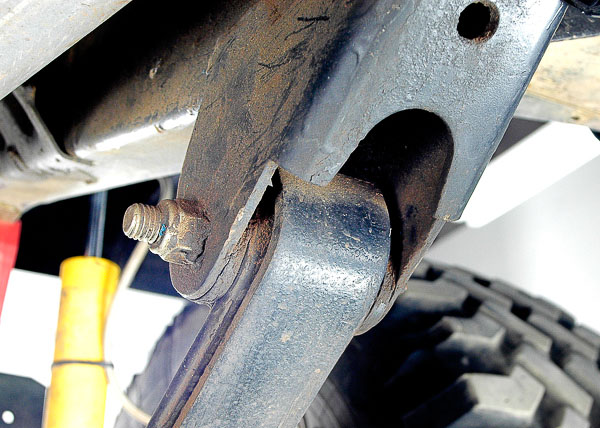
Illus. 45: Urethane bushings are common to aftermarket lift kits. The original spring bushings on this YJ required no maintenance during their service life beyond occasional spraying with a rubber lubricant or an anti-oxidant like 303 Protectant. Urethane bushings, however, do require occasional disassembly, thorough cleaning and inspection. If still serviceable, they need re-greasing with a special lubricant designed for these materials.
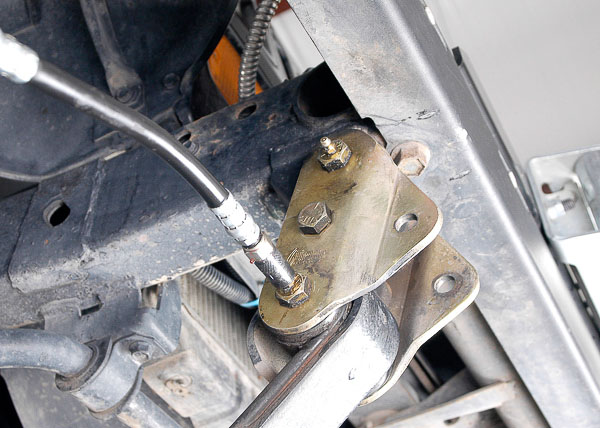
Illus. 46: These unique aftermarket “Currie” front shackles for the YJ Wrangler feature bolts with grease passageways and grease fittings. The urethane bushings, in this case, can be flushed with grease regularly to reduce friction, noise and wear. Regular greasing will extend bushing life and prevent seizure and galling.
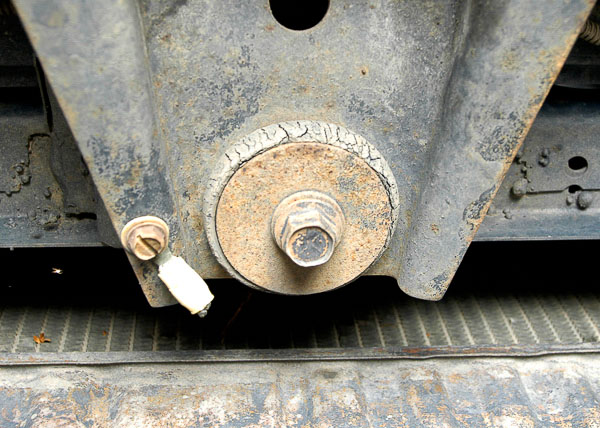
Illus. 47: Body rubber, like the shackle and spring anchor bushings, takes a beating. Weather, heat, flexing and age have this front body mount looking grim. The use of 303 Protectant earlier in this part’s life could have helped. I have used ‘303’ for years to reduce UV damage and the effects of weather on rubber products, canvas and vinyl. At this stage, the body mount needs replacing with either an OEM piece or aftermarket urethane cushion.
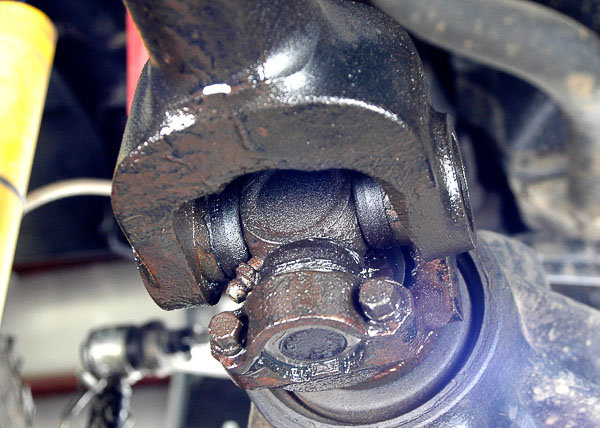
Illus. 48: Still beneath the vehicle, the final chore is driveline and U-joint service. Beginning with the front driveshaft and U-joints, the LOF has turned up a real concern. Drenching this joint is power steering fluid—not gear oil from the pinion seal as might be suspected. The front differential was full of lube and not leaking.
Composed with HTML Editor
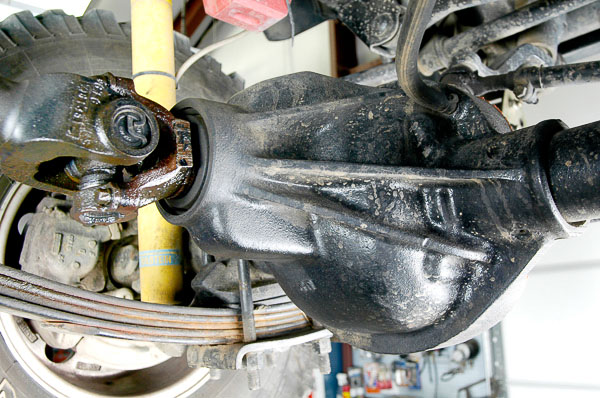
Illus. 49: Side view of leak shows what could be mistaken for a pinion seal leak. Gear oil is much different than power steering fluid, and I quickly determine that the leak is not from the YJ’s ‘high pinion’ Dana 30 front axle. Periodic service reveals these kinds of troubles. This problem occurred recently, between services, yet neglect could cause power assist failure when fluid leaks away! Checking fluid levels is essential.

Illus. 50: Special pinpoint (needle) grease tip is needed for U-joint service. The tight fit of this joint makes it impossible to insert the regular grease gun tip. With needle extension pressed against the spring-loaded grease fitting ball, I am able to fill the joint. Check for wear, excess movement and ruptured dust seals at each U-joint.
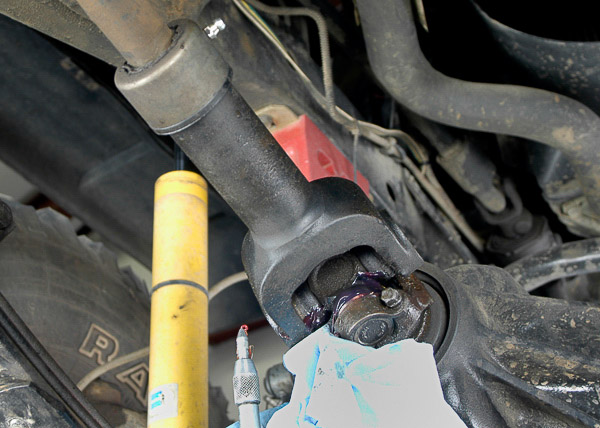
Illus. 51: A hand grease gun is the traditional approach for greasing U-joints. Seals are delicate, and the use of a high pressure lube gun can damage these seals. Note that there is no old grease leaving the flushed joint. This joint was fairly dry yet still not showing signs of wear or damage—despite the neglect. I will wipe off all exposed grease before moving to the next chore.
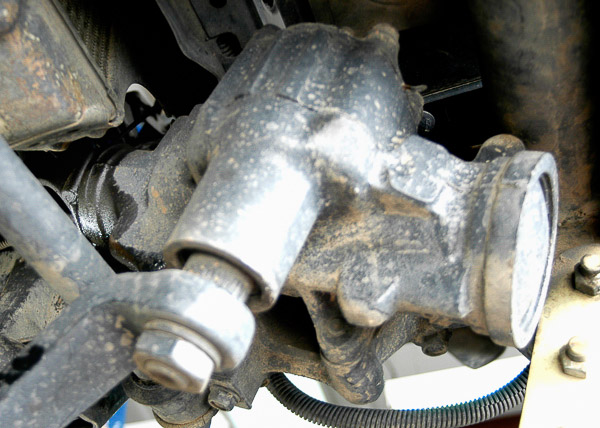
Illus. 52: Power steering gear leak is visible here. Upper worm shaft seal is worn. Leak could also indicate excess play at upper worm shaft bearing. Steering gear needs immediate attention, as this problem can only worsen. When the steering was worked left-to-right under a parked load with 33” x 12.50” tires, power steering fluid dripped to the floor and formed a puddle!
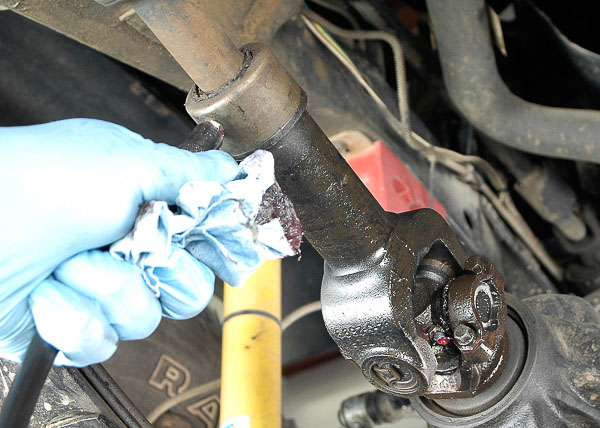
Illus. 53: Front driveshaft splined slip-collar requires grease. This coupler must not be overfilled. On the hoist with axles dropped and drivelines stretched, too much grease can pack an extended collar. The driveshaft can lock in this extended mode. When the vehicle returns to curb height, there have been instances where a grease-locked, extended driveshaft has cracked the transfer case housing! 4-5 hand pumps at regular service intervals are plenty.
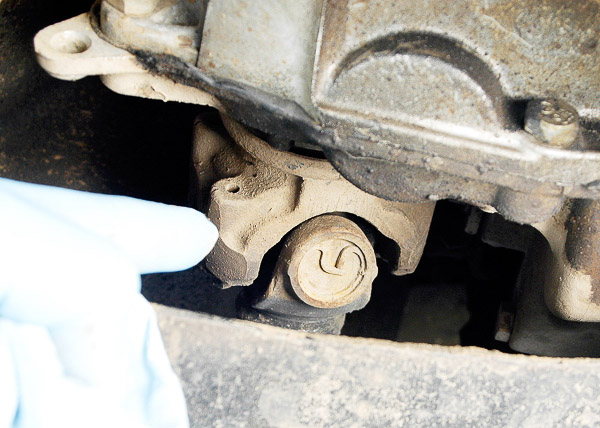
Illus. 54: At transfer case end of front driveshaft, the U-joint is difficult to reach on this YJ Wrangler. The factory joint is a non-serviceable, permanently sealed U-joint. Occasionally, a shop or individual will replace this joint with a grease fitting type. This creates an issue, as periodic greasing becomes a major task. Here, the U-joint is original type.
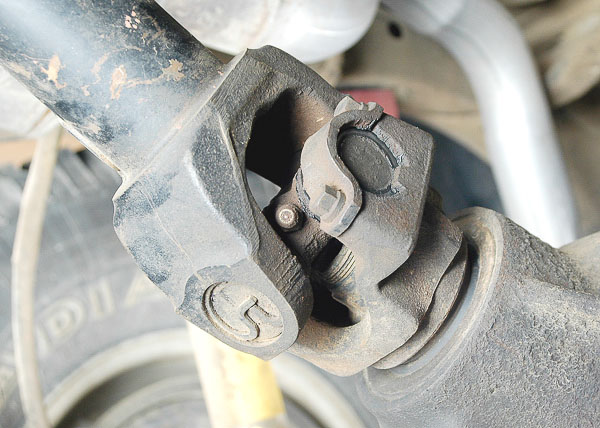
Illus. 55: The rear driveshaft has a greaseable axle end U-joint on this Jeep YJ Wrangler. Grease fitting is accessible if you rotate the shaft to create the widest gap between flanges. With the fitting at the widest gap, I can insert a regular grease gun tip.

Illus. 56: This is how a nicely greased U-joint should look! Grease comes out uniformly at each of the four bearings in the cross. Just enough grease has gone through to assure adequate lubrication. I use Mopar recommended lubricants or Texaco’s Starplex II grease (shown here) for exceptional service and long U-joint or bearing life.
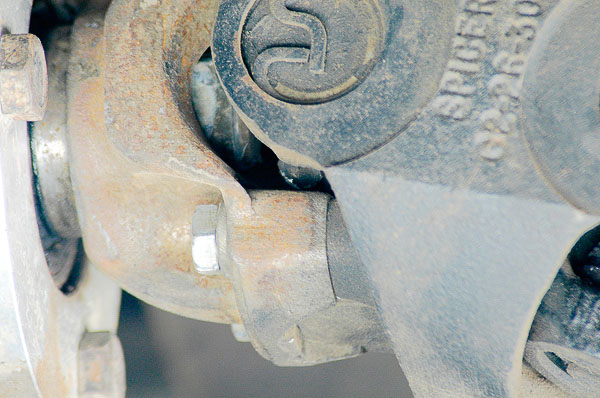
Illus. 57: Double-Cardan type joints have been popular on 4×4 drivelines. When A Jeep Wrangler gets a suspension lift, the short rear driveline with steeper drop often leads to the installation of a double-Cardan joint. This ’87 YJ Wrangler has a 3.5” suspension lift. The U-joint mates to an aftermarket MIT slip yoke eliminator output shaft at the rear of the transfer case. A double-Cardan is a tightly coupled pair of U-joints. These joints require a needle-point grease tip to service them.
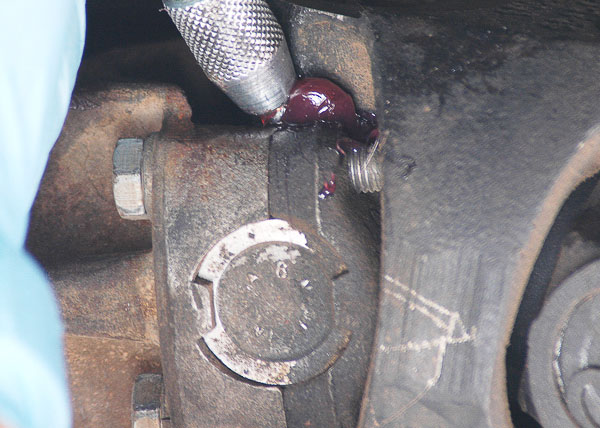
Illus. 58: Here I hold the needle point against the cupped center of the special grease fitting. Fittings on these U-joints do not extend with a nipple. Instead, they fit nearly flush with the U-joint yoke. There is a spring ball in the center of the fitting. Once you locate and clean off the fitting, carefully aim the tip at the ball and place pressure against the needle tip. With the tip seated against the ball, you can apply grease to the joint.
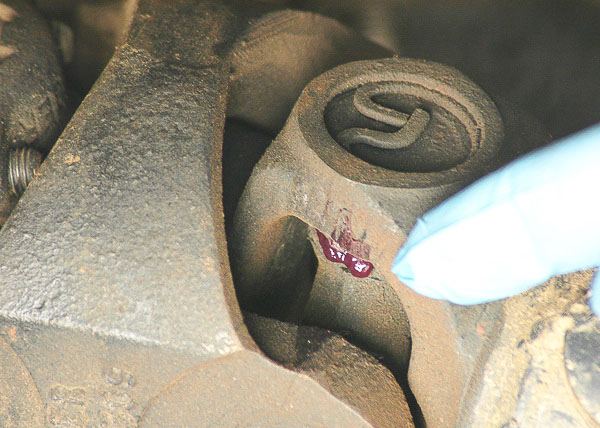
Illus. 59: You should see this kind of grease exiting each of the four bearing cap seals of the U-joint. Again, clean grease here indicates a fairly dry joint, one that needed attention. The double-Cardan type joints are often called “constant velocity” type. They have become popular for their ability to cancel out vibration and enable unusual usage—like with suspension lifts and short drivelines.
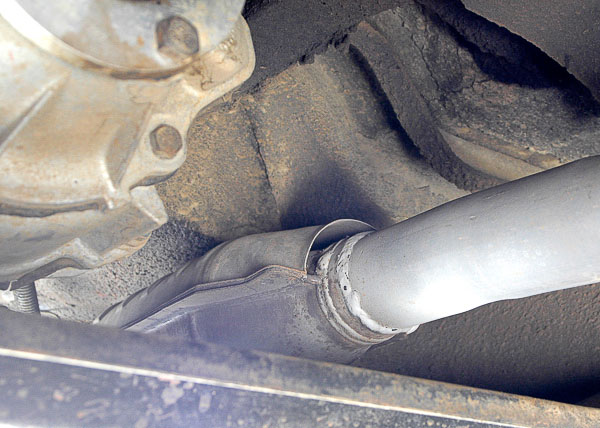
Illus. 60: Before wrapping up the underside chores, inspect the exhaust system for signs of leakage or damage. On this ’87 YJ Wrangler with 203,300 miles on the odometer, there is a newer exhaust system. 2.5L four gains performance from a low-restriction catalytic converter and larger than stock diameter, smooth flowing exhaust piping. Aftermarket, 50-State legal exhaust components can sometimes improve Jeep performance.

Illus. 61: Header pipe leading into the catalytic converter is part of the custom exhaust system for this YJ Wrangler’s 2.5L four. Nice bends and flow, larger pipe diameter for less restriction, this fully legal system benefits performance. A muffler shop built the entire system from scratch, following the OEM routing and exiting the exhaust out the rear of the Jeep. Also visible is the engine’s rear main seal leak, which has spread engine oil over the bellhousing plate, starter motor and the manual transmission.

Illus. 62: The muffler is a low-restriction, 50-State legal unit, larger in capacity than stock. Tailpipe runs all the way to the rear of the vehicle, like the OEM routing, to assure safety of rear seat passengers and closed-cab occupants. Side exiting exhaust has its place on race cars—but not on a Jeep 4×4 vehicle! Always route the tailpipe to the back end of the vehicle to prevent exhaust fumes from entering the tailgate or body tub. Inspect clamps, hangers and sealing joints at each maintenance service.
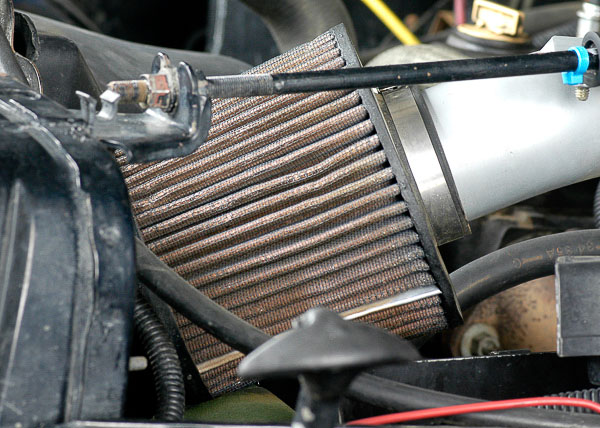
Illus. 63: Out from beneath the vehicle, it’s time to work under the hood! The aftermarket air cleaner needs cleaning, as per the manufacturer’s instructions. While the washable filter soaks to loosen dirt, I turn to other chores. If your Jeep 4WD still has its OEM air filter box and dry paper filter, check and change the filter as needed. Use Mopar OEM air filter cartridges when servicing and replacing a stock Jeep air filter.
Footnote: Stock Versus Aftermarket Air Filters for the Off-Road Jeep 4WD
The 1987 YJ Wrangler equipped with the 2.5L four offered the first use of a remote, box-type air filter. This is a practical design, well-suited to the needs of a Jeep 4×4. The remote box, in itself, offers a cooler air supply to the engine. Perched forward, high and with a long, flat filter, the air box provides all of the air and protection a stock Jeep engine needs. Easy to service, readily accessible, Jeep 4WD air intake systems benefit from the use of genuine Mopar air filters and the stock air box.
1987-90 YJ Wrangler 4.2L models use a newer version of the earlier CJ-7 air filtration system. This, too, is an ample method of protecting the 4.2L inline six. However, the filter is right above the engine heat on these carbureted models. For owners of the earliest YJ models, here are the two air filter assemblies used:
1) 2.5L TBI four-cylinder engines: The air box reflects a design that carries through the YJ and TJ era. This is a durable, well-sealed assembly, easily accessible and featuring a modern, flat air filter cartridge. Mopar replacement filters are available.
2) YJ Wrangler 4.2L inline sixes with a carburetor*: This is a carryover engine from the CJ era, and the filter assembly still mounts above the engine. Despite heat and other drawbacks, for a carbureted engine, this assembly works well. It seals adequately, and the intake air comes from the same location as the four-cylinder engine: the radiator core support area. Mopar replacement filters work well.
*The later CJ-7 4.2L engine is much the same as the 4.2L six found in ’87-’90 YJ Wrangler models. Despite differences in their bodies and underhood layout of components like the battery, the engine in these CJ-7s has the same features, including air cleaner assembly, as the early YJ Wrangler 4.2L applications. Use care when removing the upper canister section to access the 4.2L air filter. Inspect the sealing gasket at the carburetor air horn to be sure you have a good seal here! All incoming air must be free of dust.
Note: TJ models mount the air filter higher than the YJ Wrangler, in the upper right side of the underhood. They use an upward facing intake snorkel that tucks away from water hazards—an excellent design that works well with OEM Mopar paper filters.
Fairly well shielded from water and relatively high on the body, the air intake for the Wrangler is still vulnerable during deep water fording. In the Jeep® Owner’s Bible, I address the subject of drawing water into the intake stream. If sufficient in quantity, like plunging off a stream bank into hood-high water, there is great risk of hydro-locking the engine and breaking critical internal engine parts!
Fortunately, the intake is behind the outer grille face and to the left of the grille bar opening. The 2.5L four’s air box itself will take on a small amount of water without sucking it directly through the air filter cartridge and into the engine’s cylinders. If you absolutely must cross deeper water, maintain a bow wave; keep moving steadily forward! (See the Jeep® Owner’s Bible and articles at this website for details.)
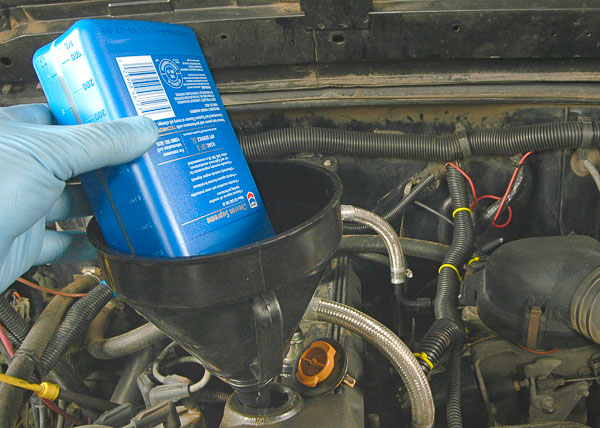
Illus. 64: This is a good point to begin filling the crankcase. Line up oil bottles and remove their caps. Using a stable and clean funnel, begin pouring oil into the engine, one quart at a time. You can go on to other chores while the oil drains from each bottle. There’s plenty else to do while the oil pours!
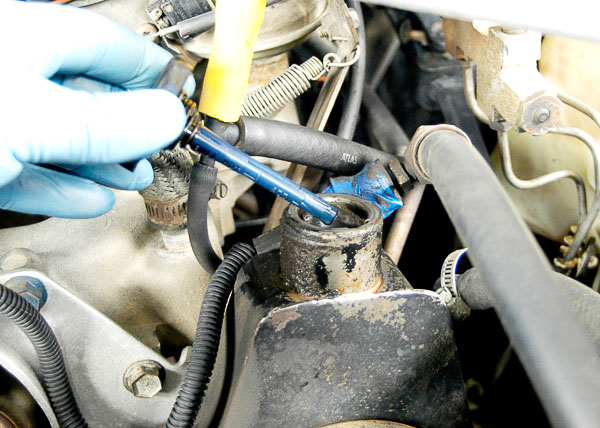
Illus. 65: Time to confirm the fluid loss at the steering gear! Make sure the area around the filler cap is free of debris before removing the power steering cap dipstick. This engine has been cleaned at the car wash, and the remaining (encrusted) grime will not lift with the cap.(Avoid getting dirt in the power steering pump housing!) Lift the cap and wipe the stick clean with a lint-free rag. Dip the cap straight back to its seated position. Lift again and read the fluid level. Here, fluid is barely visible on the dipstick! Periodic checks of fluids will catch these kinds of problems and prevent damage.

Illus. 66: Until the power steering gear is fixed, quality Mopar fluid will keep the system working. Mopar Power Steering fluid is specially formulated for your Jeep. This is not “ATF” or a generic fluid. Once rebuilt or repaired, this entire steering system needs a thorough flush with fresh Mopar power steering fluid.
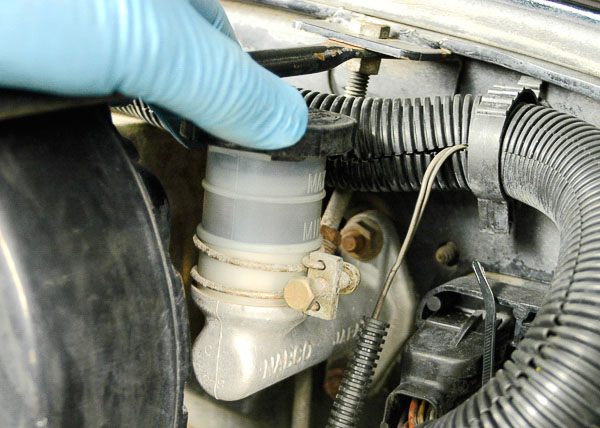
Illus. 67: The clutch master cylinder has a transparent housing. You can quickly spot check the fluid level and make certain fluid stands between the ‘Maximum’ and ‘Minimum’ lines. If you need to add fluid, make certain the cap and your hands are clean before opening the cap. Like the brake system, the clutch hydraulics use brake fluid. The specified fluid type is noted on the top of the cap or in your Jeep® owner’s handbook. This ’87 YJ Wrangler uses DOT 3 fluid. DOT 4 also works here.
Warning: DOT 5 (silicone) brake fluid is incompatible with DOT 3 and DOT 4 brake fluids! Do not mix DOT 5 with these other fluids.
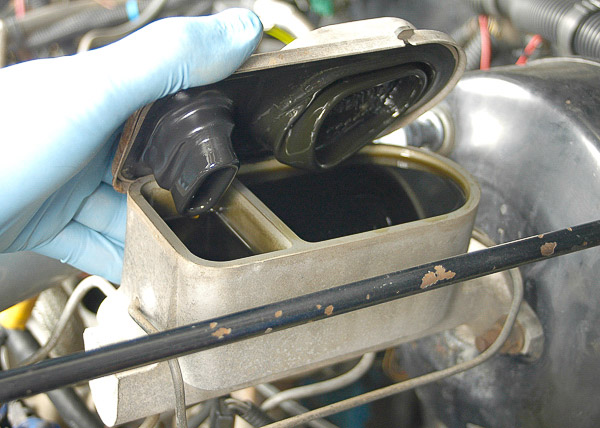
Illus. 68a: The need for cleanliness around the brake hydraulic system cannot be overstated. This YJ had its underhood parts cleaned thoroughly at the car wash before service. If necessary, vacuum around the cylinder to be sure that when you lift the cap, there is no risk of dirt or water entering the cylinder. (Note that the mechanic’s glove is clean, too, and free of any oil, debris or abrasive material.) Although full, this master cylinder’s fluid is very dark and in need of a brake fluid flush.
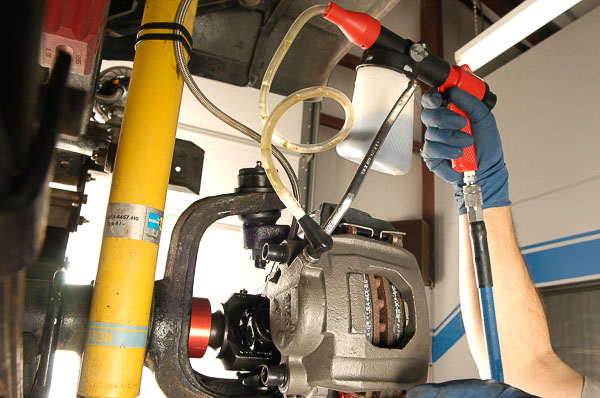
Illus. 68b: Periodic flushing of the brake or clutch hydraulic systems is essential. If your Jeep 4WD has brake fluid that is murky like in Illus. 70a, consider the vacuum method flush-and-bleed. I first draw dirty fluid out of each master cylinder reservoir then fill the master cylinder with clean, Mopar-recommended brake fluid. With vacuum applied at each bleeder valve, fresh brake fluid gets drawn from the master cylinder through each wheel cylinder and caliper. I keep adding clean brake fluid to the master cylinder, vacuum drawing until exiting fluid is spotlessly clean and air-free at all wheels.
Note: Unlike traditional pressure bleeders, vacuum bleeding does not leave debris and dirty fluid trapped within the hydraulic cylinders. The vacuum flush/bleeding method uses recommended brake fluid to remove contaminants, debris and all old fluid! After vacuum flushing and bleeding to the point that fluid runs clean, top off the system with the recommended Mopar brake fluid.
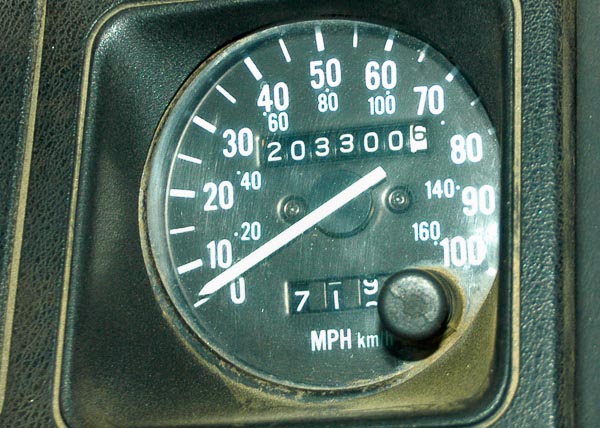
Illus. 69: The YJ Wrangler introduced the use of a seven-digit speedometer. Much to its credit, this trail-running ’87 (first year) model has clocked 203,300 miles! Judging by the findings in the LOF service and inspection, the mileage appears accurate and a testimonial to YJ durability. Even the brake and clutch master cylinders look original. A brake fluid change was long overlooked; unfortunately, this is not unusual. Keep your Jeep 4×4 in top condition for the backcountry. Do not neglect fluid changes.
Warning: Brake fluid is hygroscopic and draws moisture over time. Contaminated with moisture, the fluid’s boiling point drops. Storing an opened bottle or can of brake fluid is risky, as any moisture drawn into the container will reduce the effectiveness of the fluid. Water-contaminated fluid can cause brake fade, poor performance and pitting of brake cylinders. Years ago, when master cylinders vented to atmosphere, manufacturers recommended an annual brake fluid change—with renewal of all rubber seals, cups and dust boots!
Newer, sealed master cylinder systems have helped lower brake system risks. However, fluid still breaks down over time, drawing moisture at approximately 3% per year. The vacuum method for brake fluid flushing and bleeding is one means for protecting a Jeep 4WD’s brake system and reducing wear on expensive parts. With an air powered vacuum bleeder, service can be performed periodically for just the cost of quality Mopar brake fluid. This could help keep your Jeep 4WD brakes safe and functional between brake system overhauls!
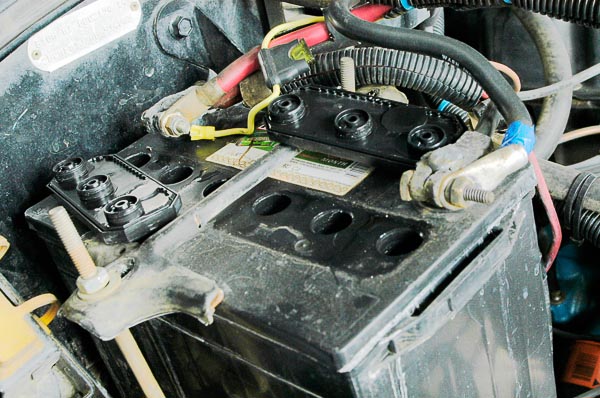
Illus. 70: Periodic battery water checks are crucial. You depend upon your Jeep’s battery for starting and powering up the electrics! Modern Jeep 4WDs with an automatic transmission cannot be “bump started”. If the battery charge gets low, the only cure would be a jump charge and start from another vehicle. Be aware that Jeep TBI or MPI engines require a minimum of 12.4-volts to start and run. If you suspect the battery’s condition, check each cell’s specific gravity with a hydrometer.
Note: One of the best ways I extend battery life and assure winter starts is by using a ‘Battery Tender’ device. Attach this charger when you park. According to the manufacturer, you can extend battery life by as much as 3-5 years! Our XJ Cherokee’s 4.0L and Cummins-powered Dodge Ram 3500 (with two batteries) are always ready to start—regardless of how long they park. I hardwired each of these vehicles for a Battery Tender. Hook-up is quick and simple, even in a blizzard!
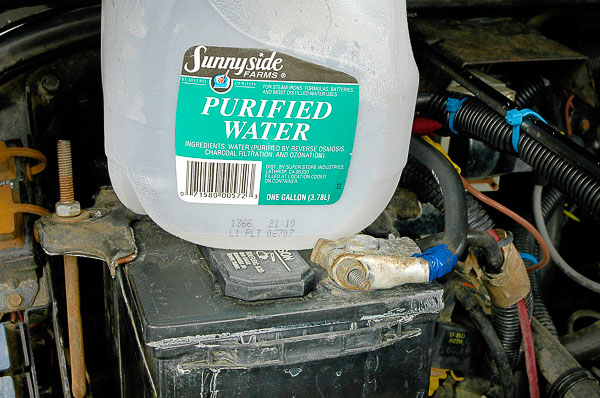
Illus. 71: Use only distilled water to replenish the battery. This is readily available at grocery stores. Make sure the water does not contain minerals. Tap water may contaminate the acid solution and damage the battery. The reliable approach is to keep a gallon of inexpensive distilled water handy, specifically for battery use.
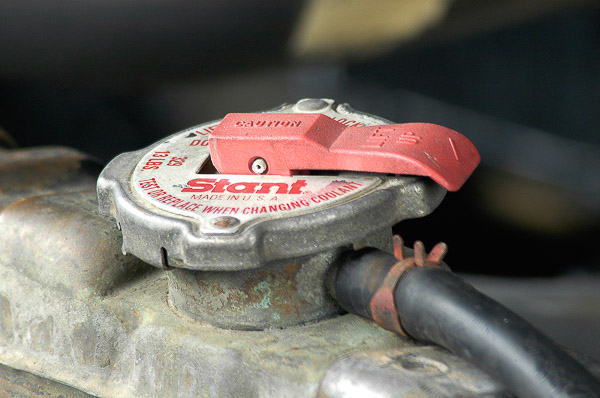
Illus. 72: The radiator cap plays a crucial role in engine cooling. A cap of the proper pressure will raise the boiling point of coolant. Anti-freeze coolant raises the boiling point further, and this safely protects a Jeep engine from overheating or boil-over. Here, a Stant aftermarket radiator cap protects this engine and offers a release lever to allow safer let-off of pressure before cap removal. Mopar OEM replacement caps are available for most Jeep radiator applications.

Illus. 73: Engine cooling is very important for safe backcountry travel. Pressure checking the cooling system is part of my routine Jeep 4WD service. Here, the entire cooling system is pressurized with the engine shut off. Careful monitoring of the tester will indicate whether the system seals properly. You can find leaks this way and even determine if the engine has casting cracks, a blown head gasket or a weak water pump seal.
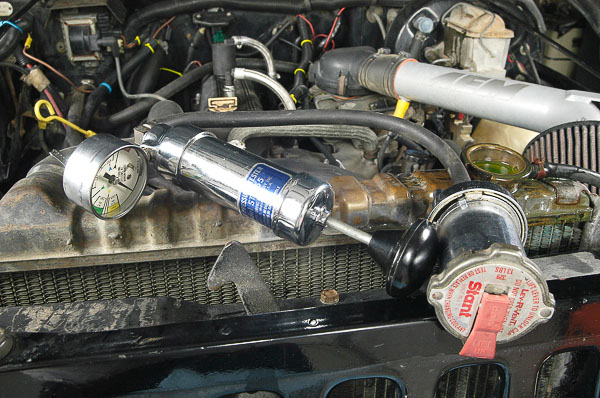
Illus. 74: The radiator cap must also be tested. This assures proper sealing and release pressure at the cap, to the PSI recommended for your Jeep 4WD’s cooling system. With the engine cold and not running, testing the cooling system and cap is safe and simple. I have used Stant’s cooling system pressure testers for 45 years and still come back to this quick and accurate diagnostic tool!

Illus. 75: Look for leaks at hoses, connections, coolant gaskets and under the dash at the heater core. These hoses and the thermostat housing each require monitoring. It is practical to find these troubles at your home or shop—not on the Jeep four-wheel drive trail!
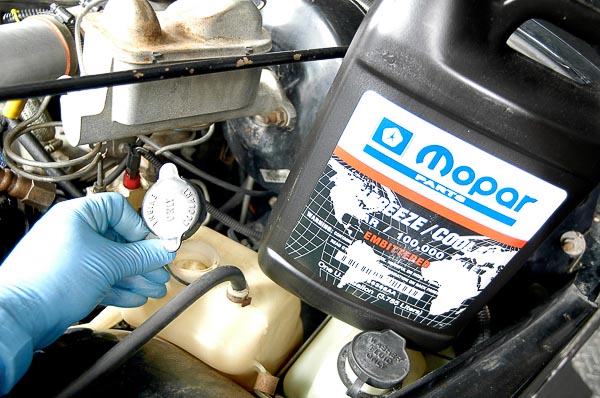
Illus. 76: Anti-freeze is not all the same! Mopar offers traditional ethylene glycol (green) anti-freeze for vehicles that use that kind of coolant. For late model vehicles, there is a new generation of extended interval coolant (orange) that should not be mixed with the green anti-freeze unless the cooling system has been thoroughly flushed, purged of all green anti-freeze then replenished with extended interval coolant.
Caution: Anti-freeze shown here is long-life Mopar type. The YJ Wrangler had major engine work and a thorough coolant flush. This Jeep is now a candidate for replenishing with contemporary, long-life anti-freeze. Do not mix green and orange anti-freeze types! Check the coolant color and the owner’s handbook before adding coolant. To be safe, buy the correct Mopar coolant/anti-freeze from your Jeep dealer. Use only the recommended type for your Jeep model.
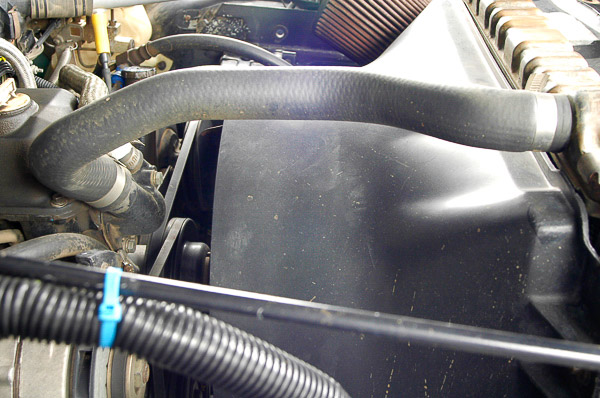
Illus. 77: Belt and hose condition determines back- country reliability. Never take chances with worn or soft hoses. This YJ’s 2.5L four has extra long radiator hoses. Make sure hoses feel firm, not mushy. Look for leaks, deterioration and rub marks. These signs suggest a pending hose failure. Inspect belts and hoses as part of your cooling system’s pressure check.
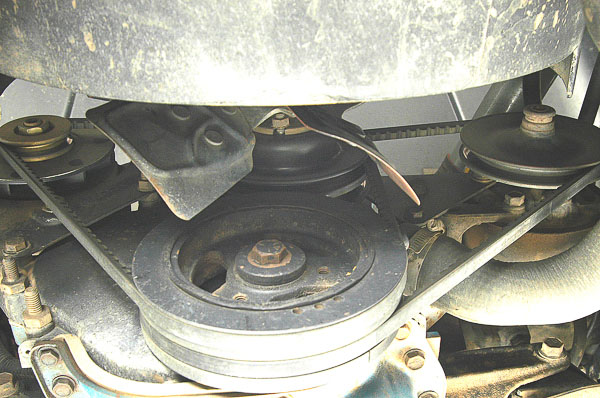
Illus. 78: View from the bottom of a cold, shut off engine reveals lower hose and belt condition. Check hose clamp screws periodically to make sure they are snug. Note bottom side of belts, visible at upper right. Minute cracks have developed. This could lead to failure of a drive belt for the power steering pump or water pump! From the top side, without rolling the belt over, these cracks could not be seen. Routinely inspect the belts, clamps and hoses!
Caution: Always lock and disable the engine’s ignition before handling drive belts or the fan assembly. Always disconnect the battery cables at the battery posts before fiddling with the engine’s belts or pulleys! Inspect the belts, hoses and clamps when you service and clean the battery.
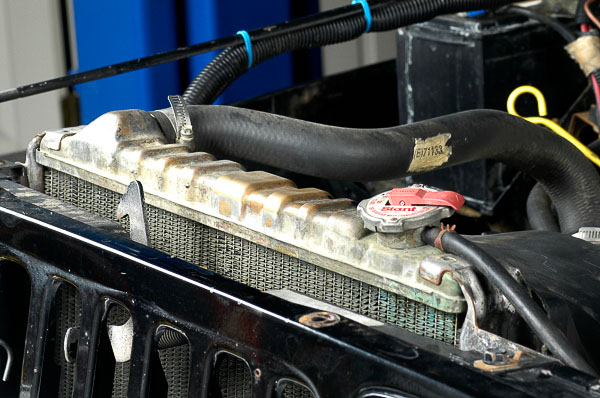
Illus. 79: The radiator’s top tank, frame and core show corrosion, although the radiator pressure tests okay. If this were my Jeep, I would send the radiator out for boil-out, tube “rodding”, inspection and professional soldering of seams and tanks. A fresh coat of radiator paint helps prevent corrosion.
Advice: When the radiator core is questionable, replace or rebuild the radiator. This is “insurance” for a 4WD vehicle that plies remote backcountry, rambling through isolated desert like this YJ does!

Illus. 80: Fan clutch unit is another overlooked item. With the engine cold, shut off, the key removed from a locked ignition switch and the coil high tension spark wire or battery cables disconnected, you can safely handle the fan blade and fan clutch. Wiggle the fan blade fore and aft. Look for play or movement at the water pump shaft and fan clutch unit. Spin the fan gently; note the resistance, which should be slight with the engine cold. If the fan spins without any resistance, the clutch unit is likely defective.
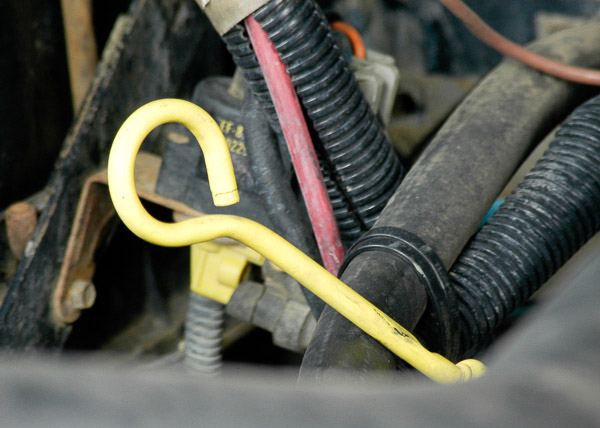
Illus. 81: All checks done and oil in the crankcase, start the engine. Let it run for several minutes. When so equipped, check the automatic transmission’s fluid level. Watch for any oil leaks beneath the vehicle, especially in the area of the oil filter and drain plug. Shut off the engine and let it set for a while before re-checking the dipstick oil level. With routine care and regular tune-ups, you can depend upon your Jeep 4WD wherever you go!
Checking the Automatic Transmission Fluid
Since the early 1960s, Jeep 4WDs have been factory-optioned with automatic transmissions. Transmissions built by Borg-Warner, General Motors, Chrysler and Aisin-Warner have provided Jeep owners with durable, satisfying service. If your Jeep 4WD has an automatic transmission, consider the transmission when you perform routine maintenance and inspections.
Note: In other articles at the 4WD Mechanix Magazine website, you will find details on Jeep automatic transmissions. Learn about band adjustments and filter service requirements for Jeep 4WD vehicles. If you have additional questions, I will gladly discuss Jeep automatic transmission service, adjustments, routine maintenance, and unit rebuilding needs! Send a ‘Q & A’ note from the ‘Workshop’ section for your Jeep 4WD vehicle.
As part of your Jeep’s routine service, you do need to check the automatic transmission fluid level. The dipstick of most automatic transmissions has details on how to check the fluid. Automatic transmission fluid should be bright red. If you do need to “top off”, use the Mopar ATF type recommended in your owner’s handbook or by your Jeep dealership parts department. Fluid types have been formulated for each transmission design.
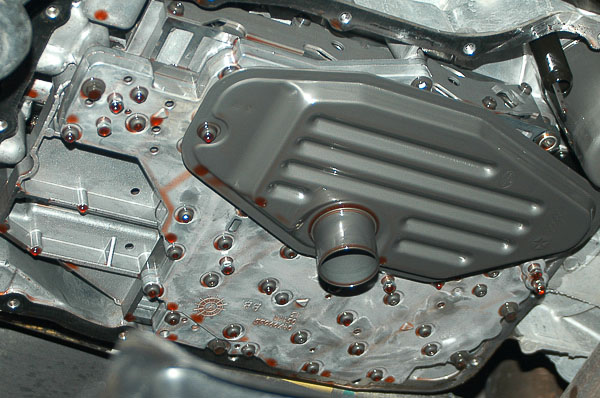
Illus. 82: The automatic transmission requires long-interval fluid and filter changes. I cover band adjustment and filter service in other articles at the 4WD Mechanix Magazine website. For routine service and care, check the fluid level and always watch for leaks or drips. Cleanliness during service is absolutely essential. Prevent debris from entering an automatic transmission during service or fluid checks! Use lint-free rags when servicing the automatic transmission in your Jeep 4WD.
Confirm the recommended procedure for checking your Jeep 4WD’s automatic transmission fluid level. Generally, checks should be done with the engine and transmission fully warmed. Drive the Jeep for a while before checking the fluid. With the engine idling in Neutral or Park as specified (parking brake set firmly, wheels blocked and on level ground!), clean around the dipstick area. Remove the dipstick and wipe it with a clean, lint-free rag. Insert the stick fully and remove it again.
Read the fluid level on the dipstick. Fluid should reach the “Maximum” or “Full” level. If not, top ATF off carefully. Do not overfill the transmission.

Illus. 83: Clean around the dipstick before removing it. Never allow the automatic transmission to run low on fluid or below the “Add” line, or serious damage can result. With the transmission warmed completely under load, fluid should read at the full line. A 4×4 operates on steep angles, and a low fluid level can cause aeration and rapid damage to an automatic transmission.
Caution: For a vehicle operated on steep up and down slopes, the automatic transmission needs to be at the “Full” mark before heading off-pavement! Aeration and fluid starvation can quickly damage the clutch packs and other vital parts. Running low on fluid places the transmission at risk.

