
The Jeep XJ Cherokee is a cost-effective way to ply the back country. These SUVs, built from 1984-2001, offer the utility, space and conveniences often missing in the more spartan CJs, YJ or TJ Wrangler models. Due to its unitized body and high transfer case location, the 101.4″ wheelbase Jeep XJ Cherokee—or its counterpart Comanche MJ—provides surprisingly good ground clearance when mildly “lifted.”
Arguably, for off-road four-wheeling a unitized body/frame has its limits. Its structural stamina dictates just how much pounding the vehicle can take. Off-road racing, trail running and JeepSpeed™ XJ Cherokee models are often reinforcement plated from bumper-to-bumper. They weigh hundreds of pounds more than stock!
In the years since the XJ Cherokee earned its share of aftermarket lift kits and axle modifications, these 4x4s have proven their mettle. Longevity is high, and the Jeep XJ Cherokee provides impressive utility. They built so many of these basic wagons (2.8-million!) that they’re also abudantly available and cheap. The good news: most XJs survived the “clunker” round-up, and they remain in large numbers.
When lifting a Jeep XJ Cherokee, its similarity to the YJ and TJ Wrangler become apparent. The front link-and-coil (Quadra-Link) suspension is similar to the TJ Wrangler, while the rear leaf springs are more like the earlier CJ Jeep and YJ Wrangler. Installing a suspension lift kit is actually made easier by this configuration, as you will discover within this project.
If you intend any serious kind of off-road use for your XJ Cherokee, there are many lift kit approaches available. The comments that I provide here are intended as a lift kit orientation and overview. Always follow the steps outlined in your lift kit. Supplement this information with the Jeep XJ Cherokee factory workshop manual or similar guide.
—Moses Ludel
You will also want to see the article on an Advance Adapters SYE kit and CV rear driveshaft installation! This six-inch “long arm” chassis lift is a thorough and well-conceived approach to raising a Jeep XJ Cherokee. I installed the Full-Traction Suspension kit several years ago. The system has proven itself time and again in the backcountry. This XJ Cherokee, now fully outfitted with off-road accessories, doubles as a highway SUV.
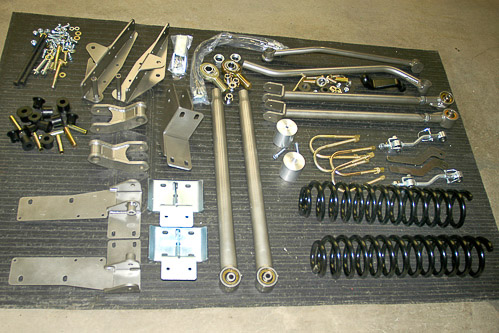
The Long-Arm Lift Kit pictured above illustrates the front suspension components found in a Full-Traction Suspension lift kit for the Jeep XJ Cherokee. This well-designed, precise set of pieces will lift and upgrade an XJ Cherokee. If you want to ply backcountry with 33″ diameter tires, without the need to cut out fender wells, an FTS lift kit is as close to “bolt-on” as you will find. The rear suspension consists of hefty leaf springs and shock absorbers. FTS includes these rear pieces plus shocks for the front as well.

1: Two significant tools are shown here: a vehicle hoist and sturdy axle stands. Using a fixed lifting point and supporting the front axle during disassembly and assembly work, axle alignment can be maintained. This saves time later, when adjusting and aligning the four-link front suspension. If necessary, you can simulate this approach with four frame stands and a pair of hydraulic floor jacks.

2: Axle suspended and supported stably, the front sway bar is disconnected and stock shock absorbers removed. Keep parts together to maintain their layout. Extend the distance between the axle and frame/body to relieve the front coil spring tension. Remove the track bar as shown here. I like to remove the steering linkage for better access.

3: Once spring tension is relieved, you can uncouple and remove the springs. When performing this work, refer to steps in your Jeep XJ Cherokee workshop manual. Springs exert considerable force and can cause physical injury if not handled properly.
Warning: Make certain there is no tension on the springs before removing them. Keep the axle in alignment with the body/frame points to ease assembly and subsequent wheel alignment.
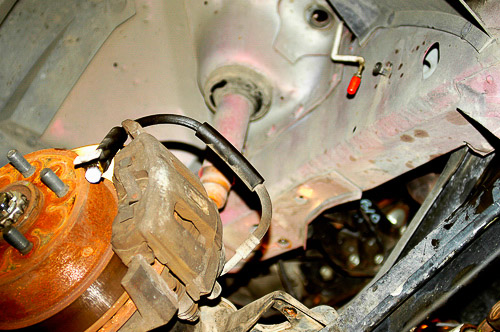
4: Important items in the chassis lift are the front and rear brake hoses. As the chassis spreads away from the axle, the hoses become too short. Quality lift kits like this one contain new, longer brake hoses and mounting brackets. I cap the lines to prevent contamination. After installation of the kit, you will need to bleed the brakes of air and fill the master cylinder to its “full” mark. At higher mileage, this is a good time to flush fresh brake fluid through the system.
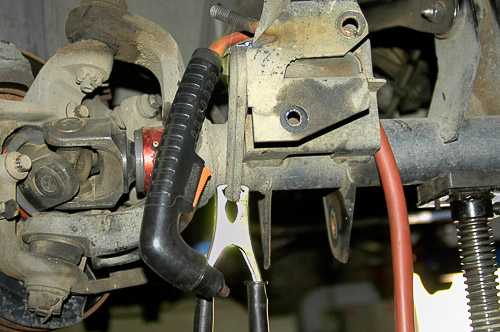
5: The stock sway bar brackets at the axle require modification. With the lifted chassis, the original brackets would be too short. Full-Traction Suspension provides new, weld-on brackets that extend the sway bar link attaching points. The stock bracket requires cutting and becomes part of the modified link mount system. I use my plasma cutter for the cutting chore.
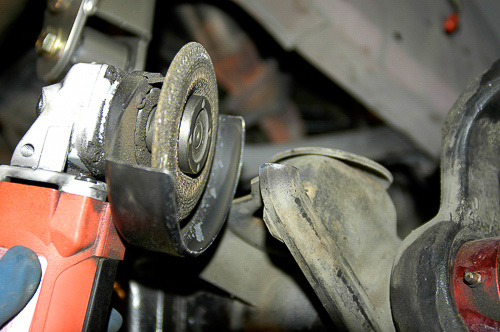
6: Having cut the brackets with a plasma cutter, I dress and bevel the cut edges. This is a high stress point and requires skilled welding. For those unfamiliar with welding, the chore might best be sublet to a profession.
Note: In the welding section of this website magazine, I provide tips on welding and how to improve your welding skills. For more details and how-to, follow Moses Ludel at the “Road Ready!” with Moses Ludel YouTube channel…If you have welding or metallurgy questions, join us at the forums for answers: https://forums.4WDmechanix.com.
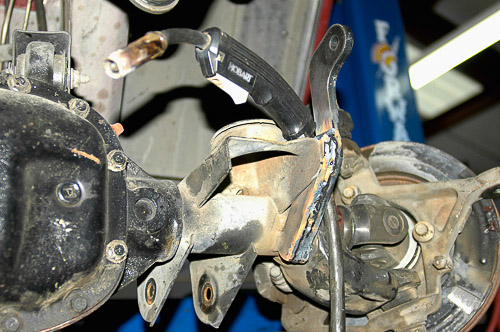
7: My MIG 170-amp unit and 0.035″ ER70S-series wire with 25% CO2 and 75% Argon gas work well with this material.
Allow metals to cool naturally (at ambient or room temperature), and keep heat concentrated.
Moses Ludel’s welding tips: Before welding, wire brush away scale from the original brackets and the axle member. Use a welding amperage and wire speed (MIG or GMAW) that will burn into the thicker plate material. Concentrate your gun or stick electrode slightly more at the heavier plate side. The factory bracket is thinner, so weld to deposit some crown at that side. Welding will be in all positions for this project—go for strength. If you have an SMAW (stick) welder, try 1/8″ 6011 or dry 7018 electrodes.
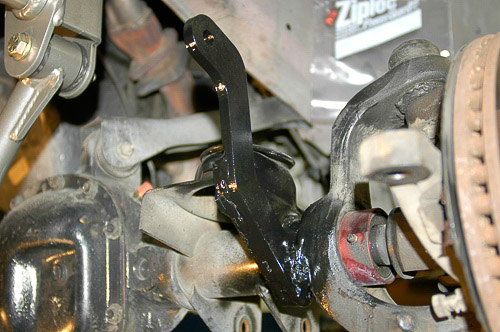
8: When metal cools completely, paint the new bracket appropriately. Minimize the risk of rusting, especially if you live in an area with salted winter roads! I have mated the original bracket with the new part, carrying a bead into the axle’s knuckle support. This produces a stronger piece than simply welding the new bracket to the old one.
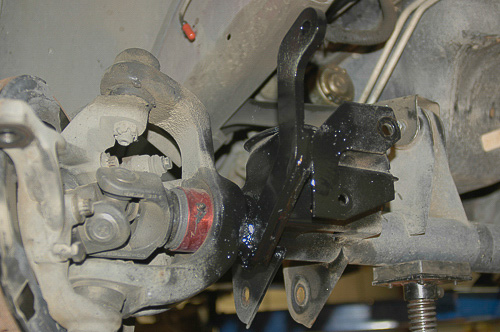
9: Note that the lower link arms, shock absorbers, sway bar, track bar and steering linkage were each removed prior to welding. This is to prevent heat damage or the risk of the bushings catching on fire. The upper link arms, away from the weld area, help keep the axle in position until the new parts go into place.
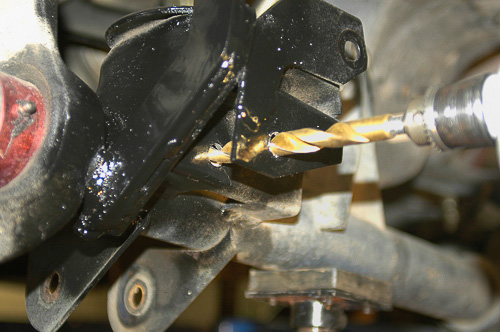
10: This kit requires re-drilling these holes to accept larger hardware. The new track bar will mount to this point. Overall, the FTS lift kit is well conceived and designed for minimal modifications and relative ease of installation. Understand, going in, that lift kit work gets involved!
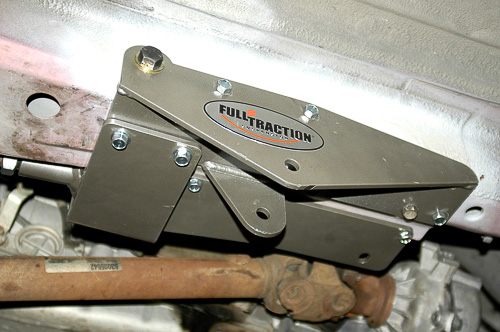
11: Full-Traction Suspension draws upon the engineering structure of the XJ Cherokee unitized body. Following the Jeep strength points, FTS attaches hardware with bolt-on, high-grade fasteners. (There is minimal welding in this entire installation.) Here, the link arm bracket is fitted at the reinforced side section or “frame.”
Note: Long-arm suspension has many advantages. The primary one is the moderate “arc of radius” (impacting caster angle) changes when the front axle rises and sets. Ride quality, steering stability and wheel travel are each dramatically improved with a “long arm” suspension approach. Though more costly, the long-arm suspension is better for the Jeep XJ Cherokee.
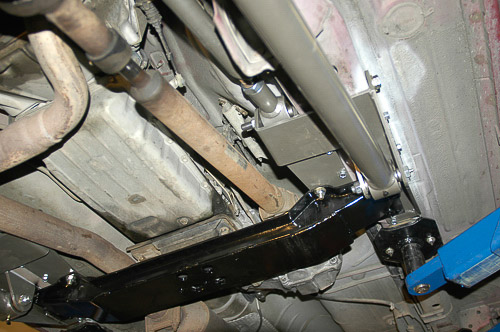
12: The long arms attach near the transmission cross-member, well back in the chassis. I would not consider a short arm lift kit unless total lift is in the two-inch range. Beyond that, consider the many advantages of the long arm suspension design.
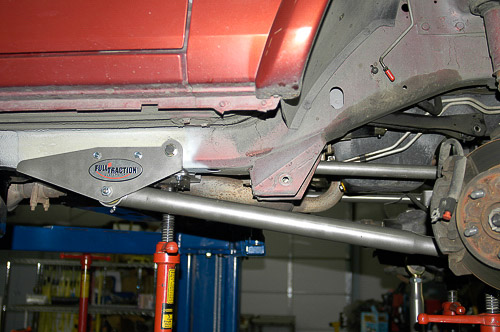
13: Side profile demonstrates the long arm’s value. Note the original link arm mount, further ahead in the chassis. Long travel suspension with short arms will cause dramatic caster angle changes as the axle rises and sets. The cliche “death wobble” is one side effect of short arm lifts or too little caster angle at the front axle. My approach of choice is a well-conceived long arm suspension.
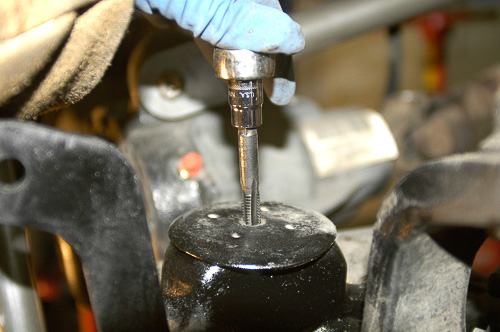
14: For the bump stops to be effective, with the longer springs and a wider gap between the axle housing and frame/body points, a bump stop spacer must be installed. Here, I drill and tap into the original stop pad. Spacers are part of the lift kit and come with mounting hardware. I assisted the “self-tapping” bolts, using an appropriate tap.
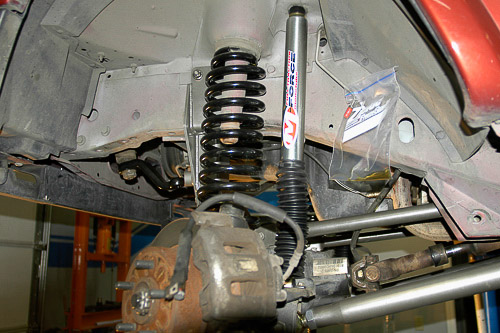
15: Shock absorbers must be longer and rated for the new suspension. With long travel, stiff off-road springs and more unsprung weight mass, these shocks have a job to perform. The shocks, an ‘M-Force’ design from FTS, have held up well in a variety of driving environments. Note the installation of a new, FTS dropped pitman arm at the steering gear.
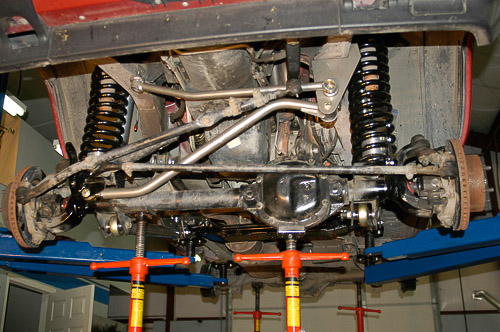
16: Here, the track bar, track bar bracket, cross frame brace, steering linkage, springs, shock absorbers and bump stops are all in place. (Follow the assembly sequence in the lift kit instructions and your factory-level workshop manual.) The axle has remained stably on the stands, and the link-arm and track bar adjustments will be close to specification.
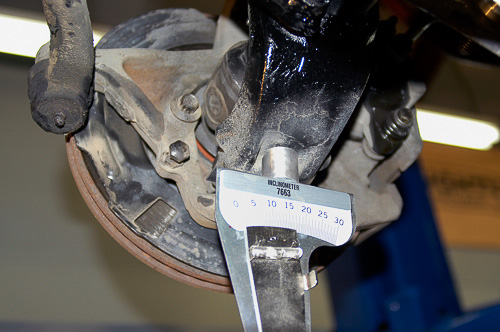
17: Front axle caster angle is critical. I like 7-plus degrees of positive caster for a Jeep XJ Cherokee front axle. Here, an inclinometer reads the approximate caster, using the factory knuckle support flat as a reference point.
Additional Note: Once the lift installation is complete and the vehicle sets weighted on the ground, use equipment like the FasTrax 91025 alignment system to confirm caster, camber and toe-in. See my in-depth articles and how-to videos on SPC’s FasTrax alignment equipment and the techniques that work well at home or a 4×4 shop. Use the search box for “FasTrax”.
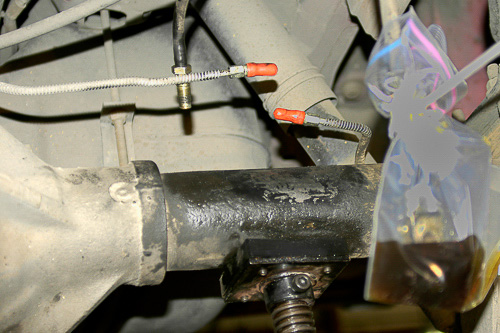
18: At the rear axle, the brake hose junction is loosened and pipes capped to prevent contamination. A longer rear brake hose is essential. When installing new hoses, route them in a manner that will prevent interference with other parts. Make sure you allow for the full range of suspension movement, the axle’s rise and drop. Hyperextending or damaging a brake hose can be dangerous! Bleed and replenish brake fluid when done.
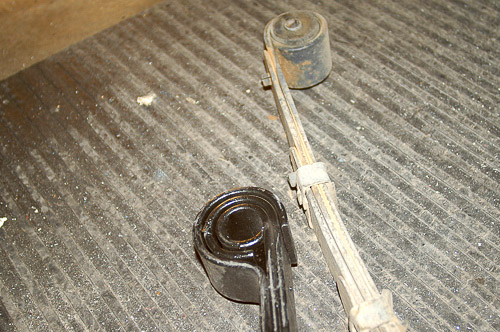
19: The Full-Traction Suspension rear leaf springs are a heavy-duty design. They have enough arch to lift the vehicle six-inches at the rear. Note the secure, reverse “military” wrap of this spring design. This will protect the spring from separating in the event of main leaf breakage. These springs have held up very well with added weight, off-road use and plenty of highway miles. After 30,000 miles of testing, there is no sag or sign of wear!
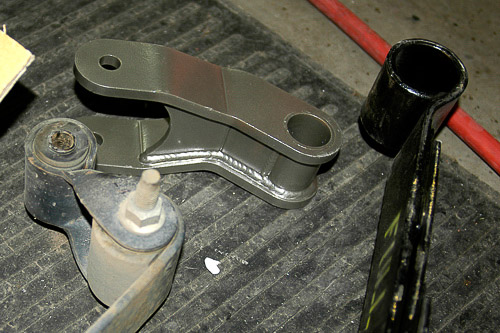
20: Rear spring hanger shackles are exceptionally stout. FTS has exceeded the factory design by a wide margin. The springs and shackles use urethane bushings, and these, too, have held up well. A lift kit designed for off-road use must meet or exceed the original equipment. Check hardware and bushings periodically for wear.

21: Installed springs fit neatly into the stock Jeep XJ Cherokee mounting points. The exhaust system may require some attention or slight tweaking. Make sure all parts can move freely, without interfering with each other. Torque hardware to specification. Check hardware after the vehicle has been in service for a while.
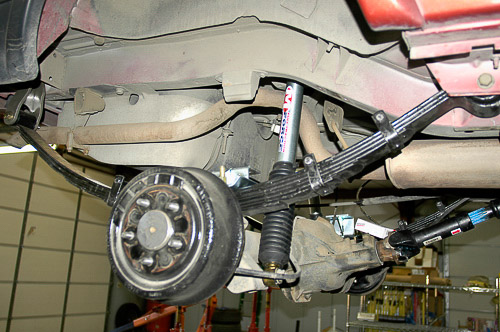
22: Here, the rear suspension and a new driveline are in place. A raised chassis calls for a longer driveline. The new rear driveline should be a CV style. The Jeep XJ Cherokee requires a slip yoke eliminator at the transfer case. With the chassis at curb (normally weighted, on the ground) height, I like a 1.5 to 2.0 degree pinion angle at the rear axle for a CV-type driveline.
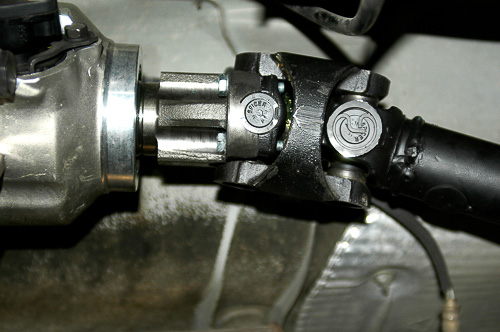
23: This is a “CV” or constant velocity style, Double-Cardan joint. The NV231 transfer case on this Jeep XJ Cherokee now has an Advance Adapters slip yoke eliminator (SYE) fixed yoke kit that accepts the CV joint. The front end of the rear driveshaft is a CV joint and the rear U-joint at the axle is a single Cardan (cross-type) U-joint. Sizing is traditional Spicer 1310, ample for this XJ Cherokee application.
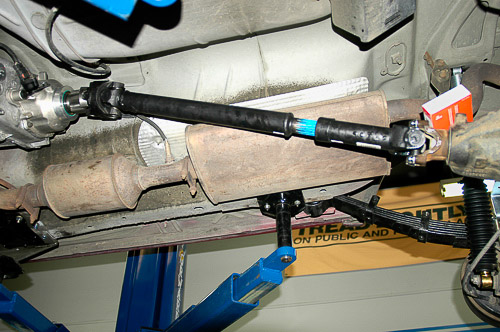
24: Here is the rear driveline. Note the double Cardan CV at the front and single U-joint at the rear. I support all of the vehicle weight on the axles before measuring rear axle pinion angle. The FTS springs are designed for a CV rear driveline. Curb height angle of the pinion is approximately two-degrees. Check the angle with both axles on the ground and the vehicle normally weighted.

25: View from rear forward shows entire front suspension in place and relationship of parts. This is now a versatile Jeep for off-pavement and highway use. The vehicle soon received a low-restriction Borla-based exhaust system, heavy duty bumpers, a Warn 9000# winch and other off-road accessories. At its first off-road test, the ’99 XJ Cherokee performed before 4-Wheeler TV cameras at Moab, Utah. It has done many other trails since.
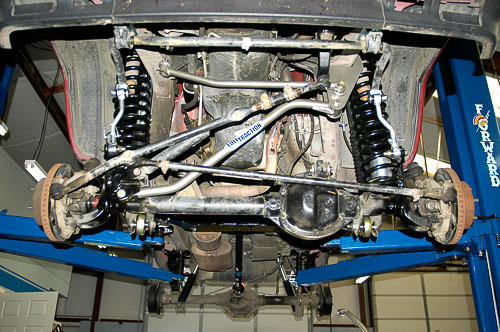
26: The Jeep XJ Cherokee front suspension is a marvel! Its centerpiece is a strong beam axle assembly. While a 6-inch lift sounds considerable, this is the actual amount needed to run 33″ diameter tires on an XJ Cherokee—unless you want to hack out the wheel wells, which I do not advise on a unibody vehicle. The lift has worked optimally, without tire-to-body interference at extreme axle articulation!
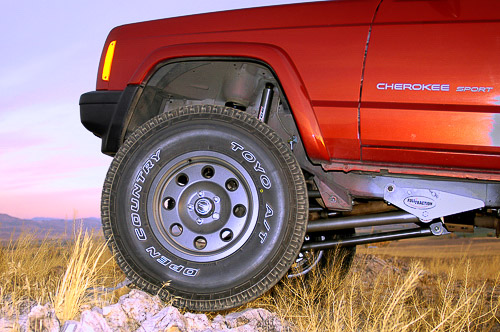
27: Custom look with American Racing alloy wheels and Toyo tires! This is far more than cosmetic, though. The tires are rugged, and the wheels hold close tolerance. This package provides impressive, useful ground clearance. In a world of 35″-37″ tires, the Cherokee holds its own. Know the limits of a unitized body and how to keep an XJ Cherokee alive. 33″ tires are plenty. Pick trails accordingly.

